
九保すこひです(フリーランスのITコンサルタント、エンジニア)
さてさて、ここのところリリースされたばかりのLaravel Jetstreamを触って新しい体験をしています。
ほぼなんでも備わっているこのJetstreamはきっと今後開発者の強力な味方になってくれるだろうと期待をしていますが、一点気になることがあります。
それが・・・・・・
日本語化してない
というものです。(これまでのLaravelでも同じですが・・・)
日本はマーケットが大きい分、やはり英語への対応がまだ進んでいないのが現状ですので、Jetstreamをインストールしたままの状態でクライアントさん方に使ってくださいというのはちょっと難しいと思います。
そこで❗
今回は、Jetstreamの以下3つのフォームを日本語化する方法をご紹介したいと思います。
- ログイン(通常&2段階認証)
- ユーザー登録
- パスワード再発行(申請&変更)
ぜひ皆さんのお役に立てましたら嬉しいです😊✨
(最後にソースコード一式をダウンロードできますよ👍)
 「また英語リスニングも鍛えないと・・・
(元々苦手です😫)」
開発環境: Laravel 8.x
目次
前提として
Laravel Jetstramがインストール済みであることが前提です。
もしまだの方は、以下のURLを参考にしてみてください。
📝 Laravel8.x以降でログイン機能をインストールする方法
※ なお、今回はlivewireでインストールした場合の方法になります。
Jetstreamパッケージからビューをコピーする
まずは、Jetstreamが提供するHTMLを直接変更できるように、パッケージ内にあるビューをLaravel側へコピーしましょう。
以下のコマンドを実行してください。
php artisan vendor:publish --tag=jetstream-views
すると、/resources/views/vendor/jetstreamにビューがコピーされます。
では、エラーが発生したときのタイトル「Whoops! Something went wrong.」を日本語化しましょう。
resources/views/vendor/jetstream/components/validation-errors.blade.php
@if ($errors->any())
    <div {{ $attributes }}>
        <!-- 👇ここを変更しました -->
        <div class="font-medium text-red-600">エラーが発生しました!</div>

        <ul class="mt-3 list-disc list-inside text-sm text-red-600">
            @foreach ($errors->all() as $error)
                <li>{{ $error }}</li>
            @endforeach
        </ul>
    </div>
@endif
変更するが完了すると、元は英語だったこのメッセージが、
![]()
このように変更になります。
![]()
言語パッケージをダウンロードする
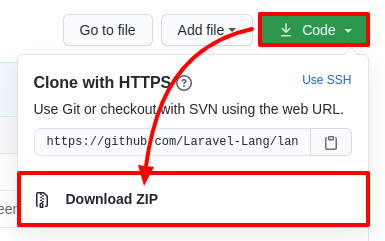
バリデーションなどの翻訳データが公開されていますので、以下のURLからzipファイルをダウンロードしてください。
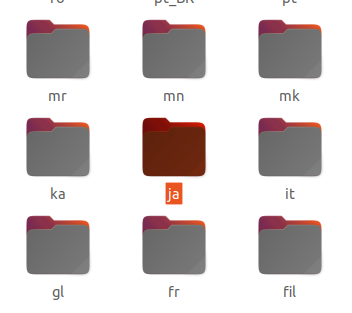
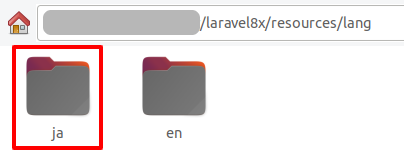
ダウンロードしたら適当な場所に展開すると「lang-master/src」というフォルダに世界各国の翻訳データが入っていますので、ここから「ja」というフォルダをLaravelの「resources/lang」フォルダの中にコピーします。
👇 コピーします
ただ、これだけでは不十分で、このままだと以下のように中途半端な翻訳になってしまいます。

そこで、これらのエラーメッセージを完全にするために次のように変更してください。
resources/lang/ja/validation.php
<?php

return [

    // 省略

    'attributes' => [
        'name' => '名前', // 👈 追加
        'email' => 'メールアドレス', // 👈 追加
        'password' => 'パスワード' // 👈 追加
    ],

];
すると、エラーメッセージがこのように変更になります。

ビューを日本語化する
では、ここからは各フォームを日本語化していきます。
※ なお、今回は翻訳切り替えは行わない方法で実装します。
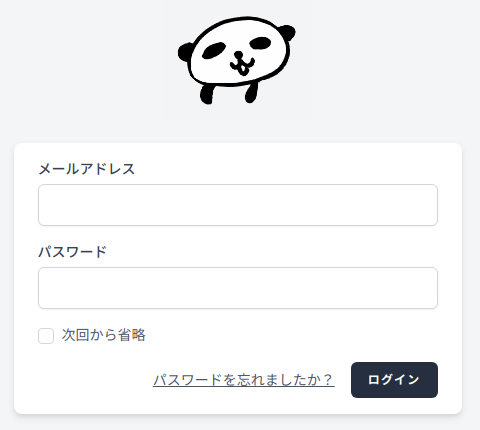
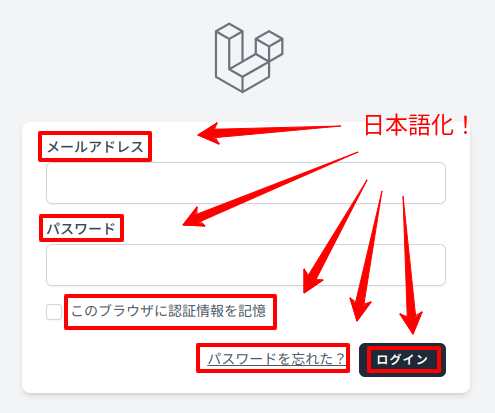
ログインフォーム(通常)
resources/views/auth/login.blade.php
<x-guest-layout>
    <x-jet-authentication-card>
        <x-slot name="logo">
            <x-jet-authentication-card-logo />
        </x-slot>

        <x-jet-validation-errors class="mb-4" />

        @if (session('status'))
            <div class="mb-4 font-medium text-sm text-green-600">
                {{ session('status') }}
            </div>
        @endif

        <form method="POST" action="{{ route('login') }}">
            @csrf

            <div>
                <x-jet-label value="メールアドレス" />
                <x-jet-input class="block mt-1 w-full" type="email" name="email" :value="old('email')" required autofocus />
            </div>

            <div class="mt-4">
                <x-jet-label value="パスワード" />
                <x-jet-input class="block mt-1 w-full" type="password" name="password" required autocomplete="current-password" />
            </div>

            <div class="block mt-4">
                <label class="flex items-center">
                    <input type="checkbox" class="form-checkbox" name="remember">
                    <span class="ml-2 text-sm text-gray-600">次回から省略</span>
                </label>
            </div>

            <div class="flex items-center justify-end mt-4">
                @if (Route::has('password.request'))
                    <a class="underline text-sm text-gray-600 hover:text-gray-900" href="{{ route('password.request') }}">
                        パスワードを忘れましたか?
                    </a>
                @endif

                <x-jet-button class="ml-4">
                    ログイン
                </x-jet-button>
            </div>

        </form>
    </x-jet-authentication-card>
</x-guest-layout>
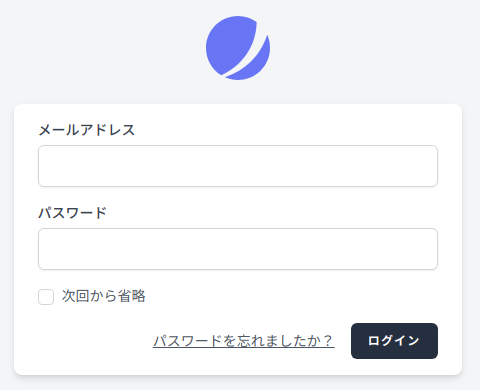
変更すると、以下のようになります。
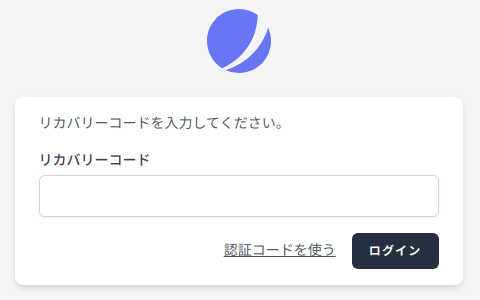
ログインフォーム(2段階認証)
resources/views/auth/two-factor-challenge.blade.php
<x-guest-layout>
    <x-jet-authentication-card>
        <x-slot name="logo">
            <x-jet-authentication-card-logo />
        </x-slot>

        <div x-data="{ recovery: false }">
            <div class="mb-4 text-sm text-gray-600" x-show="! recovery">
                認証アプリが発行するコードを入力してください。
            </div>

            <div class="mb-4 text-sm text-gray-600" x-show="recovery">
                リカバリーコードを入力してください。
            </div>

            <x-jet-validation-errors class="mb-4" />

            <form method="POST" action="/two-factor-challenge">
                @csrf

                <div class="mt-4" x-show="! recovery">
                    <x-jet-label value="Code" />
                    <x-jet-input class="block mt-1 w-full" type="text" name="code" autofocus x-ref="code" autocomplete="one-time-code" />
                </div>

                <div class="mt-4" x-show="recovery">
                    <x-jet-label value="リカバリーコード" />
                    <x-jet-input class="block mt-1 w-full" type="text" name="recovery_code" x-ref="recovery_code" autocomplete="one-time-code" />
                </div>

                <div class="flex items-center justify-end mt-4">
                    <button type="button" class="text-sm text-gray-600 hover:text-gray-900 underline cursor-pointer"
                                    x-show="! recovery"
                                    x-on:click="
                                        recovery = true;
                                        $nextTick(() => { $refs.recovery_code.focus() })
                                    ">
                        リカバリーコードを使う
                    </button>

                    <button type="button" class="text-sm text-gray-600 hover:text-gray-900 underline cursor-pointer"
                                    x-show="recovery"
                                    x-on:click="
                                        recovery = false;
                                        $nextTick(() => { $refs.code.focus() })
                                    ">
                        認証コードを使う
                    </button>

                    <x-jet-button class="ml-4">
                        ログイン
                    </x-jet-button>
                </div>
            </form>
        </div>
    </x-jet-authentication-card>
</x-guest-layout>
変更後はこうなります。(Alpine.jsでシームレスに切り替わります👍)
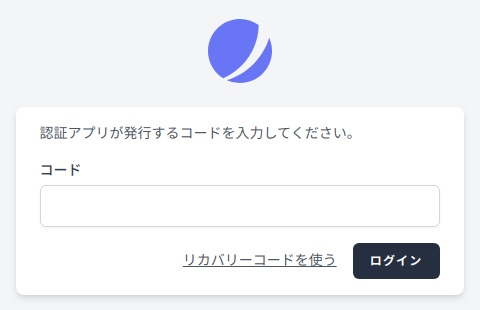
なお、Jetstreamの2段階認証の使い方は以下のページをご覧ください。
📝 Laravel Jetstreamの2段階認証を使う方法
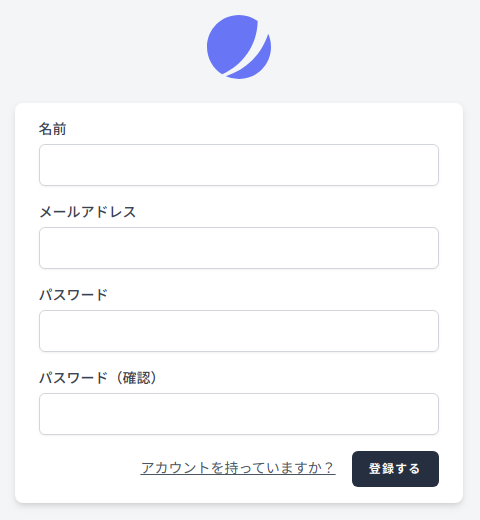
ユーザー登録フォーム
resources/views/auth/register.blade.php
<x-guest-layout>
    <x-jet-authentication-card>
        <x-slot name="logo">
            <x-jet-authentication-card-logo />
        </x-slot>

        <x-jet-validation-errors class="mb-4" />

        <form method="POST" action="{{ route('register') }}">
            @csrf

            <div>
                <x-jet-label value="名前" />
                <x-jet-input class="block mt-1 w-full" type="text" name="name" :value="old('name')" required autofocus autocomplete="name" />
            </div>

            <div class="mt-4">
                <x-jet-label value="メールアドレス" />
                <x-jet-input class="block mt-1 w-full" type="email" name="email" :value="old('email')" required />
            </div>

            <div class="mt-4">
                <x-jet-label value="パスワード" />
                <x-jet-input class="block mt-1 w-full" type="password" name="password" required autocomplete="new-password" />
            </div>

            <div class="mt-4">
                <x-jet-label value="パスワード(確認)" />
                <x-jet-input class="block mt-1 w-full" type="password" name="password_confirmation" required autocomplete="new-password" />
            </div>

            <div class="flex items-center justify-end mt-4">
                <a class="underline text-sm text-gray-600 hover:text-gray-900" href="{{ route('login') }}">
                    アカウントを持っていますか?
                </a>

                <x-jet-button class="ml-4">
                    登録する
                </x-jet-button>
            </div>
        </form>
    </x-jet-authentication-card>
</x-guest-layout>
変更後はこうなります。
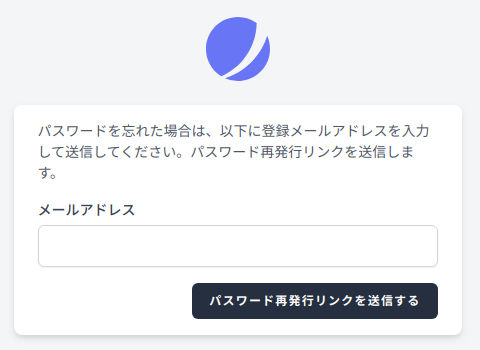
パスワード再発行フォーム(申請)
resources/views/auth/forgot-password.blade.php
<x-guest-layout>
    <x-jet-authentication-card>
        <x-slot name="logo">
            <x-jet-authentication-card-logo />
        </x-slot>

        <div class="mb-4 text-sm text-gray-600">
            パスワードを忘れた場合は、以下に登録メールアドレスを入力して送信してください。パスワード再発行リンクを送信します。
        </div>

        @if (session('status'))
            <div class="mb-4 font-medium text-sm text-green-600">
                {{ session('status') }}
            </div>
        @endif

        <x-jet-validation-errors class="mb-4" />

        <form method="POST" action="/forgot-password">
            @csrf

            <div class="block">
                <x-jet-label value="メールアドレス" />
                <x-jet-input class="block mt-1 w-full" type="email" name="email" :value="old('email')" required autofocus />
            </div>

            <div class="flex items-center justify-end mt-4">
                <x-jet-button>
                    パスワード再発行リンクを送信する
                </x-jet-button>
            </div>
        </form>
    </x-jet-authentication-card>
</x-guest-layout>
変更後はこうなります。
ℹ ちなみに、このページからメールアドレスを送信すると、以下のようなエラーが出る場合があります。
Cannot send message without a sender address
これは、.envのMAIL_FROM_ADDRESSが設定されていないことが原因ですので、以下のように設定してください。
MAIL_FROM_ADDRESS=no-reply@example.com
パスワード再発行フォーム(変更)
resources/views/auth/reset-password.blade.php
<x-guest-layout>
    <x-jet-authentication-card>
        <x-slot name="logo">
            <x-jet-authentication-card-logo />
        </x-slot>

        <x-jet-validation-errors class="mb-4" />

        <form method="POST" action="/reset-password">
            @csrf

            <input type="hidden" name="token" value="{{ $request->route('token') }}">

            <div class="block">
                <x-jet-label value="メールアドレス" />
                <x-jet-input class="block mt-1 w-full" type="email" name="email" :value="old('email', $request->email)" required autofocus />
            </div>

            <div class="mt-4">
                <x-jet-label value="パスワード" />
                <x-jet-input class="block mt-1 w-full" type="password" name="password" required autocomplete="new-password" />
            </div>

            <div class="mt-4">
                <x-jet-label value="パスワード(確認)" />
                <x-jet-input class="block mt-1 w-full" type="password" name="password_confirmation" required autocomplete="new-password" />
            </div>

            <div class="flex items-center justify-end mt-4">
                <x-jet-button>
                    パスワードを再発行する
                </x-jet-button>
            </div>
        </form>
    </x-jet-authentication-card>
</x-guest-layout>
変更後はこうなります。

おまけ1:ロゴを変更するには
ちなみにログインフォームの上に表示されているロゴを変更する方法もご紹介しましょう。

今回は以下の画像に変更してみます。

resources/views/vendor/jetstream/components/authentication-card-logo.blade.php
<a href="/">
    <!-- 👇 ここにあった<svg>タグを削除して、以下を追加しています -->
    <img src="/images/panda.png">
</a>
変更するとこうなります。
おまけ2:もっと楽して日本語化したい方へ(Breezejp パッケージ)
【追記:2023.7.16】
ここまでの作業はいろいろと作業をしないといけないため、結構めんどうだったりします。
そこで、そんな時間がない方たちにおすすめなパッケージが「askdkc/breezejp」です。
なんと、以下2コマンドだけで日本語化が完了します。
composer require askdkc/breezejp --dev

php artisan breezejp
こんなカンジです😄
しかもこれ、ログインページだけじゃなく以下全てが日本語化されます。(2023.7.16 現在)
- ログインページ
- ユーザー登録
- パスワード再発行
- アカウント情報変更
- メール文面
- ページネーション
そしてさらに、以下のコマンドを実行するだけで言語の切り替えができるようにもなります。
php artisan breezejp --langswitch
なんとも「いたれりつくせり」なパッケージですので、こちらもぜひ試してみてください。😄👍
📝 参考ページ: Breezejp
ダウンロードする
今回の日本語化で実際に変更したソースコード一式を以下からダウンロードできます。
Laravel Jetstream を日本語化する※ ただし、バリデーションの翻訳データはご自身でセットしてください。
おわりに
ということで今回は、Laravel Jetstreamを日本語化してみました。
実はですが、当初はログイン後のページも日本語化しようと考えていたのですが、そうなると変更内容が多すぎるため今回はフォームのみに限定しました。
また、Email verification機能(本登録→仮登録)の日本語化は今後Email verification専用の記事を書こうと考えていますので、そちらでご紹介します。
ということで、ぜひ皆さんもJetstreamの日本語化をやってみてくださいね。
ではでは〜❗
 「どうやら左も四十肩になりました。
合わせて八十肩ですね・・・涙」