
九保すこひです(フリーランスのITコンサルタント、エンジニア)
さてさて、私の中ではすでにChatGPTが仕事だけでなく生活の一部になりかけている今日この頃です。
もはやChatGPTがどれだけ強力(&協力)なのかは誰もが知るところとなり、最近聞かれるのは「ChatGPTすごい!」から「こんなことに使えるぞ!」という内容に変わってきたような印象があります。
ただ、一点ChatGPTに実装してほしいなと考えているものがあります。
それが・・・・・・
過去の会話履歴の検索機能
です。
というのも、これだけChatGPTを活用していると「おっ!これはあの時 ChatGPT が答えてくれたやつが使えるぞ👍」という場面がよくあるのですが、数が多すぎて、
…でもどこにあるのか忘れちゃったよ…😫
となってしまうからなんですね。
そこで❗
今回はLaravelを使ってChatGPTの会話履歴を検索できる機能を作ってみます。
ぜひ何かの参考になりましたら嬉しいです。😄✨
 「ChatGPT に聞いても
私の超クセッ毛を治す方法は
うまくいきませんでした😢」
開発環境: Laravel 10.x、React、Inertia.js、Vite、ChatGPT 4
目次
ChatGPT から会話データをエクスポートする
実は(この記事を書いている2023.5.9より)少し前にChatGPTがエクスポート機能を実装してくれたんですね。(これがあるなら検索機能も…とは思いましたが、AI機能にリソースを集中させたいのかもしれませんね)
そこでまずはこの会話データをエクスポート(ダウンロード)しておきましょう。
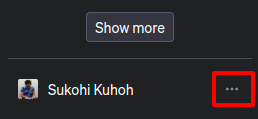
まず、ChatGPTにログインして画面左下にある「三点リーダ」をクリックします。
ポップアップが表示されるので「Settings」をクリック。
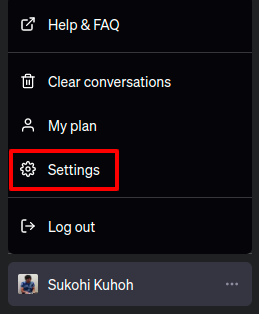
すると、設定モーダルが表示されるので、その中の「Export」をクリック。
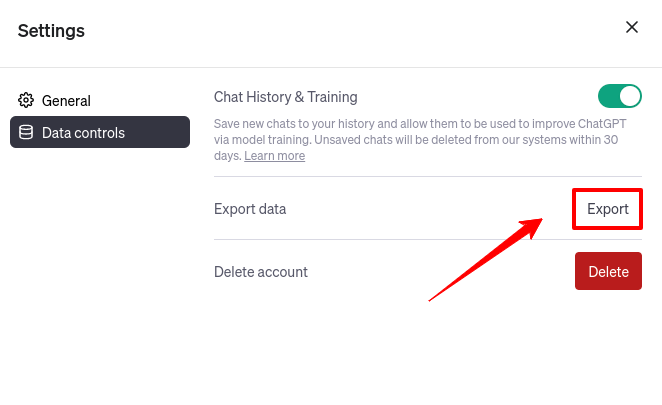
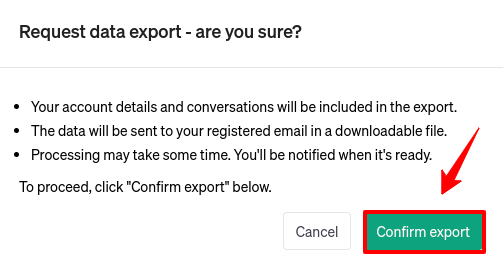
エクスポートのリクエストをするために「Confirm export」ボタンをクリックします。
※ データは、登録したメールアドレスに送信されるようになっています。
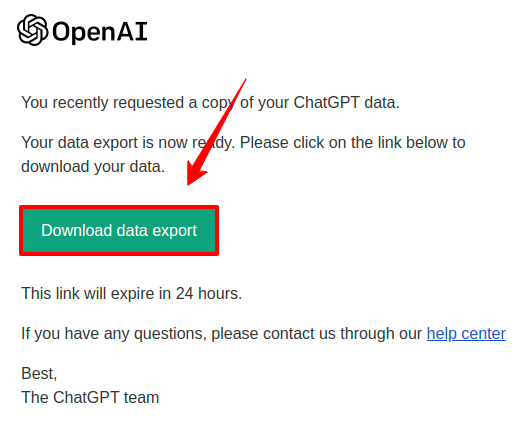
そして、(私の場合はすぐ送信されてきました)メールが届きますので、「Download data export」ボタンをクリックしてファイルをダウンロードします。
ダウンロードが完了したら、適当な場所に展開してください。
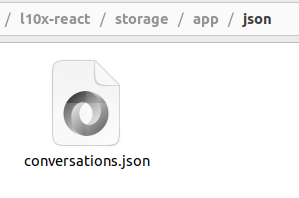
展開すると以下のようになります。
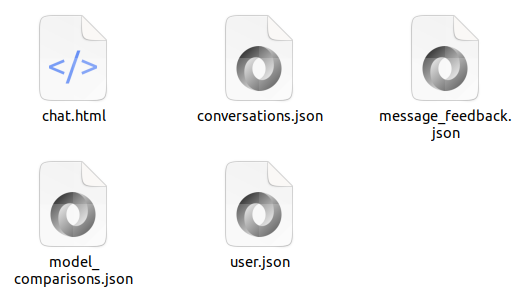
※ なお、chat.htmlをブラウザで開くと会話履歴を1ページにまとめたものを見ることもできます。
では、今回必要なファイルは「conversations.json」のみですので、このファイルをLaravelの「/storage/app/json/」フォルダへ設置しておきましょう。
これでChatGPT側の作業は完了です❗
モデル&マイグレーションをつくる
では、ここからはLaravel側の作業になります。
まずはDB周りです。
以下のコマンドを実行してください。
php artisan make:model ChatGptConversation -m
すると、モデルとマイグレーションの2ファイルが作成されるので中身をそれぞれ変更します。
/app/Models/ChatGptConversation.php
<?php

namespace App\Models;

use Illuminate\Database\Eloquent\Factories\HasFactory;
use Illuminate\Database\Eloquent\Model;

class ChatGptConversation extends Model
{
    use HasFactory;

    protected $guarded = ['id'];

    // Relationship
    public function parent()
    {
        return $this->hasOne(ChatGptConversation::class, 'uid', 'parent_uid');
    }

    public function child()
    {
        return $this->hasOne(ChatGptConversation::class, 'uid', 'child_uid');
    }
}
そしてマイグレーションです。
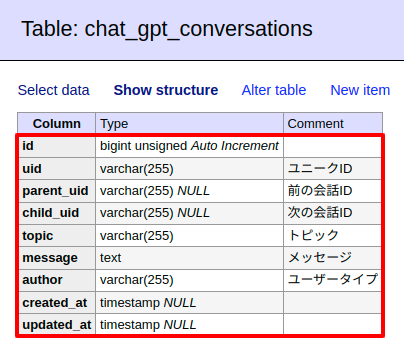
database/migrations/****_**_**_******_create_chat_gpt_conversations_table.php
// 省略

Schema::create('chat_gpt_conversations', function (Blueprint $table) {
    $table->id();
    $table->string('uid')->comment('ユニークID');
    $table->string('parent_uid')->nullable()->comment('前の会話ID');
    $table->string('child_uid')->nullable()->comment('次の会話ID');
    $table->string('topic')->comment('トピック');
    $table->text('message')->comment('メッセージ');
    $table->string('author')->comment('ユーザータイプ');
    $table->timestamps();
});

// 省略
なお、エクスポートしたJSONファイルの中には1つ前と次「会話 ID」が含まれていますので、これらを保存し、「質問」&「回答」ペアとして使います。
では、この状態でDBを再構築します。
以下のコマンドを実行してください。
php artisan migrate:fresh --seed
すると、実際のテーブルはこうなりました。
会話データをインポートできる Artisan コマンドをつくる
では、次にエクスポートした会話データをDBテーブルに保存できるように、独自Artisanコマンドをつくっていきます。
以下のコマンドを実行してください。
php artisan make:command ImportChatGptConversations
すると、コマンドファイルが作成されるので中身を以下のように変更してください。
<?php

namespace App\Console\Commands;

use App\Models\ChatGptConversation;
use Carbon\Carbon;
use Illuminate\Console\Command;

class ImportChatGptConversations extends Command
{
    /**
     * The name and signature of the console command.
     *
     * @var string
     */
    protected $signature = 'import:chatgpt {file?}';

    /**
     * The console command description.
     *
     * @var string
     */
    protected $description = 'ChatGPTからエクスポートした会話データをインポートする';

    /**
     * Execute the console command.
     */
    public function handle()
    {
        $file_path = $this->argument('file');

        if(is_null($file_path)) { // ファイル指定がないときはデフォルトのファイルを読み込む

            $file_path = storage_path('app/json/conversations.json');

        }

        if (! file_exists($file_path)) {

            $this->error('File not found: ' . $file_path);
            return Command::FAILURE;

        }

        // 会話データを全削除
        ChatGptConversation::truncate();

        // ファイルから会話データを読み込む
        $json_data = file_get_contents($file_path);
        $conversations = json_decode($json_data, true);

        if (! is_array($conversations) || count($conversations) === 0) {

            $this->error('Invalid file: '. $file_path);
            return Command::FAILURE;

        }

        foreach ($conversations as $conversation) {

            $topic = $conversation['title'];
            $mapping = $conversation['mapping'];

            foreach ($mapping as $mapping_item) {

                $uid = data_get($mapping_item, 'id');
                $parent_uid = data_get($mapping_item, 'parent');
                $child_uid = data_get($mapping_item, 'children.0');

                $content_type = data_get($mapping_item, 'message.content.content_type', '');
                $message = data_get($mapping_item, 'message.content.parts.0', '');

                if($content_type === 'text' && $message !== '') {

                    $author = data_get($mapping_item, 'message.author.role');
                    $created_time = data_get($mapping_item, 'message.create_time');
                    $updated_time = data_get($mapping_item, 'message.update_time');

                    $conversation = new ChatGptConversation([
                        'uid' => $uid,
                        'topic' => $topic,
                        'message' => $message,
                        'author' => $author,
                        'parent_uid' => $parent_uid,
                        'child_uid' => $child_uid,
                        'created_at' => $created_time,
                        'updated_at' => $updated_time,
                    ]);
                    $conversation->save();

                }

            }

        }

        $this->info('Imported ' . count($conversations) . ' conversations.');

        return Command::SUCCESS;
    }
}
この中でやっているのは、JSONファイルを読み込んでDBに格納しているだけのシンプルなものです。
※ ただし、どうやら不要なデータも含まれているようでしたので、いくつかの条件式を使ってフィルターをかけています。
さぁ、これでphp artisan import:chatgptコマンドを実行するとconversations.jsonからデータが取得されて、DBに格納されるようになります。
※ fileを指定すると別ファイルからインポートもできますよ👍
コントローラーをつくる
では、インポートしたデータを検索できるようにしていきます。
以下のコマンドを実行してください。
php artisan make:controller ChatGptSearchController
すると、ファイルが作成されるので中身を以下のように変更します。
<?php

namespace App\Http\Controllers;

use App\Models\ChatGptConversation;
use Illuminate\Http\Request;
use Inertia\Inertia;

class ChatGptSearchController extends Controller
{
    public function index()
    {
        return Inertia::render('ChatGptSearch/Index');
    }

    public function list(Request $request)
    {
        // 注意: 今回検索はメインどころではないのでキーワードはひとつでページ送りも実装していません
        $keyword = $request->keyword;

        $conversations = ChatGptConversation::query()
            ->with('parent', 'child')
            ->where('message', 'LIKE', "%{$keyword}%")
            ->orWhere('topic', 'LIKE', "%{$keyword}%")
            ->latest()
            ->limit(10)
            ->get();

        return [
            'conversations' => $conversations,
        ];
    }
}
なお、コード内にも書いているとおり今回のメインは「ChatGPT のエクスポート」ですので、検索機能はとてもシンプルなものにしています。
ビュー(React部分)をつくる
続いて、React部分をつくっていきましょう。
以下のファイルを作成してください。
resources/js/Pages/ChatGptSearch/Index.jsx
import { useState } from 'react';

export default function Index() {

    const [keyword, setKeyword] = useState('');
    const [conversations, setConversations] = useState([]);

    const handleSearch = () => {

        const url = route('chat_gpt_search.list');
        const data = {
            params: { keyword }
        };

        axios.get(url, data)
            .then((response) => {

                setConversations(response.data.conversations);

            });

    };

    return (
        <div className="container mx-auto px-4">
            <div className="flex justify-center items-center my-4">
                <input
                    type="text"
                    value={keyword}
                    onChange={(e) => setKeyword(e.target.value)}
                    className="border border-gray-300 p-2 rounded w-full sm:w-1/2"
                    placeholder="検索キーワードを入力..."
                />
                <button
                    onClick={handleSearch}
                    className="bg-blue-500 text-white px-4 py-2 ml-2 rounded"
                >
                    検索
                </button>
            </div>
            <ul>
                {conversations.map((conversation, index) => (
                    <li key={index} className="mb-6">
                        <div className="bg-gray-100 p-4 rounded">
                            {conversation.author === 'assistant' && conversation.parent && (
                                <div className="mb-2 text-sm text-gray-500">
                                    <div className="font-bold">質問:</div>
                                    <div className="whitespace-pre-wrap">{conversation.parent.message}</div>
                                </div>
                            )}
                            <div className="text-lg mb-2 whitespace-pre-wrap">{conversation.message}</div>
                            {conversation.author === 'user' && conversation.child && (
                                <div className="text-sm text-gray-500">
                                    <div className="font-bold">回答:</div>
                                    <div className="whitespace-pre-wrap">{conversation.child.message}</div>
                                </div>
                            )}
                        </div>
                    </li>
                ))}
            </ul>
        </div>
    );

};
この中でやっていることは次のとおりです。
- キーワードが入力されて検索ボタンがクリックされたら Ajax でデータを取得する
- 取得したデータは、「質問」&「回答」のペアで表示
これで作業は完了です。
お疲れ様でした😄
テストしてみる
では、実際にテストしてみましょう❗
まずはJSONデータのインポートです。
以下のコマンドを実行してみましょう。
php artisan import:chatgpt
すると・・・・・・
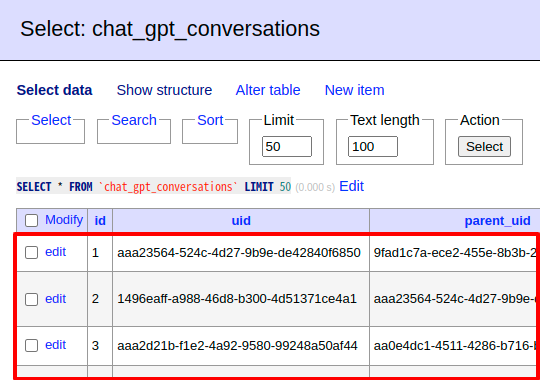
はい❗
空だったテーブルの中にデータが入っています。
まずは成功です😄✨
では、続いて検索です。
Viteを起動して「https://******/chat_gpt_search」にアクセスします。
すると、検索ボックスが表示されました。

では、今回は「ビジネス」で検索してみましょう。
どうなったでしょうか・・・・・・

はい❗
うまく「質問」と「回答」を表示することができました。
成功です😄✨
企業様へのご提案
今回のようにChatGPTで回答してもらったデータを独自に利用することができます。
そのため、過去に質問した内容を以下のようなフィルターを使って簡単に取り出すことができます。
- 質問した内容
- 回答された内容
- トピック
- 質問/回答日時
- ユーザータイプ(自分 or ChatGPT)
- チャットタイプ(chatgpt-4)
など。
もしこういったデータの加工やデータの取り込み機能を実装されたい場合は、ぜひお気軽にお問い合わせください。
お待ちしております。😄✨
おわりに
ということで、今回は「Laravel + ChatGPTの会話データ」で検索システムをつくってみました。
ちなみに、最後にテストしたときに思いましたが、検索結果の中に含まれているキーワードが黄色く装飾されていたら見やすいなと思いました。もしやってみたい方はそちらも実装してみてくださいね👍
また、この記事を書いている2023.5.9現在はChatGPTのデータエクスポートは手動でしか対応していませんが、もし今後APIなどの形になると便利ですよね。(というかやっぱり現在の形は不便です…😢)
ということで、AIの波に飲まれないように研究を続けていきます。
ぜひみなさんも楽しくやってみてくださいね。
ではでは〜❗
 「お店を紹介して褒められたら、
(自分は関係ないのに)
ハナ高々になりますよね😄」