
九保すこひです(フリーランスのITコンサルタント、エンジニア)
さてさて、先日ウェブプッシュに関する「Laravel + Reactで実現するWebプッシュ通知!ChatGPTと共にiOS 16.4で試してみた結果」という記事を公開しました。
そして、iPhoneでもちゃんとウェブプッシュが機能しているのを確認したのでテンションが上がりました。
しかし、前回1つだけ「うーん、もっと…😅」と思う部分がありました。
それは・・・・・・
ユーザー登録してない人にもウェブプッシュしたい❗
というものです。
前回は登録されたユーザーをテーブルから呼び出してプッシュ通知をするようになっていましたが、実際のウェブサービス運用を考えると、ユーザー登録なしでも送信できるようにしたいですよね。
例えば、「冷やし中華はじめました!」といった通知のためだけにユーザー登録するのは手間ですし、ユーザー登録したとしても(ウェブプッシュの場合は)結局プッシュ通知の設定をしないといけないのでメンドウです。
そこで❗
今回は、Laravelを使って「ユーザー登録なしでもプッシュ通知の登録/解除できる機能」を作ってみたいと思います。
ぜひ何かの参考になりましたら嬉しいです。😄✨
 ほろ酔いで
ほろ酔いで
映画「Winny」を見たら、
思わず泣きそうになりました😢
開発環境: Laravel 10.x、JavaScript(バニラ)
目次
前提として
この記事を実行するには、ローカルで実行する際でもhttpsが必要でさらに自己証明書でもダメです。
詳しくは以下をご覧ください。
📝 参考ページ: 接続環境のエラーについて
パッケージをインストールする
では実際にコードを書いていく前に必要になるパッケージをインストールしておきましょう。
composer require laravel-notification-channels/webpush
このパッケージは以前の記事でも使っていますが、便利機能を使わせてもらって開発します。
なお、データベースなどは独自に用意するので、vapidキーをつくるために、以下のコマンドだけ実行しておいてください。
php artisan webpush:vapid
これにより.env内に以下のようなコードが追加になります。
VAPID_PUBLIC_KEY=(あなたの公開鍵)
VAPID_PRIVATE_KEY=(あなたのプライベートキー)
モデル&マイグレーションをつくる
では、データベースまわりの準備をしていきましょう。
以下のコマンドを実行してください。
php artisan make:model AnonymousPushSubscription -m
すると、モデルとマイグレーションの2ファイルが作成されるので、中身を以下のように変更します。
app/Models/AnonymousPushSubscription.php
<?php

namespace App\Models;

use Illuminate\Database\Eloquent\Factories\HasFactory;
use Illuminate\Database\Eloquent\Model;

class AnonymousPushSubscription extends Model
{
    use HasFactory;

    protected $guarded = ['id']; // 👈 ここを追加しました
}
そして、マイグレーションです。
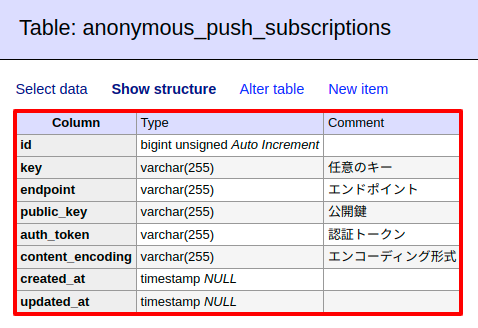
database/migrations/****_**_**_******_create_anonymous_push_subscriptions_table.php
// 省略

public function up(): void
{
    Schema::create('anonymous_push_subscriptions', function (Blueprint $table) {
        $table->id();
        $table->string('key')->comment('任意のキー');
        $table->string('endpoint')->comment('エンドポイント');
        $table->string('public_key')->comment('公開鍵');
        $table->string('auth_token')->comment('認証トークン');
        $table->string('content_encoding')->comment('エンコーディング形式');
        $table->timestamps();
    });
}

// 省略
では、この状態でテーブルを追加してみましょう。
以下のコマンドを実行してください。
php artisan migrate
すると、実際のテーブルはこうなりました。
独自の Notification チャンネルをつくる
続いて、Notificationで使うための「チャンネル」をつくります。
チャンネルは、例えば、
- メール
- slack
- LINE
など「どんな経路で通知するの?」を設定するものだと考えてください。
そして今回はユーザー登録なしのプッシュ通知なので、「AnonymousPushChannel」という名前にします。
中身はこうなります。
app/Notifications/AnonymousPushChannel.php
<?php

namespace App\Notifications;

use Illuminate\Notifications\Notification;
use Minishlink\WebPush\Subscription;
use Minishlink\WebPush\WebPush;
use NotificationChannels\WebPush\ReportHandler;

class AnonymousPushChannel
{
    public function __construct(ReportHandler $reportHandler)
    {
        $auth = [
            'VAPID' => [
                'subject' => url('/'),
                'publicKey' => env('VAPID_PUBLIC_KEY'), // 本来はコンフィグに登録すべきです
                'privateKey' => env('VAPID_PRIVATE_KEY'), // 本来はコンフィグに登録すべきです
            ],
        ];

        $this->webPush = new WebPush($auth);
        $this->reportHandler = $reportHandler;
    }

    public function send($notifiable, Notification $notification)
    {
        $message = $notification->toAnonymousPush();
        $payload = json_encode($message->toArray());
        $subscriptions = $notification->getSubscriptions();

        if($subscriptions->isEmpty()) { // 送信するものがないときは終了

            return;

        }

        foreach ($subscriptions as $subscription) { // ひとつずつ送信する

            $web_push_subscription = new Subscription(
                $subscription->endpoint,
                $subscription->public_key,
                $subscription->auth_token,
                null,
            );
            $this->webPush->queueNotification($web_push_subscription, $payload);

        }

        $reports = $this->webPush->flush();

        foreach ($reports as $report) {

            if ($report) {

                $this->reportHandler->handleReport($report, $subscription, $message);

            }

        }
    }
}
この中では、最初にインストールしたパッケージでウェブプッシュを送信しています。
ちなみに、本家のパッケージではServiceProviderの中で認証情報を追加していたのですが、ほぼ同じ内容を独自のものをつくるのもめんどうなので、直接認証情報を追加するようにしています。(お好みで変更してください)
独自の Notification をつくる
では、名前なしで実行するための専用Notificationをつくります。
以下のコマンドを実行してください。
php artisan make:notification AnonymousPushNotification
するとファイルが作成されるので、中身を以下のように変更します。
app/Notifications/AnonymousPushNotification.php
<?php

namespace App\Notifications;

use App\Models\AnonymousPushSubscription;
use Illuminate\Notifications\Notification;
use NotificationChannels\WebPush\WebPushMessage;

class AnonymousPushNotification extends Notification
{
    public function __construct(string $subscription_key, WebPushMessage $message)
    {
        $this->subscriptions = AnonymousPushSubscription::where('key', $subscription_key)->get();
        $this->message = $message;
    }

    public function via(): array
    {
        return [AnonymousPushChannel::class];
    }

    public function toAnonymousPush()
    {
        return $this->message;
    }

    public function getSubscriptions()
    {
        return $this->subscriptions;
    }
}
このクラスのメインの目的は、先ほどのチャンネルから必要なデータを取得することです。
例えば、toAnonymousPush()がメッセージ(プッシュ通知のタイトルや本文)、そしてgetSubscriptions()はanonymous_push_subscriptionsテーブルに登録されているプッシュ通知の宛先などです。
ウェブプッシュの登録・解除ページをつくる
ではここからは訪問ユーザーがブラウザからアクセスするための部分になります。
コントローラーをつくる
まずコントローラーをつくります。
以下のコマンドを実行してください。
php artisan make:controller AnonymousPushController
するとコントローラーが作成されるので、中身を以下のように変更します。
app/Http/Controllers/AnonymousPushController.php
<?php

namespace App\Http\Controllers;

use App\Models\AnonymousPushSubscription;
use App\Notifications\AnonymousPushNotification;
use Illuminate\Http\Request;
use Illuminate\Support\Facades\Notification;
use NotificationChannels\WebPush\WebPushMessage;

class AnonymousPushController extends Controller
{
    public function index()
    {
        return view('anonymous_push.index');
    }

    public function store(Request $request)
    {
        // 注意: バリデーションは省略してます

        $endpoint = $request->input('subscription.endpoint');
        $public_key = $request->input('subscription.keys.p256dh');
        $auth_token = $request->input('subscription.keys.auth');
        $subscription_key = 'new_item_added'; // 新商品入荷

        $subscription = AnonymousPushSubscription::firstOrNew([
            'key' => $subscription_key,
            'endpoint' => $endpoint
        ]);
        $subscription->key = $subscription_key;
        $subscription->endpoint = $endpoint;
        $subscription->public_key = $public_key;
        $subscription->auth_token = $auth_token;
        $subscription->content_encoding = 'aesgcm';
        $result = $subscription->save();

        return ['result' => $result];
    }

    public function destroy(Request $request)
    {
        // 注意: バリデーションは省略してます

        $result = false;
        $endpoint = $request->input('subscription.endpoint');
        $subscription = AnonymousPushSubscription::where('endpoint', $endpoint)->first();

        if(! is_null($subscription)) {

            $result = $subscription->delete();

        }

        return ['result' => $result];
    }

    public function test() // ウェブプッシュテスト用
    {
        $subscription_key = 'new_item_added'; // 新商品入荷
        $message = (new WebPushMessage())
            ->title('新商品が入荷しました!')
            ->body('入荷した新商品をご紹介します。')
            ->data(['url' => 'https://example.com/new_item']); // 今回は通知をクリックしても何も起きませんが、参考として追加します

        Notification::route('to_anonymous_push', null)
            ->notify(new AnonymousPushNotification($subscription_key, $message));
    }
}
subscribe()は登録用で、unsubscribe()は解除用です。
そして、testはこのページにアクセスするとプッシュ通知が送信されるようになっています。
ビューをつくる
続いて、実際に表示されるビュー部分です。
なお、最近はReact + Inertia.jsを使っていましたが、「この開発案件からすると、オーバースペックなのに、わざわざ難しいコードを書いて鼻タカダカになってるだけじゃない…??」(つまり、本質を見失ってるんじゃ…🤔)と思ったりもしていたので今回は完全ネイティブのJavaScript(バニラJS)でつくってみます。
以下のファイルをつくってください。
resources/views/anonymous_push/index.blade.php
<html>
<head>
    <script src="https://cdn.tailwindcss.com"></script>
    <script src="https://cdnjs.cloudflare.com/ajax/libs/axios/1.3.4/axios.min.js"></script>
</head>
<body>
    <div class="p-5">
        <h1 class="mb-2">ウェブプッシュ通知(ユーザー登録不要)のテスト</h1>

        <button id="subscription_button" type="button" class="bg-green-800 text-white p-2 rounded mr-2">登録する</button>
        <button id="unsubscription_button" type="button" class="bg-red-700 text-white p-2 rounded">解除する</button>

    </div>
    <script>

        // 変数 & 定数
        const vapidPublicKey = '{{ env('VAPID_PUBLIC_KEY') }}';
        const getUint8VapidPublicKey = () => {

            let key = vapidPublicKey;
            key += '='.repeat((4 - key.length % 4) % 4);
            const base64 = key
                .replace(new RegExp('\-', 'g'), '+')
                .replace(new RegExp('_', 'g'), '/');

            const binary = window.atob(base64);
            const binaryLength = binary.length;
            let uint8Array = new Uint8Array(binaryLength);

            for(let i = 0; i < binaryLength; i++) {

                uint8Array[i] = binary.charCodeAt(i);

            }

            return uint8Array.buffer;

        };
        const pushManager = () => {

            return webPushRegistration.pushManager;

        };
        let webPushRegistration = null;
        let isSubscribed = false;

        // ウェブプッシュ
        const addSubscriptionEvents = () => {

            document.getElementById('subscription_button')
                .addEventListener('click', () => subscribe());
            document.getElementById('unsubscription_button')
                .addEventListener('click', () => unsubscribe());

        };
        const subscribe = () => {

            const subscriptionOptions = {
                userVisibleOnly: true,
                applicationServerKey: getUint8VapidPublicKey(),
            };

            webPushRegistration
                .pushManager
                .subscribe(subscriptionOptions)
                .then(subscription => {

                    const url = '/anonymous_push';
                    const data = { subscription: subscription };

                    axios.post(url, data)
                        .then(response => {

                            if(response.data.result === true) {

                                isSubscribed = true;
                                alert('登録しました。');

                            }

                        });

                });

        };
        const unsubscribe = () => {

            webPushRegistration
                .pushManager
                .getSubscription()
                .then(subscription => {

                    subscription
                        .unsubscribe()
                        .then(() => {

                            const url = '/anonymous_push';
                            const data = {
                                _method: 'DELETE',
                                subscription: subscription,
                            };

                            axios.post(url, data)
                                .then(response => {

                                    if(response.data.result === true) {

                                        isSubscribed = false;
                                        alert('解除しました。');

                                    }

                                });

                        });

                });

        };

        // 準備
        window.addEventListener('load', () => {

            if('serviceWorker' in navigator && 'PushManager' in window) {

                addSubscriptionEvents();

                const serviceWorkerPath = '/anonymous_push_sw.js';

                navigator
                    .serviceWorker
                    .register(serviceWorkerPath)
                    .then(registration => {

                        webPushRegistration = registration;
                        webPushRegistration.pushManager.getSubscription()
                            .then(subscription => {

                                isSubscribed = ! (subscription === null); // すでに登録済みかどうか

                            });

                    });

            } else {

                alert('このブラウザではプッシュ通知できません。');

            }

        });

    </script>
</body>
</html>
バニラJS(何もフレームワークを使わずに素のJavaScriptを使う開発方法)で書いているので少し冗長な部分もありますが、シンプルな機能の場合はこっちでも十分ですね。
ちなみに、CDNは久しぶりに使いましたが、やはりシンプルですね!とはいえ、お仕事の場合はバニラで書くとしても必ずフレームワークやライブラリは自前でホスティングしますけどね…😄
ServiceWorker をつくる
では、先ほどのJavaScript内で呼び出していたServiceWorker「anonymous_sw.js」をつくります。
public/anonymous_push_sw.js
self.addEventListener('push', e => {

    const json = e.data.json();
    const title = json.title;
    const options = {
        body: json.body,
        data: {
            url: json.data.url,
        }
    };
    e.waitUntil(
        self.registration.showNotification(title, options)
    );

});

// 通知がクリックされたときの処理はここに書く(今回は省略)
ルートをつくる
最後にルートをつくります。
// 省略

use App\Http\Controllers\AnonymousPushController;

// 省略

Route::prefix('anonymous_push')->controller(AnonymousPushController::class)->group(function () {
    Route::get('/', 'index');
    Route::get('/test', 'test');
    Route::post('/', 'store');
    Route::delete('/', 'destroy');
});
【追記:2024.4.18】
ルートを省略してましたが追記しました。
混乱させてしまってすみません!
これで作業は完了です❗
お疲れ様でした😄✨
テストしてみる(デモページを用意しました)
では、実際にテストしてみましょう…といいたいところですが、せっかくユーザー登録なしでOKなウェブプッシュなので、デモページを用意しました。
ぜひご自身で試してみてください❗
📝 デモページ: ウェブプッシュ通知(ユーザー登録不要)のテスト
企業様へのご提案
今回のようにユーザー登録しなくてもウェブプッシュを利用することができます。
そして、この機能を利用することで以下のような通知をすることができます。
- まだ発売していない商品が入荷したとき(早いもの勝ちのパターンの時)
- 人気の飲食店に行列ができている場合に順番が来たら通知をするサービス
- キャンセル待ちの部屋に登録しておけば、後で
YesorNoを通知してくれる
などなど。
もしこういったサービスを開発されたい方はぜひお問い合わせからご連絡ください。
お待ちしております。😄✨
おわりに
ということで、今回は「Laravel + バニラJS」で「ユーザー登録が不要のウェブプッシュ機能」をつくってみました。
少し手間ですが、iOS 16.4からはiPhoneでもウェブプッシュを使えるようになりましたので、利用範囲が拡大するのは間違いないでしょう。
ぜひ皆さんもいろんな活用方法を考えてみてくださいね。
ではでは〜❗
 「あったかくなったから、
また街角コレクションに
出かけようかな(ワクワク♪)」