
九保すこひです(フリーランスのITコンサルタント、エンジニア)
さてさて、このところ外出をしてないので家の中で楽しめる方法を模索しています。
そして、そんな中「何かいい本でもないかな?(ゲーム含む👍)」ということで久しぶりにブックオフ・オンラインにログインしてみました。
すると、「あ、これはLaravelでつくってみたい❗」と思う機能に遭遇しました。
それは・・・・・
「入荷したらメールでお知らせ」機能
です。
この機能は簡単に言うと「ごめん❗今は売り切れだけど、入荷したら必ずメールで知らせるね😊」というもので、実はLaravelに備わった機能を使うと比較的簡単に実装することができます。
そこで❗
今回はこの「入荷したらメールでお知らせメール」機能の作り方をご紹介します。
ぜひ楽しみながらやっていきましょう❗

「ほしい本はほぼ売り切れでした😂」
開発環境: Laravel 7.x
目次
この記事を見たらできること
itemsというテーブルに商品データが登録してあり、在庫(stock)がゼロになったら「お知らせメール」を登録するボタンを表示。
そして、その後在庫が1以上になった瞬間に、メールアドレスへ「お知らせメール」送信する、という機能をつくることができます。
では、実際にやっていきましょう❗
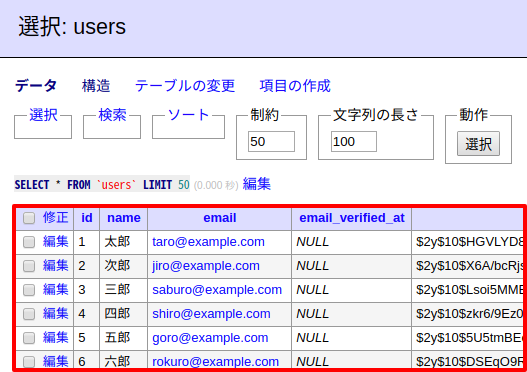
前提として
Laravelにログイン機能がインストールされ、テストユーザーが登録されていることが前提です。
もしまだインストールされていない方は、「Laravel6.x以降でログイン機能をインストールする方法」を参考にして準備を済ませておいてください。
テーブルはこんなカンジになります。
モデル&マイグレーションをつくる
では先にDBまわりの準備をします。
今回必要になるテーブルは以下の2つです。
- items: 商品データを管理
- item_notifications: お知らせメールを管理
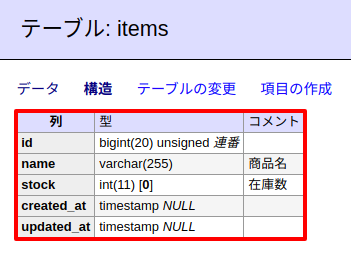
まずはitemsテーブルです。
以下のコマンドを実行してください。
php artisan make:model Item -m
実行したら作成されたマイグレーションを開いて中身を以下のようにします。
/database/migrations/****_**_**_******_create_items_table.php
// 省略

public function up()
{
    Schema::create('items', function (Blueprint $table) {
        $table->id();
        $table->string('name')->comment('商品名'); 👈 追加
        $table->integer('stock')->default(0)->comment('在庫数'); 👈 追加
        $table->timestamps();
    });
}

// 省略
そして、モデルにリレーションシップを追加します。
<?php

namespace App;

use Illuminate\Database\Eloquent\Model;

class Item extends Model
{
    // リレーションシップ
    public function notifications() { // 👈 追加

        return $this->hasMany(\App\ItemNotification::class, 'item_id', 'id');

    }
}
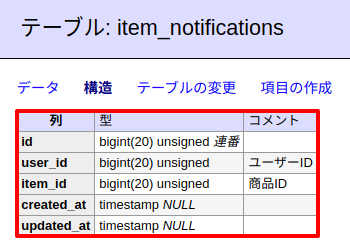
次に、お知らせメールを管理するitem_notificationsです。
同じく以下のコマンドを実行してください。
php artisan make:model ItemNotification -m
マイグレーションの中身はこうなります。
// 省略

public function up()
{
    Schema::create('item_notifications', function (Blueprint $table) {
        $table->id();
        $table->unsignedBigInteger('user_id')->comment('ユーザーID');
        $table->unsignedBigInteger('item_id')->comment('商品ID');
        $table->timestamps();

        $table->foreign('user_id')->references('id')->on('users');
        $table->foreign('item_id')->references('id')->on('items');
    });
}

// 省略
そして、こちらにもリレーションシップを追加してください。
<?php

namespace App;

use Illuminate\Database\Eloquent\Model;

class ItemNotification extends Model
{
    // リレーションシップ
    public function user() { // 👈 追加

        return $this->belongsTo(\App\User::class, 'id', 'user_id');

    }
}
では、この状態でマイグレーションを実行しましょう。
php artisan migrate
するとテーブルはこうなります。
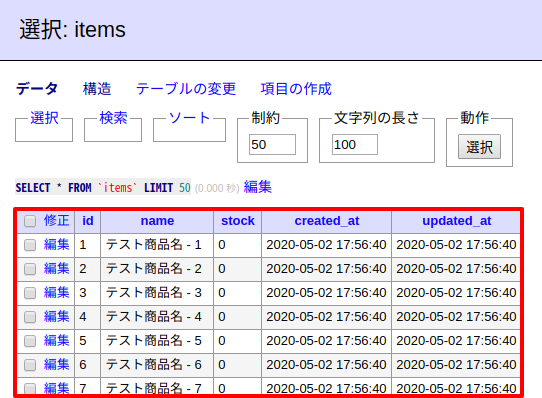
テストデータをつくる
続いて、itemsテーブルにテストデータを用意します。
以下のコマンドを実行してください。
php artisan make:seed ItemsTableSeeder
すると、ファイルが作成されるので中身を以下のように変更します。
/database/seeds/ItemsTableSeeder.php
// 省略

public function run()
{
    for($i = 1 ; $i < 25 ; $i++) {

        $item = new \App\Item();
        $item->name = 'テスト商品名 - '. $i;
        $item->stock = rand(0, 10);
        $item->save();

    }
}

// 省略
では、Seederも含めてテーブルを初期化しましょう。
php artisan migrate:fresh --seed
テーブルは次のようになります。
お知らせメールを登録する部分をつくる
では、在庫がゼロの商品はお知らせメールを登録できるようにしていきましょう。
ルートをつくる
LaravelにURLを登録します。
Route::get('items', 'ItemController@index');
Route::get('ajax/items', 'ItemController@item_list');
Route::post('ajax/items/register_notification', 'ItemController@register_notification');
Route::post('ajax/items/unregister_notification', 'ItemController@unregister_notification');
まず1行目のルートはブラウザで直接アクセスする部分で、次の項目でつくるビューを返すことになります。
そして、2行目はAjaxで商品データを取得する部分になり、残り2つはAjaxでお知らせメールの登録/解除をする部分です。
※なお、今回はテストなのでひとつのコントローラーで実装しますが本来は機能ごとに分割することをおすすめします。
コントローラーをつくる
続いてコントローラーです。
以下のコマンドを実行してください。
php artisan make:controller ItemController
そして中身を次のようにします。
<?php

namespace App\Http\Controllers;

use Illuminate\Http\Request;

class ItemController extends Controller
{
    // ブラウザから
    public function index() {

        return view('items');

    }

    // 以降はAjax
    public function item_list() {

        return \App\Item::with('notifications')->get();

    }

    public function register_notification(Request $request) { // ①

        $result = false;
        $user = $request->user();
        $exists = \App\ItemNotification::where('user_id', $user->id)
            ->where('item_id', $request->item_id)
            ->exists();

        if(!$exists) {

            $notification = new \App\ItemNotification();
            $notification->user_id = $user->id;
            $notification->item_id = $request->item_id;
            $result = $notification->save();

        }

        return ['result' => $result];

    }

    public function unregister_notification(Request $request) { // ②

        $user = $request->user();
        $query = \App\ItemNotification::where('user_id', $user->id)
            ->where('item_id', $request->item_id);

        if($query->exists()) {

            $result = ($query->delete() === 1);

        }

        return ['result' => $result];

    }
}
この中で重要なのが、以下2つです。
①register_notification
この中で、ある商品のお知らせメールを登録することになります。
流れとしては、まず「商品ID」と「ユーザーID」を使ってすでにデータが存在しているかをチェックし、もしデータが存在してないなら新規追加するという形になります。
②unregister_notification
上のregister_notification()とほぼ同じですが、こちらは存在チェックと削除をひとつのクエリーで実装しています。(つまり、コードを省略して楽しました👍)
ビューをつくる
続いてビューをつくります。
<html>
<head>
<link href="https://stackpath.bootstrapcdn.com/bootstrap/4.4.1/css/bootstrap.min.css" rel="stylesheet">
</head>
<body>
<div id="app" class="p-3">
<h3 class="mb-3">「入荷したらメールでお知らせ」システム・サンプル</h3>
@if(!auth()->check())
<div class="alert alert-danger">
<a href="/login">ログイン</a>してください。
</div>
@endif
<table class="table table-bordered">
<thead class="bg-secondary text-white">
<tr>
<th class="text-nowrap">商品名</th>
<th class="text-nowrap">在庫数</th>
<th></th>
</tr>
</thead>
<tbody>
<tr v-for="i in items">
<td class="w-100" v-text="i.name"></td>
<td v-text="i.stock"></td>
<td class="text-right text-nowrap">
<button
type="button"
class="btn btn-sm btn-light"
v-if="showRegistrationButton(i)"
@click="registerNotification(i.id)">入荷したらメールでお知らせ</button>
<button
type="button"
class="btn btn-sm btn-secondary"
v-if="showUnregistrationButton(i)"
@click="unregisterNotification(i.id)">お知らせメールを解除</button>
</td>
</tr>
</tbody>
</table>
</div>
<script src="https://cdnjs.cloudflare.com/ajax/libs/vue/2.6.11/vue.min.js"></script>
<script src="https://cdnjs.cloudflare.com/ajax/libs/axios/0.19.2/axios.min.js"></script>
<script>
new Vue({
el: '#app',
data: {
items: [],
userId: parseInt('{{ auth()->user()->id ?? -1 }}')
},
methods: {
getItems() {
axios.get('/ajax/items')
.then(response => {
this.items = response.data;
});
},
showRegistrationButton(item) {
if(parseInt(item.stock) > 0 || this.userId === -1) {
return false;
}
for(let notification of item.notifications) {
if(notification.user_id === this.userId) {
return false;
}
}
return true;
},
showUnregistrationButton(item) {
if(parseInt(item.stock) > 0 || this.userId === -1) {
return false;
}
for(let notification of item.notifications) {
if(notification.user_id === this.userId) {
return true;
}
}
return false;
},
registerNotification(itemId) {
const url = '/ajax/items/register_notification';
const params = {
item_id: itemId
};
axios.post(url, params)
.then(response => {
if(response.data.result === true) {
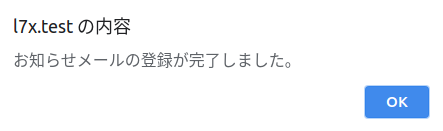
alert('お知らせメールの登録が完了しました。');
this.getItems();
}
});
},
unregisterNotification(itemId) {
const url = '/ajax/items/unregister_notification';
const params = {
item_id: itemId
};
axios.post(url, params)
.then(response => {
if(response.data.result === true) {
alert('お知らせメールの解除が完了しました。');
this.getItems();
}
});
},
},
mounted() {
this.getItems();
}
});
</script>
</body>
</html>
この中でやっているのは、データのリスト表示と「必要があれば」お知らせメール登録ボタンを表示することです。
そして、その必要があるかどうかの条件は、
- ログインしている
- 商品の在庫がゼロ
- ログインしてるユーザーはまだお知らせメールを登録してない
というもので、showRegistrationButton()で設定されています。
逆に解除ボタンの条件は、
- ログインしている
- 商品の在庫がゼロ
- ログインしてるユーザーが事前にお知らせメールを登録している
で、こちらはshowUnregistrationButton()が該当する部分です。
お知らせメールを送信する部分をつくる
では、最後に商品が入荷した(itemsテーブルのstockがゼロではなくなった)瞬間にメール送信する部分をつくっていきましょう。
メール送信部分をつくる
では、先にメール送信する部分です。
以下のコマンドでMailable(Laravelのメール送信機能)をつくります。
php artisan make:mail ItemArrived
中身はこうなります。
/app/Mail/ItemArrived.php
// 省略
public function build()
{
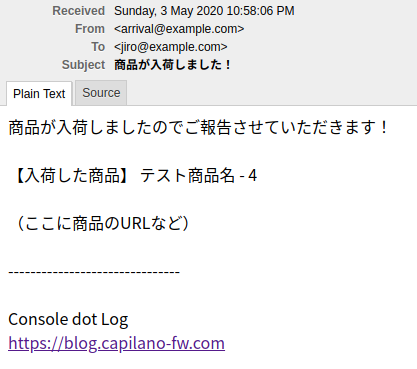
return $this->subject('商品が入荷しました!')
->from('arrival@example.com')
->text('emails.item_arrived')
->with('item', $this->item);
}
// 省略
そして、この中で設定したメール文面のビューもつくりましょう。
/resources/views/emails/item_arrived.blade.php
商品が入荷しましたのでご報告させていただきます!

【入荷した商品】 {{ $item->name }}

(ここに商品のURLなど)

-------------------------------

Console dot Log
https://blog.capilano-fw.com
イベントをつくる
続いて、ItemSavedというイベントを作成します。
以下のコマンドを実行してください。
php artisan make:event ItemSaved
そして、中身を次のように変更します。
/app/Events/ItemSaved.php
// 省略

public function __construct(Item $item)
{
    $old_stock = intval($item->getOriginal('stock'));
    $new_stock = intval($item->stock);

    if($old_stock === 0 && $new_stock > 0) {    // 保存前はゼロだったけど、今は1以上あるとき

        foreach($item->notifications as $notification) {

            $user = $notification->user;
            \Mail::to($user)->send(new ItemArrived($item)); // メール送信

        }

    }
}

// 省略
そして、作成したItemSavedをItemモデルにセットします。
<?php

namespace App;

use App\Events\ItemSaved;
use Illuminate\Database\Eloquent\Model;

class Item extends Model
{
    protected $dispatchesEvents = [ // 👈 追加
        'saved' => ItemSaved::class // 保存後に実行
    ];

    // 省略
}
これでメール送信部分も完了です。
テストしてみる
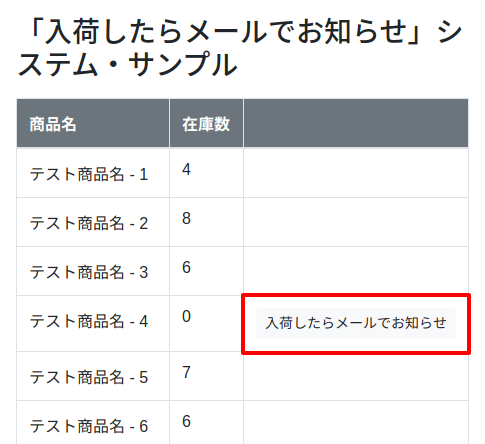
では、ログインしてから「http://*****/items」にアクセスしてみましょう❗

在庫数がゼロのものだけ「お知らせメール」ボタンが表示されています。
では、「テスト商品名 – 4」のボタンをクリックしてみましょう。
すると、以下のアラートが表示されました。
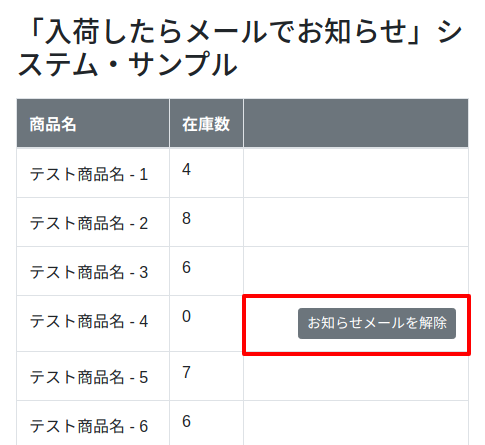
そして、ボタンが解除用に変更になりました。
この時、item_notificationsはこうなっています。

では次に、解除ボタンをクリックしてみましょう。

すると解除のアラートが表示されて、解除ボタンは登録ボタンに戻りました。
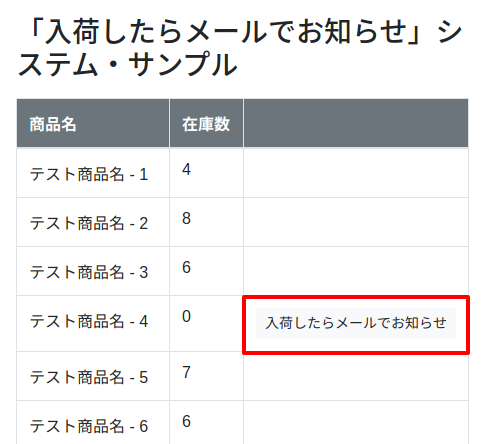
成功です😊✨
続いてメールが実際に送信されるかをチェックします。
ルートに以下のようなテストコードを追加してください。
/routes/web.php
Route::get('items/test', function(){

    $item = \App\Item::find(8); // 👈 該当する商品IDへ変更してください
    $item->stock = 20; // 20個入荷
    $item->save();

});
そして、もう一度「お知らせメール」を登録して「http:/*****/items/test」ににアクセスして実行すると・・・・
はい❗
こちらもうまくメール送信されました😉
教材ソースコードをダウンロードする
今回実際に開発した教材ソースコードを以下からダウンロードすることができます。
「入荷したらメールでお知らせ」機能をつくる※ただし、マイグレーションなどはご自身で実行していただく必要があります。
おわりに
ということで、今回はブックオフ・オンラインに影響されて「入荷したらメールでお知らせ」機能をつくってみました。
この機能を使えば、いち早く買いたいと思っている人にお知らせできますし、業務システムにも応用ができるんじゃないでしょうか。
ぜひ皆さんもチャレンジしてみてください。
ではでは〜❗

「そういえば、棚に
読んでない小説が眠ってました😉」