

九保すこひです(フリーランスのITコンサルタント、エンジニア)
さてさて、この間 Laravel + Livewire 3 で CRUD を実装してみる という記事を公開したのですが、その後とあることが気になっていました。
それは・・・・・・
他の JavaScript パッケージが一緒に使えるかどうか 🤔
です。
Livewire自体はとても完成された感があるテクノロジーだと感じているのですが、とはいえ、ある機能を作りたい場合はJavaScript界に存在する優秀なパッケージを一緒に使いたいと思うのは自然なことですよね。
そこで❗
今後の開発のためにも、Livewire 3と以下のパッケージが一緒に使えるかどうかを検証してみることにしました。
- Chart.js: グラフ
- FullCalendar: カレンダー
- DataTable: リスト表示
- CKEditor: テキストエディタ
- Leaflet: 地図
- Day.js: 日付・時間
- Sortable: ドラッグ・アンド・ドロップ
- Lodash: 各種便利機能
- SweetAlert2: ダイアログ
- node-qrcode: QRコード作成
ぜひ何かの参考になりましたら嬉しいです。😊✨
 「ええっ!
「ええっ!
英語の AR と ER の
発音て別なの❗❓」
開発環境: Laravel 10.x、Livewire 3
目次
前提として
今回使用するJSパッケージはnpmでインストールしてViteでビルドしてから使うものとします。(本番環境を意識しました👍)
そのため、各検証にはパッケージのインストールとViteの設定を追加しておきますので、ビルドして使用してください。
また、Livewire 3はフルページ・コンポーネントを使います。
そのため、レイアウト・ファイルには@vite()をセットしてから実施しています。
<!DOCTYPE html>
<html lang="{{ str_replace('_', '-', app()->getLocale()) }}">
<head>
    <meta charset="utf-8">
    <meta name="viewport" content="width=device-width, initial-scale=1.0">

    <title>{{ $title ?? config('app.name') }}</title>
    @vite(['resources/css/app.css', 'resources/js/app.js'])
</head>
<body class="p-5">

<!-- 省略 -->

</body>
</html>
また、Laravelインストール後のまっさらな状態ではTailwindCSSが入っていないので、ここもインストールしておきます。(おまけ:TailwindCSSをインストールするを参考にしてください)
※ 確かLaravel BreezeをインストールするとTailwindCSSが自動で入ってくるのでそっちでもOKかもしれません。
また、Livewireが操作された場合の挙動も調べたいのでコンポーネントをつくって以下のフォームを設置し、その下に今回チェックするJSパッケージをセットしていくことにします。
<div>

    @if (session('message'))
        <div class="bg-green-100 border border-green-400 text-green-700 px-4 py-3 rounded mb-3" role="alert">
            {{ session('message') }}
        </div>
    @endif

    <!-- フォーム -->
    <form wire:submit="save">
        <input wire:model="email" type="text" id="title" name="title" class="mt-1 p-2 w-full rounded border mb-5">
        <button type="submit" class="bg-green-600 text-white px-4 py-2 rounded">送信</button>
    </form>

    <hr class="my-5">

    <!-- ここに各 JS パッケージの HTML を記述する -->

    <!-- JavaScript -->
    <script>

        document.addEventListener('livewire:initialized', () => {

            // ここに各 JS パッケージのコードを記述する

        });

    </script>

</div>
ではひとつずつ見ていきましょう❗
Chart.js(グラフ)
まずは、JavaScriptでグラフを使う場合のデファクトスタンダードといっていいChart.jsです。
(コマンド)
npm i chart.js -D
resources/js/bootstrap.js
import Chart from 'chart.js/auto';
window.Chart = Chart;
(検証結果)
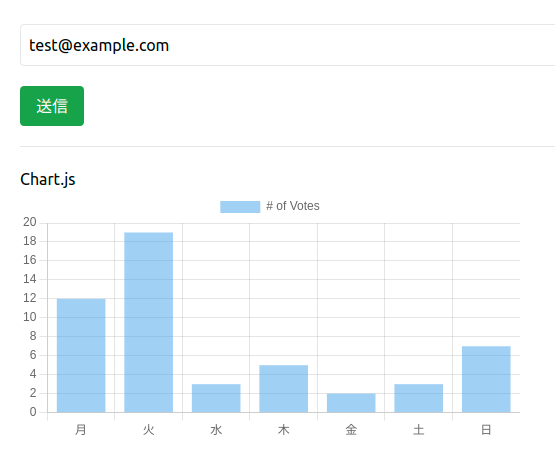
以下のコードでページ読み込み時にグラフを表示することができました。
<script>

    // Chart.js
    const renderChart = () => {

        const ctx = document.getElementById('myChart');
        new Chart(ctx, {
            type: 'bar',
            data: {
                labels: ['月', '火', '水', '木', '金', '土', '日'],
                datasets: [{
                    label: '# of Votes',
                    data: [12, 19, 3, 5, 2, 3, 7],
                }]
            },
        });

    };

    document.addEventListener('livewire:initialized', () => {

        renderChart();

    });

</script>
しかし、(他のパッケージもそうですが)再レンダリングしたら(フォーム送信したら)グラフが消えてしまうという現象がありました。
DOMが消えてしまうので当たり前と言えば当たり前なのですが、これを解消するためにはwire:ignoreでLivewireの管理から外しておく必要があります。
<canvas id="myChart" wire:ignore></canvas>
FullCalendar(カレンダー)
こちらも有名パッケージのFullCalendarです。
カレンダーをつくるときに助かってる開発者はきっとたくさんいると思います。
(コマンド)
npm install @fullcalendar/core -D
npm install @fullcalendar/daygrid -D
npm install @fullcalendar/timegrid -D
npm install @fullcalendar/list -D
resources/js/bootstrap.js
// FullCalendar
import { Calendar } from '@fullcalendar/core';
import dayGridPlugin from '@fullcalendar/daygrid';
import timeGridPlugin from '@fullcalendar/timegrid';
import listPlugin from '@fullcalendar/list';
import fullCalendarLocales from '@fullcalendar/core/locales-all';
window.Calendar = Calendar;
window.dayGridPlugin = dayGridPlugin;
window.timeGridPlugin = timeGridPlugin;
window.listPlugin = listPlugin;
window.fullCalendarLocales = fullCalendarLocales;
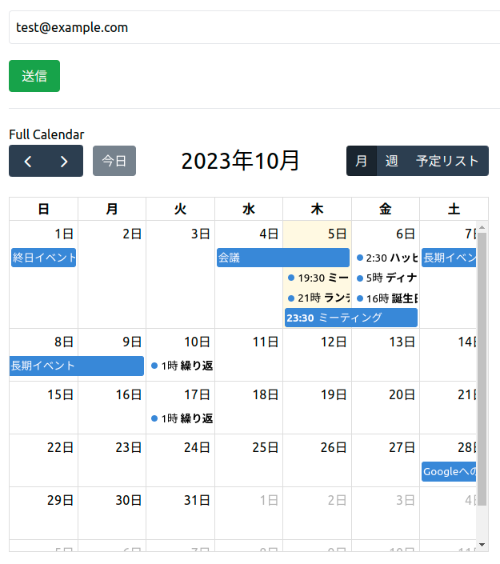
(検証結果)
以下のコードでうまく表示できるようでした。
// FullCalendar
const renderCalendar = () => {

    const el = document.getElementById('calendar');
    const calendar = new Calendar(el, {
        plugins: [dayGridPlugin, timeGridPlugin, listPlugin],
        initialView: 'dayGridMonth',
        headerToolbar: {
            left: 'prev,next today',
            center: 'title',
            right: 'dayGridMonth,timeGridWeek,listWeek'
        },
        locales: fullCalendarLocales,
        locale: 'ja',
        events: '/json/events.json'
    });
    calendar.render();

};

document.addEventListener('livewire:initialized', () => {

    renderCalendar();

});
ただし、やはりwire:ignoreは必要です。
<div id="calendar" style="width:600px;" wire:ignore></div>
なお、eventsは以下のJSONファイルをpublic/jsonに設置しました。(これは、本家のサンプルをChatGPTで日本語化したものです)
public/json/events.json
[
    {"title":"終日イベント","start":"2023-10-01"},
    {"title":"長期イベント","start":"2023-10-07","end":"2023-10-10"},
    {"groupId":"999","title":"繰り返しイベント","start":"2023-10-09T16:00:00+00:00"},
    {"groupId":"999","title":"繰り返しイベント","start":"2023-10-16T16:00:00+00:00"},
    {"title":"会議","start":"2023-10-04","end":"2023-10-06"},
    {"title":"ミーティング","start":"2023-10-05T10:30:00+00:00","end":"2023-10-05T12:30:00+00:00"},
    {"title":"ランチ","start":"2023-10-05T12:00:00+00:00"},
    {"title":"誕生日パーティー","start":"2023-10-06T07:00:00+00:00"},
    {"url":"http://google.com/","title":"Googleへのリンク","start":"2023-10-28"},
    {"title":"ミーティング","start":"2023-10-05T14:30:00+00:00"},
    {"title":"ハッピーアワー","start":"2023-10-05T17:30:00+00:00"},
    {"title":"ディナー","start":"2023-10-05T20:00:00+00:00"}
]
DataTable(リスト表示)
DataTableはウェブ上でデータテーブルを効率的に操作するためのものです。
私自身も過去にはよくお世話になりました。
(コマンド)
npm install datatables.net-dt -D
resources/js/bootstrap.js
// DataTables
import DataTable from 'datatables.net-dt';
window.DataTable = DataTable;
resources/css/app.css
@import 'datatables.net-dt/css/jquery.dataTables.css';
※ ご注意: @tailwindより上に記述する必要があります。(一番上にしておけば問題ありません)
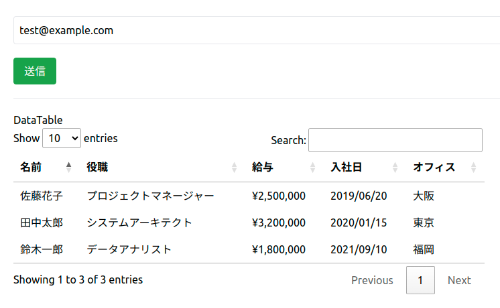
(検証結果)
これも以下のコードでうまくいきました!
// DataTable
const renderDataTable = () => {

    new DataTable('#myTable', {
        ajax: {
            url: '/json/staff.json',
            method: 'GET',
            dataSrc: 'data'
        },
        columns: [
            { data: 'name', title: '名前' },
            { data: 'position', title: '役職' },
            { data: 'salary', title: '給与' },
            { data: 'start_date', title: '入社日' },
            { data: 'office', title: 'オフィス' },
        ],
    });

};

document.addEventListener('livewire:initialized', () => {

    // DataTable
    renderDataTable();

});
ただし、気をつけないといけないのが、「wire:ignore」をつける場所です。
Chart.jsやFullCalendarは「本体」にセットしておけば問題ありませんでしたが、DataTableは以下のようにひとつ上の階層にセットしないとうまくいきませんでした。
<!-- 👇 wire:ignore はここ -->
<div style="width:700px;" wire:ignore>
    <!-- 👇 本体はここ -->
    <table id="myTable"></table>
</div>
なお、表示するデータはajaxで以下のJSONを読みにいくようにしました。
public/json/staff.json
{
    "data": [
        {
            "name": "田中太郎",
            "position": "システムアーキテクト",
            "salary": "¥3,200,000",
            "start_date": "2020/01/15",
            "office": "東京"
        },
        {
            "name": "佐藤花子",
            "position": "プロジェクトマネージャー",
            "salary": "¥2,500,000",
            "start_date": "2019/06/20",
            "office": "大阪"
        },
        {
            "name": "鈴木一郎",
            "position": "データアナリスト",
            "salary": "¥1,800,000",
            "start_date": "2021/09/10",
            "office": "福岡"
        }
    ]
}
ちなみに、DataTableは現在jQueryなしでも動くんですね👍
CKEditor 5(テキストエディタ)
文字を太字にしたり下線をつけたりできる、いわゆる「リッチエディタ」と呼ばれるものです。
※ なお、CKEditorをViteでビルドするのはまだ本格運用ではないようなのでお気をつけください。(2023.10.6 現在)詳しくは以下から。
📝 参考ページ: Integrating from source using Vite
(コマンド)
npm install @ckeditor/ckeditor5-theme-lark -D
npm install @ckeditor/ckeditor5-autoformat -D
npm install @ckeditor/ckeditor5-basic-styles -D
npm install @ckeditor/ckeditor5-block-quote -D
npm install @ckeditor/ckeditor5-editor-classic -D
npm install @ckeditor/ckeditor5-essentials -D
npm install @ckeditor/ckeditor5-heading -D
npm install @ckeditor/ckeditor5-link -D
npm install @ckeditor/ckeditor5-list -D
npm install @ckeditor/ckeditor5-paragraph -D
npm install @ckeditor/vite-plugin-ckeditor5 -D
vite.config.js
import { defineConfig } from 'vite';
import laravel from 'laravel-vite-plugin';

// 👇 以下を追加しました
import { createRequire } from 'node:module';
const require = createRequire( import.meta.url );
import ckeditor5 from '@ckeditor/vite-plugin-ckeditor5';

export default defineConfig({
    plugins: [
        laravel({
            input: ['resources/css/app.css', 'resources/js/app.js'],
            refresh: true,
        }),
        ckeditor5({theme: require.resolve('@ckeditor/ckeditor5-theme-lark')}) // 👈 ここを追加しました
    ],
    build: { chunkSizeWarningLimit: 1600, },
});
resources/js/bootstrap.js
// CKEditor
import { ClassicEditor as ClassicEditorBase } from '@ckeditor/ckeditor5-editor-classic';
import { Essentials } from '@ckeditor/ckeditor5-essentials';
import { Autoformat } from '@ckeditor/ckeditor5-autoformat';
import { Bold, Italic } from '@ckeditor/ckeditor5-basic-styles';
import { BlockQuote } from '@ckeditor/ckeditor5-block-quote';
import { Heading } from '@ckeditor/ckeditor5-heading';
import { Link } from '@ckeditor/ckeditor5-link';
import { List } from '@ckeditor/ckeditor5-list';
import { Paragraph } from '@ckeditor/ckeditor5-paragraph';

export default class ClassicEditor extends ClassicEditorBase {}

ClassicEditor.builtinPlugins = [
    Essentials,
    Autoformat,
    Bold,
    Italic,
    BlockQuote,
    Heading,
    Link,
    List,
    Paragraph
];

ClassicEditor.defaultConfig = {
    toolbar: {
        items: [
            'heading',
            '|',
            'bold',
            'italic',
            'link',
            'bulletedList',
            'numberedList',
            'blockQuote',
            'undo',
            'redo'
        ]
    },
    language: 'en'
};
window.ClassicEditor = ClassicEditor;
なお、もしビルドしたときに以下のような警告が出た場合は、
[vite:css] Nested CSS was detected, but CSS nesting has not been configured correctly.
Please enable a CSS nesting plugin *before* Tailwind in your configuration.
postcss.config.js に以下を記述してください。(どうやらプラグインが先に読み込まれていないといけないことが原因のようです)
postcss.config.js
export default {
  plugins: {
    'tailwindcss/nesting': {}, // 空のオブジェクトを追加しました
    tailwindcss: {},
    autoprefixer: {},
  },
}
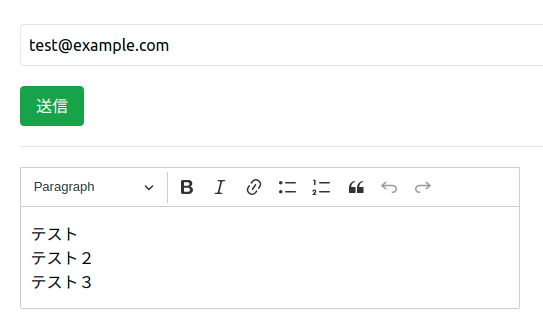
(検証結果)
CKEditorもうまく動作するようでした!
const renderCkeditor = () => {

    const el = document.querySelector('#editor');
    ClassicEditor.create(el);

};

document.addEventListener('livewire:initialized', () => {

    // CKEditor 5
    renderCkeditor();

});
やはりwire:ignoreを使うとほぼ干渉はしないようですね👍
ただし、DataTableと同じくwire:ignoreは外側につけないと再レンダリングのときにおかしくなってしまうようでした。
<div style="width:500px;" wire:ignore>
    <div id="editor">
        <p>テスト</p>
        <p>テスト2</p>
        <p>テスト3</p>
    </div>
</div>
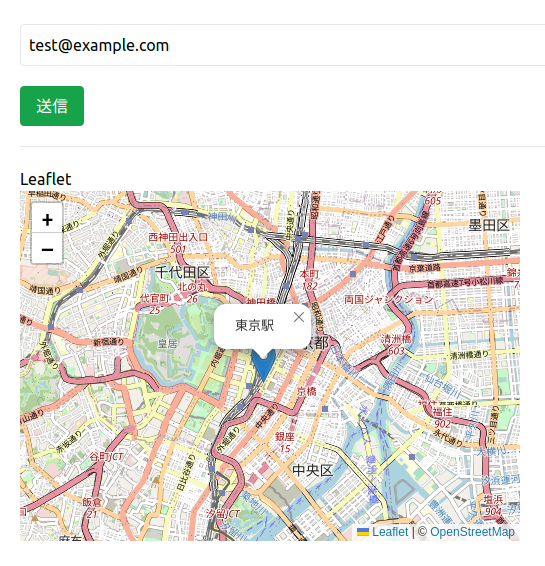
Leaflet(地図)
続いて、地図表示のパッケージLeafletです。
地図の埋め込みではGoogle Mapが最優先でしょうが、(無料で)いろいろな地図の操作ができるようにするにはLeaflet一択という印象です。
(コマンド)
npm install leaflet -D
resources/js/bootstrap.js
// Leaflet
import L from 'leaflet';
import 'leaflet/dist/leaflet.css';
import markerIcon from 'leaflet/dist/images/marker-icon.png';
window.markerIcon = markerIcon; // マーカーのアイコン
(検証結果)
以下のコードでうまく地図(マーカー付き)を表示することができました。
const renderLeaflet = () => {
const map = L.map('map').setView([35.680545109582106, 139.76822649218585], 13);
L.Marker.prototype.setIcon(L.icon({
iconUrl: markerIcon,
iconSize: [25, 41],
}))
L.tileLayer('https://tile.openstreetmap.org/{z}/{x}/{y}.png', {
maxZoom: 19,
attribution: '© <a href="http://www.openstreetmap.org/copyright">OpenStreetMap</a>'
}).addTo(map);
L.marker([35.6812, 139.7671]).addTo(map)
.bindPopup('東京駅')
.openPopup();
};
document.addEventListener('livewire:initialized', () => {
// leaflet
renderLeaflet();
});
※ iconSizeは必ずセットしてください。ズームしたときに位置がずれてしまうので。
ただし、こちらもwire:ignoreは必須ですが、本体にセットして問題ありませんでした。
<div id="map" style="width:500px;height:350px;" wire:ignore></div>
Day.js(日付・時間)
次に日付&時間の管理をするDay.jsです。
少し前まではmoment.jsが有名でしたが、すでに開発が終了しているためDay.jsを選びました。(個人的にはLuxonの方が直感的で好きですが、Day.jsの方が人気があるっぽいです😢)
(コマンド)
npm install dayjs -D
resources/js/bootstrap.js
// Day.js
import dayjs from 'dayjs';
import 'dayjs/locale/ja'; // 日本語化プラグイン
dayjs.locale('ja');
window.dayjs = dayjs;
(検証結果)
以下のコードでpublic $emailの中身を(ちょっとおかしいですが)日付に入れ替えることができました!
<button type="button" class="bg-green-600 text-white px-4 py-2 rounded" @click="onClick">
    クリックテスト
</button>
const onClick = () => {

    @this.email = dayjs().format('YYYY/MM/DD(ddd) HH:mm:ss');

};
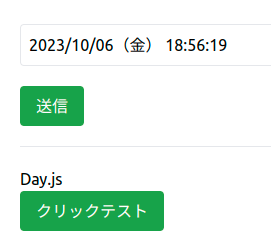
ちなみに、@thisは、自動的に以下のようなコードに入れ替えてくれるようです👍
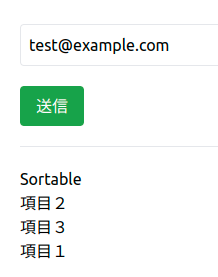
Sortable(ドラッグ・アンド・ドロップ)
直感的に要素をドラッグ・アンド・ドロップして移動するといった機能を簡単に実装することができるパッケージです。
(コマンド)
npm install sortablejs -D
resources/js/bootstrap.js
// Sortable
import Sortable from 'sortablejs';
window.Sortable = Sortable;
(検証結果)
これも問題なく動きました!
ただ、やはりwire:ignoreがないと再レンダリングのタイミングで初期状態にもどってしまうようでした。
<ul id="sortable-items" wire:ignore>
    <li>項目1</li>
    <li>項目2</li>
    <li>項目3</li>
</ul>
const initSortable = () => {
const el = document.getElementById('sortable-items');
Sortable.create(el, {
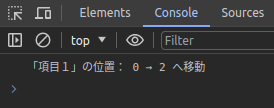
onEnd(e) {
const el = e.item;
const oldIndex = e.oldIndex;
const newIndex = e.newIndex;
console.log(`「${el.textContent}」の位置: ${oldIndex} → ${newIndex} へ移動`);
}
});
};
document.addEventListener('livewire:initialized', () => {
// Sortable
initSortable();
});
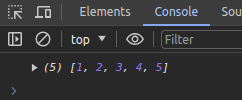
なお、ドラッグ・アンド・ドロップしたときのコンソールは以下のとおりです。
Lodash(各種便利機能)
次に、Lodashですが、これはひとつの機能ではなくいろいろな機能があるパッケージになっています。
例えば、「ある配列の重複をなくす」というような機能です。
(コマンド)
npm install lodash -D
resources/js/bootstrap.js
// Lodash
import _ from 'lodash';
window._ = _;
(検証結果)
Lodashも直接見える部分での影響はありませんので、クリックして実行できるかをチェックし、結果うまくいきました!
const onClick = () => {

    const numbers = [1, 2, 3, 4, 5, 1, 3, 4];
    const uniqNumbers = _.uniq(numbers);

    console.log(uniqNumbers);

};
npm install qrcode -DSweetAlert 2
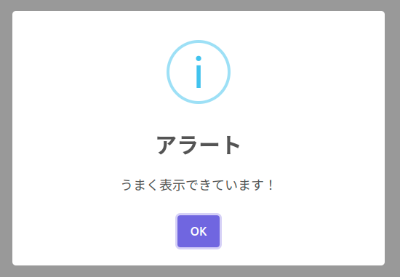
おしゃれなダイアログを実装できるパッケージです。
(インストール)
npm install sweetalert2 -D
resources/js/bootstrap.js
// SweetAlert2
import Swal from 'sweetalert2';
window.Swal = Swal;
(検証結果)
SweetAlert 2はwire:ignoreなしでも問題なく動くようでした。
const onClick = () => {

    Swal.fire({
        title: 'アラート',
        text: 'うまく表示できています!',
        icon: 'info',
    });

};
node-qrcode(QR コード作成)
パッケージ名にnodeとついていますが、ブラウザでも使えます。
(コマンド)
npm install qrcode -D
resources/js/bootstrap.js
// node-qrcode
import QRCode from 'qrcode'
window.QRCode = QRCode;
(検証結果)
これも以下のコードでうまくいきました!
ただしやはりDOMに影響するので、wire:ignoreは必要でした。
const onClick = () => {

    // node-qrcode
    const canvas = document.getElementById('qrcode-canvas');
    const text = 'https://blog.capilano-fw.com/';

    QRCode.toCanvas(canvas, text, function (error) {

        if (error) console.error(error)
        console.log('success!');

    });

};
<canvas id="qrcode-canvas" wire:ignore></canvas>
おまけ:TailwindCSS をインストールする
まず、以下のコマンドでTailwindCSSをインストールします。
npm install -D tailwindcss postcss autoprefixer
そして、初期化します。
npx tailwindcss init -p
すると、以下2ファイルが作成されます。
- tailwind.config.js
- postcss.config.js
次に作成したコンフィグファイルを変更します。(太字部分を追加しました)
tailwind.config.js
/** @type {import('tailwindcss').Config} */
export default {
  content: [
      "./resources/**/*.blade.php",
      "./resources/**/*.js",
      "./resources/**/*.vue",
  ],
  theme: {
    extend: {},
  },
  plugins: [],
}
そして、各パッケージをインストールしたら、以下のコマンドでビルドすればOKです。
npm run build
企業様へのご提案
今回の検証ではLivewire 3と他のパッケージを併用してもそれほど影響はないことがわかりました。
もちろん、より複雑な実装を進めていくと何か影響が出てくることも考えられますが、その場合は該当ページのみLivewireではなくVueやReactなどでページを作成することもできます。
もしLivewireを使った開発をお考えでしたら、いつでもお気軽にお問い合わせください。
お待ちしております。😊✨
おわりに
ということで、今回はいつもと違って「検証」をメインに記事を作成してみました。
ちなみに、Livewire 3との連携は記事の通り「予想より併用できる」ようでしたが、ちょっとだけ苦労したのが「Vite を使ったビルド」です。
というのもresources/js/bootstrap.jsにどうやって書くかはたまにトリッキーなところがあったりする(特にCKEditor…😫)ので、少し時間がかかることもありました。
とはいえ、Livewire 3とCDNを利用したパッケージの併用もできるのでシンプルに楽に導入すれば開発も学習コストを低くしたままにしておけるんじゃないでしょうか。
ということで、ぜひみなさんもLivewire 3プラスアルファで遊んでみてくださいね。
ではでは〜❗
 「最近買ったボトム、
モコモコすぎて
自転車のチェーンで真っ黒…😫」