
九保すこひです(フリーランスのITコンサルタント、エンジニア)
さてさて、前回投稿した「旅行先から自宅パソコンを操作する完全攻略!」という記事を公開しましたが、その過程で1つのことを知りました。
それは・・・・・・
SwitchbotはAPIがある(つまり、ウェブから指ロボットを動かせる)
ってことです。
正直なところ、前回は個人的にリモートデスクトップ使ったのですが、もし会社などグループで使う場合は、たとえばリモートで、
- Aさんは1番目のパソコンを使える
- Bさんは2番目と3番目
- Cさんは全部使える
といった具合に権限を与えるような使い方になると思います。
しかし、アプリから起動する場合は権限が1人だけにある状況。
すると、毎回「●●さん、すいません!1番目のパソコンを起動してください😂」みたいな連絡をしないといけないので、仕事上めんどくさいですね。
そこで!
今回は各ユーザーに権限を与えて、その人たちがウェブ上からSwitchbot(指ロボット)を起動する方法をまとめてみました!
つまり、この記事は次のような人のために書いています。
- 会社(グループ)でリモートデスクトップを使いたい
- Switchbotをウェブ上から使いたい
- 管理者が指ロボットの権限を変更したい
- 出先からサーバールームの物理スイッチを切り替えたい
- Laravelアプリと物理デバイスを連動させたい
- DIYでリモートデスクトップを整備したい
- IoTに興味があり、物理的なデバイスをLaravelと連携させてみたい
- 冒頭の動画みたいなことがやりたい
ぜひ最後まで読んでくださいね!

「ワーケーションで食べた一鶴の
ひな鳥、ガッチでうまかった!!!」
開発環境: Laravel 12.x、Vue 3(Inertia)
ご注意点
今回は「Switchbotをウェブから操作する」機能にフォーカスしているので、通常の開発でつくるべきroleやミドルウェアをつかったアクセス制限は省略しています。
また、APIリソースで「公開しても問題ないデータ」だけをフロントに渡すべきですが、ここも省略しています。
ご注意ください🙇
事前準備をする
Switchbotのトークン(アクセス&シークレット)を取得する
Switchbot APIにアクセスするには、
- アクセストークン
- シークレットトークン
の2つが必要になります。
これらはアプリから取得できます。
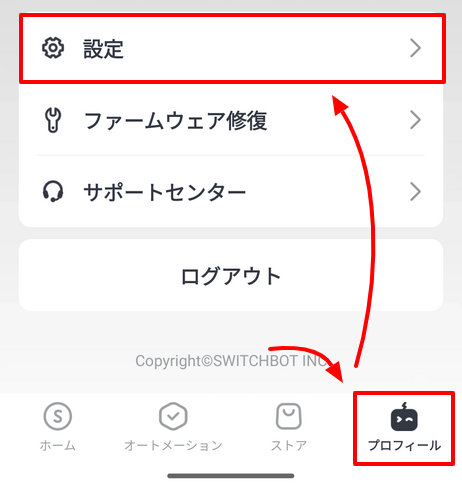
まず画面下にある「プロフィール > 設定」を選択します。
「基本データ」を選択。

「アプリバージョン」という項目が表示されるので、ここを10回ぐらいタッチします。
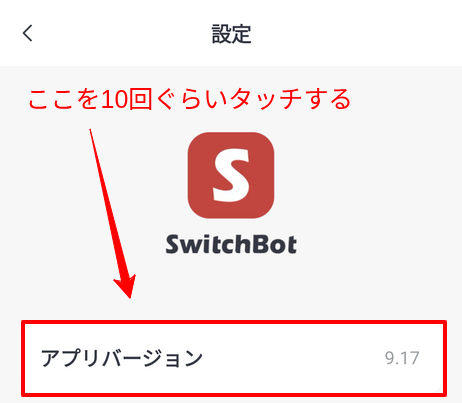
すると、開発者向けオプションが表示されます。
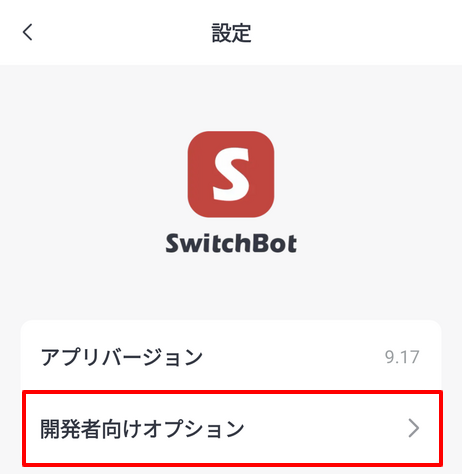
そして、ここを選択すると2つのトークンが表示されます。

それぞれ、右側にあるコピーボタンをクリックしてGoogle Keepなどに貼り付けてパソコンの方へ移動するといいでしょう。
トークンが取得できたら、Laravelの.envファイルに登録しておきます。
SWITCHBOT_ACCESS_TOKEN=********************************************
SWITCHBOT_SECRET_TOKEN=***************************
また、Laravelがコンフィグからこれらのトークンにアクセスできるようにしておきましょう。
config/services.php
<?php

return [

    // 省略

    'switchbot' => [
        'access_token' => env('SWITCHBOT_ACCESS_TOKEN'),
        'secret_token' => env('SWITCHBOT_SECRET_TOKEN'),
    ],

];
SwitchbotのデバイスIDを取得する
次に「デバイスID」と呼ばれる、動かしたい機械のユニークIDが必要です。
そして、デバイスIDはAPIを通して取得することもできますが、こちらもアプリから手っ取り早く取得できるので方法を紹介します。
アプリに指ロボットを登録すると、ホーム画面に表示されるので、該当するものを選択します。

「デバイス情報」を選択。
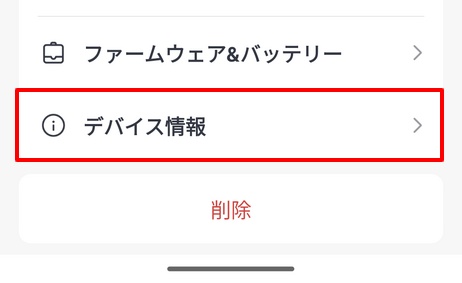
すると、BLE MACという項目があります。
これが「デバイスID」になります。
※実際にコードで使う場合はコロンを除去する必要があります。
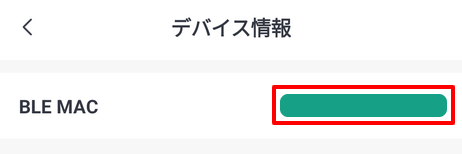
このIDは後で使うので、控えておいてください。
テストユーザーをつくる
すでにusersテーブルは存在しているので、先にテストデータを追加しておきます。
以下のコマンドを実行してください。
php artisan make:seed UserSeeder
ファイルが作成されるので、中身を次のようにします。
<?php

namespace Database\Seeders;

use App\Models\User;
use Illuminate\Database\Console\Seeds\WithoutModelEvents;
use Illuminate\Database\Seeder;

class UserSeeder extends Seeder
{
    /**
     * Run the database seeds.
     */
    public function run(): void
    {
        $userItems = [
            ['email' => 'taro.yamada@example.com', 'name' => '山田太郎'],
            ['email' => 'jiro.sato@example.com', 'name' => '佐藤二郎'],
            ['email' => 'saburo.tanaka@example.com', 'name' => '田中三郎'],
        ];

        foreach ($userItems as $userItem) {

            $user = new User();
            $user->email = $userItem['email'];
            $user->name = $userItem['name'];
            $user->password = bcrypt('xxxxxxxx');
            $user->save();

        }
    }
}
DBまわりをつくる
次に、モデルとマイグレーションをつくります。
必要なのは、以下2つ。
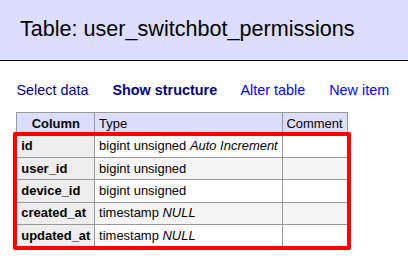
- user_switchbot_permissions:ユーザーのアクセス権限を管理
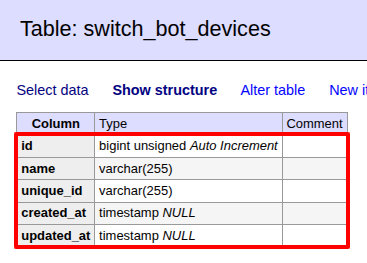
- switchbot_devices:Switchbotデバイス(指ロボットとか)の管理
では以下のコマンド2つを実行してください。
php artisan make:model SwitchBotDevice -ms
php artisan make:model UserSwitchbotPermision -ms
すると、合計6ファイルが作成されます。
それぞれ必要なものを変更していきましょう。
モデル
app/Models/SwitchBotDevice.php
<?php

namespace App\Models;

use Illuminate\Database\Eloquent\Model;

class SwitchBotDevice extends Model
{
    public function turnOnSwitchBotDevice() // SwitchBotデバイスをオンにする
    {
        $deviceId = str_replace(':', '', $this->unique_id); // コロンを除去
        $token = config('services.switchbot.access_token');
        $secret = config('services.switchbot.secret_token');

        $nonce = $this->guidv4();
        $t = time() * 1000;
        $data = mb_convert_encoding($token . $t . $nonce, 'UTF-8');
        $sign = hash_hmac('sha256', $data, $secret, true);
        $sign = strtoupper(base64_encode($sign));

        $url = 'https://api.switch-bot.com/v1.1/devices/'. $deviceId .'/commands';
        $payload = [
            'command' => 'turnOn',
            'parameter' => 'default',
            'commandType' => 'command',
        ];
        $headers = [
            'Content-Type: application/json; charset=utf8',
            'Authorization: '. $token,
            'sign: '. $sign,
            'nonce: '. $nonce,
            't: '. $t,
        ];

        $ch = curl_init($url);
        curl_setopt($ch, CURLOPT_POST, true);
        curl_setopt($ch, CURLOPT_HTTPHEADER, $headers);
        curl_setopt($ch, CURLOPT_POSTFIELDS, json_encode($payload));
        curl_setopt($ch, CURLOPT_RETURNTRANSFER, true);

        $response = curl_exec($ch);
        curl_close($ch);

        echo $response;
    }

    private function guidv4($data = null)
    {
        $data = $data ?? random_bytes(16);
        assert(strlen($data) == 16);
        $data[6] = chr(ord($data[6]) & 0x0f | 0x40);
        $data[8] = chr(ord($data[8]) & 0x3f | 0x80);

        return vsprintf('%s%s-%s-%s-%s-%s%s%s', str_split(bin2hex($data), 4));
    }
}
app/Models/UserSwitchbotPermission.php
<?php

namespace App\Models;

use Illuminate\Database\Eloquent\Model;

class UserSwitchbotPermission extends Model
{
    // Relationship
    public function device()
    {
        return $this->belongsTo(SwitchBotDevice::class, 'device_id', 'id');
    }
}
Seeder
database/seeders/UserSwitchbotPermissionSeeder.php
<?php

namespace Database\Seeders;

use App\Models\SwitchBotDevice;
use App\Models\User;
use App\Models\UserSwitchbotPermission;
use Illuminate\Database\Console\Seeds\WithoutModelEvents;
use Illuminate\Database\Seeder;

class UserSwitchbotPermissionSeeder extends Seeder
{
    /**
     * Run the database seeds.
     */
    public function run(): void
    {
        $users = User::get();
        $switchbotDevices = SwitchBotDevice::get();

        foreach ($users as $user) {

            $permission = new UserSwitchbotPermission();
            $permission->user_id = $user->id;
            $permission->device_id = $switchbotDevices->random()->id;
            $permission->save();

        }
    }
}
database/seeders/SwitchBotDeviceSeeder.php
ここで先ほど取得した「デバイスID」をつかいます(unique_idにセットします)
コード内にあるXX:XX:XX:XX:XX:XXの部分を、ご自身のデバイスIDに変更してください。
<?php

namespace Database\Seeders;

use App\Models\SwitchBotDevice;
use Illuminate\Database\Console\Seeds\WithoutModelEvents;
use Illuminate\Database\Seeder;

class SwitchBotDeviceSeeder extends Seeder
{
    /**
     * Run the database seeds.
     */
    public function run(): void
    {
        $devices = [
            ['name' => '指ロボット1', 'unique_id' => 'XX:XX:XX:XX:XX:XX'],
            ['name' => '指ロボット2', 'unique_id' => 'XX:XX:XX:XX:XX:XX'],
            ['name' => '指ロボット3', 'unique_id' => 'XX:XX:XX:XX:XX:XX'],
        ];

        foreach ($devices as $device) {

            $switchBotDevice = new SwitchBotDevice();
            $switchBotDevice->name = $device['name'];
            $switchBotDevice->unique_id = $device['unique_id'];
            $switchBotDevice->save();

        }
    }
}
※XX:XX:XX:XX:XX:XXの部分は重複しないようにしてください(意味がないので)
マイグレーション
database/migrations/****_**_**_******_create_user_switchbot_permissions_table.php
<?php

use Illuminate\Database\Migrations\Migration;
use Illuminate\Database\Schema\Blueprint;
use Illuminate\Support\Facades\Schema;

return new class extends Migration
{
    /**
     * Run the migrations.
     */
    public function up(): void
    {
        Schema::create('user_switchbot_permissions', function (Blueprint $table) {
            $table->id();
            $table->unsignedBigInteger('user_id');
            $table->unsignedBigInteger('device_id');
            $table->timestamps();

            $table->foreign('user_id')->references('id')->on('users');
            $table->foreign('device_id')->references('id')->on('switch_bot_devices');
        });
    }

    /**
     * Reverse the migrations.
     */
    public function down(): void
    {
        Schema::dropIfExists('user_switchbot_permissions');
    }
};
database/migrations/****_**_**_******_create_switch_bot_devices_table.php
<?php

use Illuminate\Database\Migrations\Migration;
use Illuminate\Database\Schema\Blueprint;
use Illuminate\Support\Facades\Schema;

return new class extends Migration
{
    /**
     * Run the migrations.
     */
    public function up(): void
    {
        Schema::create('switch_bot_devices', function (Blueprint $table) {
            $table->id();
            $table->string('name');
            $table->string('unique_id')->unique();
            $table->timestamps();
        });
    }

    /**
     * Reverse the migrations.
     */
    public function down(): void
    {
        Schema::dropIfExists('switch_bot_devices');
    }
};
では、この状態でDBを初期化しておきます。
以下のコマンドを実行してください。
php artisan migrate:fresh --seed
実際のテーブルはこうなりました。
リレーションシップを追加する
Userモデルにリレーションシップが必要になります。
追加しておいてください。
app/Models/User.php
<?php

namespace App\Models;

/* ここは省略してます */

class User extends Authenticatable
{
    /* ここは省略してます */

    // Relationship
    public function switchbotPermissions()
    {
        return $this->hasMany(UserSwitchbotPermission::class, 'user_id', 'id');
    }
}
Switchbotの権限を付与/解除する機能をつくる
コントローラーをつくる
では、まずコントローラをつくります。
以下のコマンドを実行してください。
php artisan make:controller SwitchBotPermissionController
するとファイルが作成されるので、中身を次のようにします。
app/Http/Controllers/SwitchBotPermissionController.php
<?php

namespace App\Http\Controllers;

use App\Models\SwitchBotDevice;
use App\Models\User;
use App\Models\UserSwitchbotPermission;
use Illuminate\Http\Request;
use Inertia\Inertia;

class SwitchBotPermissionController extends Controller
{
    public function index()
    {
        $users = User::query()
            ->with('switchbotPermissions') // Userモデルに定義されたリレーション名
            ->get();
        $switchbotDevices = SwitchBotDevice::get();

        return Inertia::render('SwitchBot/Permission/Index', [
            'users' => $users,
            'switchbotDevices' => $switchbotDevices,
        ]);
    }

    public function store(Request $request)
    {
        /*** バリデーションは省略しています ***/

        $result = false;
        $userId = $request->input('userId');
        $deviceId = $request->input('deviceId');
        $hasPermission = $request->input('hasPermission');

        if($hasPermission === true) { // 権限を付与

            $permission = new UserSwitchbotPermission();
            $permission->user_id = $userId;
            $permission->device_id = $deviceId;
            $result = $permission->save();

        } else { // 権限を解除

            $result = UserSwitchbotPermission::where('user_id', $userId)
                ->where('device_id', $deviceId)
                ->first()
                ->delete();

        }

        return ['result' => $result];
    }
}
こちらは権限を付与/解除する機能です。
app/Http/Controllers/SwitchBotDeviceController.php
<?php

namespace App\Http\Controllers;

use App\Models\SwitchBotDevice;
use Illuminate\Http\Request;
use Inertia\Inertia;

class SwitchBotDeviceController extends Controller
{
    public function index(Request $request)
    {
        $user = $request->user();
        $user->load([
            'switchbotPermissions' => function ($query) {

                $query->orderBy('device_id'); // デバイスIDでソート

            },
            'switchbotPermissions.device',
        ]);

        return Inertia::render('SwitchBot/Device/Index', [
            'switchbotPermissions' => $user->switchbotPermissions,
        ]);
    }

    public function run(Request $request)
    {
        /*** バリデーション(本人確認)は省略しています ***/

        $deviceId = $request->input('deviceId');
        $switchBotDevice = SwitchBotDevice::find($deviceId);

        if(! is_null($switchBotDevice)) {

            $switchBotDevice->turnOnSwitchBotDevice();

        }
    }
}
こちらは、指ロボットを起動する機能です。
ビューをつくる
次にVue 3のビューをつくります。
resources/js/Pages/SwitchBot/Permission/Index.vue
<script setup lang="ts">
import axios from 'axios';
import { ref } from 'vue';

interface User {
    id: number;
    name: string;
    email: string;
    switchbot_permissions: SwitchBotPermission[];
}
interface SwitchBotPermission {
    userId: number;
    device_id: number;
}
interface SwitchBotDevice {
    id: number;
    name: string;
    unique_id: string;
}
const props = defineProps<{
    users: User[];
    switchbotDevices: SwitchBotDevice[];
}>();

// 権限の変更
const isSaved = ref(false);
const onSwitchBotPermissionChange = (
    e: Event,
    userId: number,
    deviceId: number,
) => {
    const target = e.target as HTMLInputElement;
    const hasPermission = target.checked;

    // Ajaxで権限変更
    const url = route('switchbot.permission.store');
    const params = {
        userId,
        deviceId,
        hasPermission,
    };
    axios
        .post(url, params)
        .then(() => {
            isSaved.value = true;
            setTimeout(() => {
                isSaved.value = false;
            }, 2000);
        })
        .catch((error) => {
            console.error(error);
        });
};

// 権限があるかどうか
const hasPermission = (userId: number, deviceId: number): boolean => {
    const targetUser = props.users.find((user) => user.id === userId);
    if (targetUser) {
        const switchBotPermissions = targetUser.switchbot_permissions;
        const checkingDeviceIds = switchBotPermissions.map(
            (permission) => permission.device_id,
        );
        return checkingDeviceIds.includes(deviceId);
    }
    return false;
};
</script>

<template>
    <div class="p-5">
        <div class="absolute bottom-5 left-5 text-green-600" v-if="isSaved">
            ✅ 保存が完了しました!
        </div>
        <h1 class="mb-3 font-bold">SwitchBot・ユーザー権限</h1>
        <div class="flex gap-3">
            <div
                v-for="user in users"
                :key="user.id"
                class="mb-4 w-64 rounded-lg bg-gray-100 p-4"
            >
                <h2 class="mb-1 text-lg font-semibold">{{ user.name }}</h2>
                <p class="mb-6 text-sm text-gray-600">{{ user.email }}</p>
                <div
                    v-for="device in switchbotDevices"
                    :key="device.id"
                    class="mb-0.5"
                >
                    <label class="inline-flex items-center">
                        <input
                            type="checkbox"
                            class="text-blue00 form-checkbox h-5 w-5"
                            :checked="hasPermission(user.id, device.id)"
                            @change="
                                onSwitchBotPermissionChange(
                                    $event,
                                    user.id,
                                    device.id,
                                )
                            "
                        />
                        <span class="ml-2 text-gray-700">{{ device.name }}</span>
                    </label>
                </div>
            </div>
        </div>
    </div>
</template>
resources/js/Pages/SwitchBot/Device/Index.vue
<script setup lang="ts">
import { ref } from 'vue';
import axios from 'axios';

interface SwitchBotPermission {
    id: number;
    user_id: number;
    device_id: number;
    device: {
        id: number;
        name: string;
        unique_id: string;
    };
}
defineProps<{
    switchbotPermissions: SwitchBotPermission[];
}>();

// Switchbotを起動する
const isRunning = ref(false);
const onSwitchBotButtonClick = (permission: SwitchBotPermission) => {
    const url = route('switchbot.device.run');
    const params = {
        deviceId: permission.device_id,
    };
    axios
        .post(url, params)
        .then(() => {
            isRunning.value = true;
            setTimeout(() => {
                isRunning.value = false;
            }, 2000);
        })
        .catch((error) => {
            console.error(error);
        });
};
</script>

<template>
    <div class="p-5">
        <div class="absolute bottom-5 left-5 text-green-600" v-if="isRunning">
            🏃 起動中です...
        </div>
        <h1 class="mb-3 font-bold">SwitchBot・ウェブから起動</h1>
        <div class="flex gap-3">
            <div
                v-for="permission in switchbotPermissions"
                :key="permission.id"
                class="mb-4 w-56 rounded-lg bg-gray-100 p-4"
            >
                <h2 class="mb-3 text-lg font-bold">
                    {{ permission.device.name }}
                </h2>
                <button
                    type="button"
                    class="w-full rounded bg-blue-600 px-4 py-2 font-semibold text-white text-sm hover:bg-blue-600"
                    @click="onSwitchBotButtonClick(permission)">
                    起動する
                </button>
            </div>
        </div>
    </div>
</template>
これで作業は完了です!
以下のコマンドを実行してビルドおきましょう。
npm run build
テストしてみる
では実際にテストしてみましょう!
まずは権限の付与/解除するページです。
https://******/switchbot/permissionにアクセスしてみましょう。
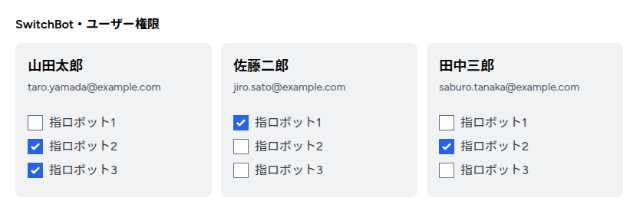
はい!
各ユーザーにデバイスのOn/Offができるフォームが表示されています。
では、チェックが外れているところをクリックしてみましょう。
どうなるでしょうか・・・・・・
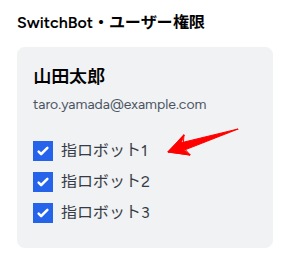
はい!
チェックが入りました。
しかもリロードしてもチェックは変わりません。
成功です😊
では、次は本題の指ロボットを起動する部分です。
これは動画でご覧ください!
はい!
ウェブ上から指ロボットを起動できました。
すべて成功です😊✨
企業様へのご提案
今回のテクニックを使えば、グループ内でリモートワークを効率的に実施することができますし、出張の際もちょっとした設定をするだけで完了させることができます。
もしお手伝いできることがありましたら、お気軽にお問い合わせください。
お待ちしてます😊✨
おわりに
ということで、今回はSwitchbotをウェブ上から動かしてみました。
そもそもSwitchbotはガジェットなので、まさかAPIで様々なことができるとは思いませんでした。
これって、アイデア次第でしっかり仕事にも応用できる機能ですよね。
もし今後「あー、これ指ロボットつかえるわ」みたいな状況になったら、また別の記事を書いてみたいと思います。
ぜひお楽しみに。
ではでは〜!

「行ったのは香川県ですが、
徳島ラーメン、2回行きました(笑)」