
九保すこひです(フリーランスのITコンサルタント、エンジニア)
さてさて、これは個人的には「え、そこまでするんだ…😅」という気持ちになってしまったのですが、ある「グループ内で利用されると言われる」機能があります。
それが・・・・・・
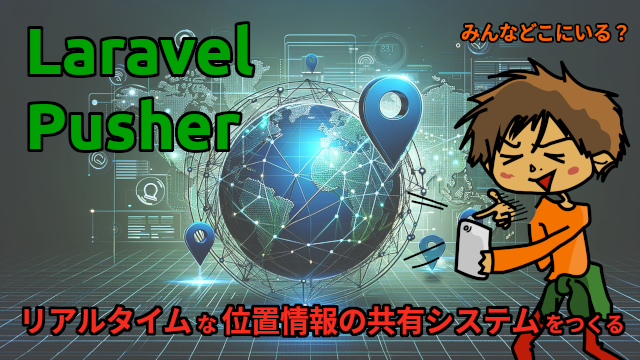
位置情報の共有システム
です。
つまり、特定のグループやカップル間で「あ、今 Aさんは駅にいるな」というのが分かるシステムです。
個人的には(やましいことはしてませんが❗)自分の位置情報を誰かとシェアされるのは窮屈なイメージですが、災害時を想定したものもあるようで使い方次第なのかなという印象でした。
そこで❗
今回は「Laravel + Alpine.js」を使ってこの「リアルタイムな位置情報の共有システム」をつくってみたいと思います。
ぜひ何かの参考になりましたら嬉しいです。😄✨
 「ファミコンミニの未使用・新品が
プレミアがついて
50,000円 で売られてました 😯」
開発環境: Laravel 10.x、Alpine.js
目次
前提として
ブラウザで位置情報を取得するにはローカル環境であってもhttps接続が必要です。(ちなみに、self.crypto.randomUUID() もです)
先に環境を整えてから実行してください。😄👍
また、リアルタイムに対応するために Pusher を利用します。
こちらも(ちょっと古い記事ですが)以下のページを参考にしてPusherにアクセスするために必要なキーを取得しておいてください。
📝 参考ページ: リアルタイムに更新する部分をつくる
パッケージをインストールする
まずは今回必要になる以下のパッケージを先にインストールしておきます。
composer require pusher/pusher-php-server
npm install --save-dev laravel-echo pusher-js leaflet
Laravel Echo が使えるようにする
PusherはLaravel Echoを使ってアクセスするのですが、初期状態では有効になっていないので、有効にしていきましょう。
まず、Pusherでチャンネルを作ったら.envの以下の部分を変更します。
.env
BROADCAST_DRIVER=pusher

// 省略

PUSHER_APP_ID=*******************
PUSHER_APP_KEY=*******************
PUSHER_APP_SECRET=*******************

// 省略

PUSHER_APP_CLUSTER=ap3
Laravel Echoの「すでにコードは存在しているけど、コメントアウトされている部分」のコメントを解除します。
resources/js/bootstrap.js
// 以下のコードは初期状態でコメントアウトされてますが解除します

import Echo from 'laravel-echo';

import Pusher from 'pusher-js';
window.Pusher = Pusher;

window.Echo = new Echo({
    broadcaster: 'pusher',
    key: import.meta.env.VITE_PUSHER_APP_KEY,
    cluster: import.meta.env.VITE_PUSHER_APP_CLUSTER ?? 'mt1',
    wsHost: import.meta.env.VITE_PUSHER_HOST ? import.meta.env.VITE_PUSHER_HOST : `ws-${import.meta.env.VITE_PUSHER_APP_CLUSTER}.pusher.com`,
    wsPort: import.meta.env.VITE_PUSHER_PORT ?? 80,
    wssPort: import.meta.env.VITE_PUSHER_PORT ?? 443,
    forceTLS: (import.meta.env.VITE_PUSHER_SCHEME ?? 'https') === 'https',
    enabledTransports: ['ws', 'wss'],
    authEndpoint: '/user_location/auth', // 👈 独自のエンドポイントを追加しました
});
※ ちなみに、今回は記事が複雑になりすぎてしまうと思ったので、独自の認証用エンドポイントを追加して1つのコントローラー内で完結できるようにしています。
なお、認証用のエンドポイントはCSRFトークンのチェックを外しておきます。
app/Http/Middleware/VerifyCsrfToken.php
<?php

namespace App\Http\Middleware;

use Illuminate\Foundation\Http\Middleware\VerifyCsrfToken as Middleware;

class VerifyCsrfToken extends Middleware
{
    /**
     * The URIs that should be excluded from CSRF verification.
     *
     * @var array<int, string>
     */
    protected $except = [
        'user_location/auth', // 👈 ここを追加しました
    ];
}
Leaflet が使えるようにする
Leafletは地図のためのライブラリですが、これもインストールするだけでは有効にはなっていないので、先ほどのLaravel Echoの下あたりに以下のコードを追加します。
resources/js/bootstrap.js
// 省略

// 地図
import L from 'leaflet';
import 'leaflet/dist/leaflet.css';
import markerIcon from 'leaflet/dist/images/marker-icon.png';
window.markerIcon = markerIcon;
ビルドする
では、準備が整いましたので、以下のコマンドを実行してビルドしましょう。
npm run build
これで以下をblade内にセットすれば自動的にビルドしたjsやcssにアクセスできるようになり、先ほどのLaravel EchoやLeafletだけでなく、axiosやAlpine.jsも使えるようになります。
@vite(['resources/css/app.css', 'resources/js/app.js'])
モデル&マイグレーションをつくる
では、データベース周りをつくります。
以下のコマンドを実行してください。
php artisan make:model UserLocation -m
すると2ファイルが作成されるので、中身を以下のようにします。
app/Models/UserLocation.php
<?php

namespace App\Models;

use Illuminate\Database\Eloquent\Factories\HasFactory;
use Illuminate\Database\Eloquent\Model;
use Illuminate\Support\Str;

class UserLocation extends Model
{
    use HasFactory;

    protected $fillable = [
        'uuid',
        'name',
        'latitude',
        'longitude',
    ];

    // Accessor
    public function getNameAttribute($value)
    {
        return (Str::length($value) === 0) ? '名前なし' : $value;
    }
}
database/migrations/****_**_**_******_create_user_locations_table.php
// 省略

public function up(): void
{
    Schema::create('user_locations', function (Blueprint $table) {
        $table->id();
        $table->uuid('uuid')->unique()->comment('UUID');
        $table->string('name')->nullable()->comment('名前');
        $table->decimal('latitude', 10, 7)->comment('緯度');
        $table->decimal('longitude', 10, 7)->comment('経度');
        $table->timestamps();
    });
}

// 省略
では、この状態でデータベースを初期化してみましょう。
以下のコマンドを実行してください。
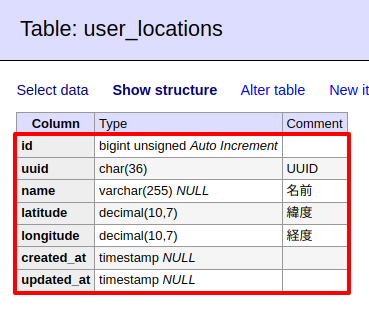
php artisan migrate
すると、実際のテーブルはこうなりました。
位置データのための独自バリデーションをつくる
では、コントローラーを作成する前に、位置情報(例: 35.710054、 139.811226)が正しい形式かどうかをチェックする独自バリデーション・ルールをつくっておきます。
以下のコマンドを実行してください。
php artisan make:rule Location
すると、app/Rulesにファイルが作成されるので中身を以下のようにします。
app/Rules/Location.php
<?php

namespace App\Rules;

use Closure;
use Illuminate\Contracts\Validation\ValidationRule;

class Location implements ValidationRule
{
    public function __construct(private string $mode)
    {}

    public function validate(string $attribute, mixed $value, Closure $fail): void
    {
        $valid_modes = ['latitude', 'longitude'];

        if(! in_array($this->mode, $valid_modes, true)) {

            throw new \Exception('$mode が正しくありません');

        }

        $patterns = [
            'latitude' => '/^-?([1-8]?[1-9]|[1-9]0)(\.{1}\d{1,6})?/',
            'longitude' => '/^-?([1]?[1-7][1-9]|[1]?[1-8][0]|[1-9]?[0-9])(\.{1}\d{1,6})?/',
        ];

        if($this->mode === 'latitude' && preg_match($patterns['latitude'], $value)) {

            return; // バリデーション通過

        } elseif($this->mode === 'longitude' && preg_match($patterns['longitude'], $value)) {

            return; // バリデーション通過

        }

        $fail('緯度または経度の形式が正しくありません'); // バリデーションエラー
    }
}
ちなみに正規表現が正しく動くかどうかをチェックするには、regex101 が便利です。ログインなしで使えますよ👍
API リソースをつくる
せっかくなので「API リソース」を作って「外に出るデータを取捨選択」もするようにしてみましょう。
例えば、誰でも閲覧ができるページで住所や電話番号のような「重要なデータ」が含まれていたら困る場合がありますよね。
そんなとき「API リソース」を使えば「これとこれ、あとはここのデータだけ OK」のようにデータのフィルタリングができます。
(元データ)
[
    'name' => '山田太郎',
    'address' => '東京都●●区●●...',
    'tel' => '090-1234-5678',
]
(API リソースによるフィルター後)
[
    'name' => '山田太郎',
]
では少し説明が長くなりましたが以下のコマンドを実行してください。
php artisan make:resource UserLocationResource
すると、app/Http/Resourcesフォルダにファイルが作成されるので中身を変更します。
app/Http/Resources/UserLocationResource.php
<?php

namespace App\Http\Resources;

use Illuminate\Http\Request;
use Illuminate\Http\Resources\Json\JsonResource;

class UserLocationResource extends JsonResource
{
    /**
     * Transform the resource into an array.
     *
     * @return array<string, mixed>
     */
    public function toArray(Request $request): array
    {
        return [
            'id' => $this->id,
            'name' => $this->name,
            'latitude' => $this->latitude,
            'longitude' => $this->longitude,
        ];
    }
}
Pusher の用イベントをつくる
これもコントローラー内で使うことになるPusher用の「イベント」をつくります。以下のコマンドを実行してください。
php artisan make:event UserLocationUpdated
すると、app/Eventsにファイルが作成されるので中身を以下のようにしてください。(太字部分を追加しました)
app/Events/UserLocationUpdated.php
<?php

namespace App\Events;

use Illuminate\Broadcasting\Channel;
use Illuminate\Broadcasting\InteractsWithSockets;
use Illuminate\Broadcasting\PresenceChannel;
use Illuminate\Broadcasting\PrivateChannel;
use Illuminate\Contracts\Broadcasting\ShouldBroadcast;
use Illuminate\Foundation\Events\Dispatchable;
use Illuminate\Queue\SerializesModels;

class UserLocationUpdated implements ShouldBroadcast
{
    use Dispatchable, InteractsWithSockets, SerializesModels;

    /**
     * Create a new event instance.
     */
    public function __construct()
    {
        //
    }

    /**
     * Get the channels the event should broadcast on.
     *
     * @return array<int, \Illuminate\Broadcasting\Channel>
     */
    public function broadcastOn(): array
    {
        return [
            new PrivateChannel('user-location-updated'),
        ];
    }
}
コントローラーをつくる
では、次はコントローラーをつくりましょう。
以下のコマンドを実行してください。
php artisan make:controller UserLocationController
すると、app/Http/Controllersにファイルが作成されるので中身を以下のように変更してください。
app/Http/Controllers/UserLocationController.php
<?php

namespace App\Http\Controllers;

use App\Events\UserLocationUpdated;
use App\Http\Resources\UserLocationResource;
use App\Models\UserLocation;
use App\Rules\Location;
use Illuminate\Http\Request;
use Pusher\Pusher;

class UserLocationController extends Controller
{
    public function index()
    {
        return view('user_location.index');
    }

    public function list()
    {
        $minutes = 10; // 本来は config などに入れておくべきです
        $base_dt = now()->subMinutes($minutes);
        $user_locations = UserLocation::query()
            ->where('updated_at', '>=', $base_dt) // 5分以内に更新されたデータだけ取得
            ->get();

        UserLocationResource::withoutWrapping(); // 初期状態では、data というキーでデータが返ってきますが、めんどうなので消します

        return UserLocationResource::collection($user_locations);
    }

    public function create(Request $request)
    {
        $validated_data = $request->validate([
            'uuid' => 'required|uuid',
            'name' => 'nullable|string|max:255',
            'latitude' => new Location('latitude'),
            'longitude' => new Location('longitude'),
        ]);

        $uuid = $validated_data['uuid'];
        $user_location = UserLocation::firstOrCreate(
            ['uuid' => $uuid], // UUID が一致するデータを探す
            $validated_data    // 見つからなかったら、作成
        );
        $result = $user_location->update($validated_data);

        UserLocationUpdated::dispatch();

        return ['result' => $result];
    }

    public function auth() // Pusher に認証するためのエンドポイント
    {
        $pusher = new Pusher(
            config('broadcasting.connections.pusher.key'),
            config('broadcasting.connections.pusher.secret'),
            config('broadcasting.connections.pusher.app_id'),
        );
        $request = request();
        $channel_name = $request->channel_name;
        $socket_id = $request->socket_id;

        return $pusher->authorizeChannel($channel_name, $socket_id);
    }
}
ビューをつくる
続いて、先ほどのコントローラーの中でセットした「ビュー」をつくります。
以下のコマンドを実行してください。(コマンドでビューが作成できるようになって便利ですね 👍)
php artisan make:view user_location.index
すると、resources/views/user_locationにビューファイルが作成されるので中身を以下のようにします。
resources/views/user_location/index.blade.php
<!DOCTYPE html>
<html lang="ja">
<head>
<meta charset="UTF-8">
<meta name="viewport" content="width=device-width, initial-scale=1.0">
<title>リアルタイムな位置情報の共有システム</title>
@vite(['resources/css/app.css', 'resources/js/app.js'])
</head>
<body>
<div class="flex flex-col" x-data="userLocation">
<!-- 地図のセクション -->
<div class="flex-grow bg-gray-200">
<div class="p-4 text-center">
<div id="map" style="height:350px;"></div> <!-- サイズ調整 -->
</div>
</div>
<!-- 入力フォームとボタンのセクション -->
<div class="bg-white p-4">
<div class="mb-4">
<label for="name" class="block text-gray-700 text-sm font-bold mb-2">名前:</label>
<input
type="text"
class="shadow appearance-none border rounded w-full py-2 px-3 text-gray-700 leading-tight focus:outline-none focus:shadow-outline"
placeholder="名前を入力"
x-model="params.name">
</div>
<div class="mb-4">
<template x-if="isSharingLocation">
<button
class="bg-red-500 hover:bg-red-700 text-white font-bold py-2 px-4 rounded focus:outline-none focus:shadow-outline"
type="button"
@click="onStop">
位置情報を共有停止
</button>
</template>
<template x-if="! isSharingLocation">
<button
class="bg-blue-500 hover:bg-blue-700 text-white font-bold py-2 px-4 rounded focus:outline-none focus:shadow-outline"
type="button"
@click="onStart">
位置情報を共有する
</button>
</template>
</div>
</div>
<!-- ユーザーリストのセクション -->
<div class="bg-white p-4">
<h2 class="text-xl font-semibold mb-2 text-gray-800">ユーザーリスト</h2>
<template x-if="userLocations.length === 0">
<p>ユーザーはいません</p>
</template>
<template x-if="userLocations.length > 0">
<ul>
<template x-for="(userLocation) in userLocations" :key="userLocation.id">
<li class="mb-2 p-2 border-b border-gray-200 hover:bg-gray-100 flex justify-between items-center">
<span x-text="userLocation.name"></span>
<!-- 「現在地へ」ボタン -->
<button
class="bg-blue-500 hover:bg-blue-700 text-white font-bold py-1 px-2 rounded text-xs focus:outline-none focus:shadow-outline"
@click="onCurrentLocationClick(userLocation)">
現在地へ
</button>
</li>
</template>
</ul>
</template>
</div>
</div>
<script>
const userLocation = () => {
// Alpine.js の中で使うとエラーになる場合があるので、外で定義する
let map = null;
let mapMarkers = [];
return {
// Data
params: {
uuid: '',
name: '',
latitude: '',
longitude: '',
},
userLocations: [],
isSharingLocation: false,
isInitialized: false,
locationWatchId: null,
// Methods
init() {
if(this.isInitialized === false) {
this.initialized = true;
this.initBroadcast();
this.initUuid();
this.initMap();
this.getUserLocations();
}
},
initBroadcast() {
Echo.private('user-location-updated')
.listen('UserLocationUpdated', () => {
this.getUserLocations();
});
},
initUuid() {
let uuid = localStorage.getItem('uuid');
if(! uuid) { // uuid がないとき
uuid = self.crypto.randomUUID();
localStorage.setItem('uuid', uuid);
}
this.params.uuid = uuid;
},
initMap() {
map = L.map('map').setView([35.680545109582106, 139.76822649218585], 13);
L.Marker.prototype.setIcon(L.icon({
iconUrl: markerIcon,
iconSize: [25, 41],
}));
L.tileLayer('https://tile.openstreetmap.org/{z}/{x}/{y}.png', {
maxZoom: 19,
attribution: '© <a href="http://www.openstreetmap.org/copyright">OpenStreetMap</a>'
}).addTo(map);
},
getUserLocations() {
const url = '/user_location/list';
axios.get(url)
.then((response) => {
this.userLocations = response.data;
mapMarkers.forEach((marker) => marker.remove()); // マーカーを全削除
mapMarkers = [];
let bounds = [];
this.userLocations.forEach((userLocation) => {
const latitude = userLocation.latitude;
const longitude = userLocation.longitude;
const mapMarker = L.marker([latitude, longitude])
.addTo(map)
.bindPopup(userLocation.name, { closeButton: false, autoClose: false }) // 常にポップアップを表示
.openPopup();
mapMarkers.push(mapMarker);
bounds.push([latitude, longitude]);
});
map.fitBounds(bounds); // マーカーが全て表示されるように地図の表示を自動で変更
});
},
onWatchPositionSuccess(position) {
this.params.latitude = position.coords.latitude;
this.params.longitude = position.coords.longitude;
this.isSharingLocation = true;
const url = '/user_location';
axios.post(url, this.params); // 現在の位置情報を保存
},
onWatchPositionError(error) {
this.isSharingLocation = false;
console.log('位置情報の取得に失敗しました', error);
},
onStart() {
if(! this.params.name) {
alert('名前を入力してください');
return;
} else if(confirm('位置情報を共有しますか?') === true) {
const options = {
enableHighAccuracy: true, // より精度の高い位置情報を取得する
timeout: 30000,
maximumAge: 0,
};
this.locationWatchId = navigator.geolocation.watchPosition(
(position) => this.onWatchPositionSuccess(position), // コールバック先で this を使えるようにする
(error) => this.onWatchPositionError(error), // コールバック先で this を使えるようにする
options
);
}
},
onStop() {
navigator.geolocation.clearWatch(this.locationWatchId);
this.isSharingLocation = false;
},
onCurrentLocationClick(userLocation) {
map.setView([userLocation.latitude, userLocation.longitude], 20);
},
};
};
</script>
</body>
</html>
ルートをつくる
では、最後にルートをつくります。
routes/web.php
use App\Http\Controllers\UserLocationController;

// 省略

Route::get('user_location', [UserLocationController::class, 'index'])->name('user_location.index');
これで作業は完了です。
お疲れ様でした。😄✨
テストしてみる
では、実際にテストしてみましょう❗
ちなみに、今回は位置情報を自由に変更できるようにしておきましょう。
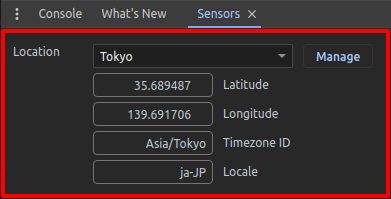
まず、Google Chromeの開発ツール(devTool)を開きます。
そして、右上の「三点コーダ > More tools > Sensors」を選択。
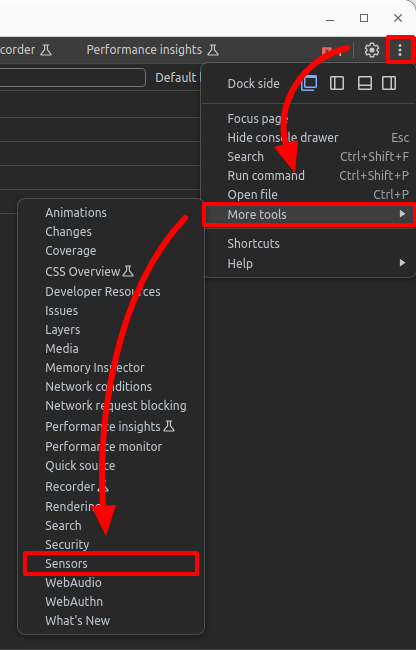
すると、開発ツールの下側に以下のような位置情報を自由に変更できるツールが出てきますので、これを使ってテストしてみましょう。
では、まずはブラウザで「https://******/user_location」へアクセスし名前を入力して「位置情報を共有する」ボタンをクリックします。

すると、「位置情報を共有しますか?」と確認がでるので、これをOKすると・・・・・・
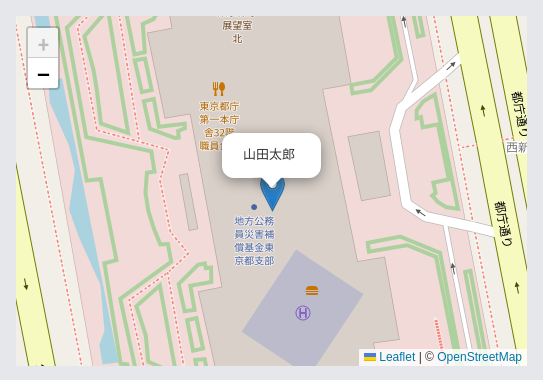
はい❗
自動的に地図が更新されて、「山田太郎」さんが東京にいることがわかるようになりました。
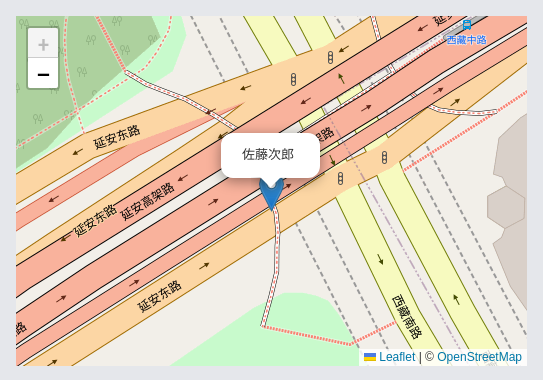
では、次に「佐藤次郎」さんで同じことをしますが、今度は「中国の上海」にいることにして実行してみましょう。(なお、別環境が必要なのでChromeのプライベートブラウジングを使って実施します)
すると・・・・・・
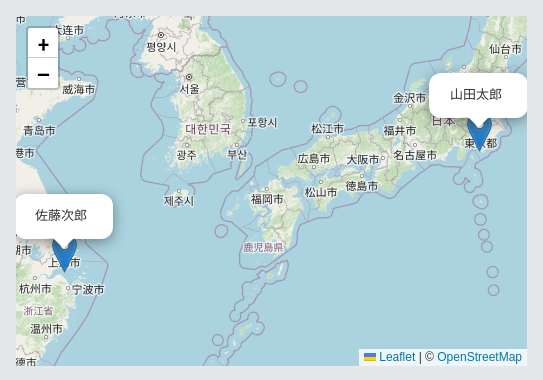
はい❗
太郎さんが東京、次郎さんが上海にいることが分かる地図に変更されました。
では、最後に地図の下にある次郎さんの「現在地へ」ボタンをクリックしてみましょう。
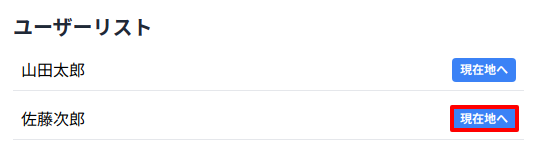
どうなったでしょうか・・・・・・
はい❗
次郎さんのいる場所に地図が移動しました。
全て成功です😄✨
企業様へのご提案
今回はログイン機能は設けていないので、特定グループだけで位置共有することはできませんが、そういった機能をつけることで「緊急時の家族や社員さんの位置情報」をリアルタイムで把握できるようになります。
また、緊急時でなくとも工場内やビル内で位置情報を共有する必要がある場合や、(賛否あるとは思いますが)営業さんの外回りの位置確認などに使えるのではないでしょうか。
もしそういった機能をご希望でしたらいつでもお気軽にお問い合わせからご相談ください。
お待ちしております。😄✨
おわりに
ということで、今回は「Laravel + Pusher」でリアルタイムに変化する位置情報共有システムをつくってみました。
ちなみに、ちょっと苦労したのは「leaflet.jsのための変数をAlpine.js内にもたせるとエラーが出る場合がある」という部分でした。
どうやらこれは変数がProxy化されるため、それが原因とのことでした。そのため、Vueなどでも同じことが起こるようです。(変数を毎回通常の変数にコンバートしてあげればOKなようですが、それもちょっと面倒ですよね😅)
それにしてもやはりPusherって便利ですね。
リアルタイムでなんでもできちゃいますので。
ぜひ皆さんも何かリアルタイムな実装をしてみてくださいね。
ではでは〜❗
 「年末に奈良で食べる
うまいお寿司が
とっても楽しみ❗」