
九保すこひです(フリーランスのITコンサルタント、エンジニア)
さてさて、優秀な人たちからマーケティングを学んでいる最中なのですが、また1つその中で始めて聞く言葉がありました。
それは・・・・・・
LINE マーケティング
です。
つまり、「LINEを使ってモノを売っていく作戦」なわけですが、私が実際に体験したものは、
ダウンロード特典をつける
作戦です。
これは、シンプルな流れで言うとこうなります。
- 特典を用意しておき、LINE をお友達登録してもらう
- 初回のありがとうメッセージで、特典へのリンクをつけておく
- (ここが一番重要ですが)もし何かがダウンロードされたら、「どんなタイプのダウンロードをしたか」を保存しておく
- その人の好みが分かるので「じゃ、これをオススメすれば売れるんじゃね❓」ってカンジで、その後のセールスに役立てる
つまり、特典をつけたことで「優良なリスト作り」ができるというわけですね。
そこで❗
今回はLaravel + LINE Messaging APIを使ってこの「LINE マーケティング」手法を実装してみます。
ぜひ何かの参考になりましたら嬉しいです。😄✨
 「老の眼が
「老の眼が
来たかもしれません
…帰って🙏✨」
開発環境: Laravel 10.x
目次
前提として
今回はLINE Messaging APIを使いますが、設定は以下のURLを参考にして準備しておいてください。
📝 参考ページ: Line Messaging API で画像つき通報システムをつくる(神戸市に影響されて)
また、ウェブフックの開発はなんでもそうなのですが、ngrokがあるとめちゃくちゃ便利です(というかこれなしで開発って地獄です😅)
なので、こちらも以下の記事を参考にして用意しておくといいでしょう。
📝 参考ページ: おまけ: ngrok について
では、今回も楽しんでやっていきましょう❗
パッケージをインストールする
まず実際の作業に行く前にパッケージをインストールしておきます。
以下のコマンドを実行してください。
composer require linecorp/line-bot-sdk
これで、LINE Messaging APIに関するいろいろな操作ができるようになりました。
DB まわりをつくる
次に、モデルやマイグレーションをつくっていきましょう。
必要になるのは以下2つです。
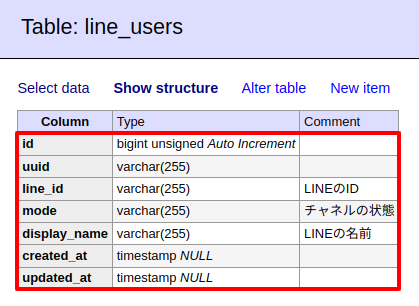
- line_users: LINE ユーザーの情報を保存しておく
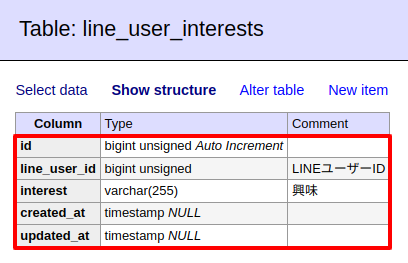
- line_user_interests: LINE ユーザーの「興味や好み」を保存しておく
以下の2つのコマンドを実行してください。
php artisan make:model LineUser -m
php artisan make:model LineUserInterest -m
すると、全部で4ファイル作成されるので中身をそれぞれ以下のようにします。
app/Models/LineUser.php
<?php

namespace App\Models;

use Illuminate\Database\Eloquent\Factories\HasFactory;
use Illuminate\Database\Eloquent\Model;

class LineUser extends Model
{
    use HasFactory;

    // Relationship
    public function line_user_interests()
    {
        return $this->hasMany(LineUserInterest::class, 'line_user_id', 'id');
    }
}
app/Models/LineUserInterest.php
<?php

namespace App\Models;

use Illuminate\Database\Eloquent\Factories\HasFactory;
use Illuminate\Database\Eloquent\Model;

class LineUserInterest extends Model
{
    use HasFactory;

    // Relationship
    public function line_user()
    {
        return $this->belongsTo(LineUser::class, 'line_user_id', 'id');
    }
}
database/migrations/****_**_**_******_create_line_users_table.php
<?php

use Illuminate\Database\Migrations\Migration;
use Illuminate\Database\Schema\Blueprint;
use Illuminate\Support\Facades\Schema;

return new class extends Migration
{
    /**
     * Run the migrations.
     */
    public function up(): void
    {
        Schema::create('line_users', function (Blueprint $table) {
            $table->id();
            $table->string('uuid')->unique();
            $table->string('line_id')->comment('LINEのID');
            $table->string('mode')->comment('チャネルの状態');
            $table->string('display_name')->comment('LINEの名前');
            $table->timestamps();
        });
    }

    /**
     * Reverse the migrations.
     */
    public function down(): void
    {
        Schema::dropIfExists('line_users');
    }
};
database/migrations/****_**_**_******_create_line_user_interests_table.php
<?php

use Illuminate\Database\Migrations\Migration;
use Illuminate\Database\Schema\Blueprint;
use Illuminate\Support\Facades\Schema;

return new class extends Migration
{
    /**
     * Run the migrations.
     */
    public function up(): void
    {
        Schema::create('line_user_interests', function (Blueprint $table) {
            $table->id();
            $table->unsignedBigInteger('line_user_id')->comment('LINEユーザーID');
            $table->string('interest')->comment('興味');
            $table->timestamps();

            $table->foreign('line_user_id')->references('id')->on('line_users');
        });
    }

    /**
     * Reverse the migrations.
     */
    public function down(): void
    {
        Schema::dropIfExists('line_user_interests');
    }
};
では、この状態でデータベースを初期化してみましょう。
以下のコマンドを実行してください。
php artisan migrate:fresh --seed
すると、実際のテーブルはこうなりました。
Webhook 部分のコントローラーをつくる
次にWebhook(LINEからデータ送信されてくる部分)をつくります。
以下のコマンドを実行してください。
php artisan make:controller LineMarketingWebhookController
すると、ファイルが作成されるので中身を以下のようにします。
app/Http/Controllers/LineMarketingWebhookController.php
<?php

namespace App\Http\Controllers;

use App\Models\LineUser;
use GuzzleHttp\Client as GuzzleClient;
use Illuminate\Http\Request;
use Illuminate\Support\Str;
use LINE\Clients\MessagingApi\Configuration;
use LINE\Clients\MessagingApi\Api\MessagingApiApi;
use LINE\Clients\MessagingApi\Model\ReplyMessageRequest;
use LINE\Clients\MessagingApi\Model\TextMessage;
use LINE\Parser\EventRequestParser;
use LINE\Webhook\Model\FollowEvent;

class LineMarketingWebhookController extends Controller
{
    private $channel_secret, $access_token;

    public function __construct()
    {
        $this->channel_secret = '(ここにシークレットトークン)';
        $this->access_token = '(ここにアクセストークン)';
    }

    public function receive(Request $request)
    {
        $request_body = $request->getContent();
        $hash = hash_hmac('sha256', $request_body, $this->channel_secret, true);
        $signature = base64_encode($hash);

        if($signature === $request->header('X-Line-Signature')) {

            $client = new GuzzleClient;
            $config = new Configuration();
            $config->setAccessToken($this->access_token);

            $this->api = new MessagingApiApi(
                client: $client,
                config: $config,
            );

            try {

                $event_parser = EventRequestParser::parseEventRequest($request_body, $this->channel_secret, $signature);

                foreach($event_parser->getEvents() as $event) {

                    if($event instanceof FollowEvent) { // お友達の登録したとき

                        $reply_token = $event->getReplyToken();
                        $line_id = $event->getSource()->getUserId();
                        $mode = $event->getMode();
                        $profile = $this->api->getProfile($line_id);
                        $display_name = $profile->getDisplayName();

                        if(is_null($line_id) || is_null($mode)) {

                            continue;

                        }

                        $line_user = LineUser::where('line_id', $line_id)->first();

                        if(is_null($line_user)) {

                            $line_user = new LineUser;
                            $line_user->uuid = Str::uuid();
                            $line_user->line_id = $line_id;

                        }

                        $line_user->mode = $mode; // チャネルの状態
                        $line_user->display_name = $display_name; // LINEの表示名
                        $line_user->save();

                        $download_contents = [
                            ['title' => '動画編集の基礎', 'url' => route('line_marketing.download', [1, $line_user->uuid])],
                            ['title' => 'プログラミング入門', 'url' => route('line_marketing.download', [2, $line_user->uuid])],
                            ['title' => 'SNS マーケティングのいろは', 'url' => route('line_marketing.download', [3, $line_user->uuid])],
                        ];
                        $text = view('line_marketing_webhook.reply_text', ['download_contents' => $download_contents])->render();
                        $this->replyText($reply_token, $text);

                    }

                }

            } catch (\Exception $e) {}

        } else {

            abort(404);

        }
    }

    private function replyText(string $reply_token, string $text)
    {
        $message = new TextMessage([
            'type' => 'text',
            'text' => $text,
        ]);
        $request = new ReplyMessageRequest([
            'replyToken' => $reply_token,
            'messages' => [$message],
        ]);

        $this->api->replyMessage($request);
    }
}
ビューをつくる
先ほどのLineMarketingWebhookControllerの中で使ったビュー(返信内容のテキスト)をつくっていきます。
以下のコマンドを実行してください。
php artisan make:view line_marketing_webhook.reply_text
すると、ビューファイルが作成されるので中身を以下のようにします。
resources/views/line_marketing_webhook/reply_text.blade.php
お友達追加ありがとうございます!

特典は以下からダウンロードできます。
ぜひご興味のあるものをダウンロードしてスキルアップにつなげてください!

【お友達追加した人だけの特典】

@foreach($download_contents as $download_content)
■ {{ $download_content['title'] }}
{{ $download_content['url'] }}

@endforeach
ダウンロード部分のコントローラーをつくる
続いて、もうひとつのコントローラーで「ダウンロード部分」をつくります。
以下のコマンドを実行してください。
php artisan make:controller LineMarketingDownloadController
すると、コントローラーが作成されるので中身を以下のようにします。
<?php

namespace App\Http\Controllers;

use App\Models\LineUser;
use App\Models\LineUserInterest;
use Illuminate\Http\Request;

class LineMarketingDownloadController extends Controller
{
    public function download(int $download_id, string $uuid)
    {
        $line_user = LineUser::where('uuid', $uuid)->first();

        if(is_null($line_user)) {

            abort(404);

        }

        // 本来は可変にするべきですが、今回はテスト用に固定値を返します。

        $interests = [
            1 => '動画編集',
            2 => 'プログラミング',
            3 => 'SNS マーケティング',
        ];

        $line_user_interest = new LineUserInterest; // 何回も保存されることを考慮して、常に新規作成します。(それもマーケティングとして使えるデータです)
        $line_user_interest->line_user_id = $line_user->id;
        $line_user_interest->interest = $interests[$download_id];
        $line_user_interest->save();

        return '実際にはここでダウンロード処理を行います。('. $line_user_interest->interest .'が保存されました)';
    }
}
VerifyCsrfToken の制限を解除する
Laravelにはデータ送信をするときに「移動元のページが同じサイト内からじゃないとダメ」という制限がかかっています。
しかし、ウェブフックにもこれが適用されてしまうので、VerifyCsrfToken.phpで解除しないといけません。
app/Http/Middleware/VerifyCsrfToken.php
<?php

namespace App\Http\Middleware;

use Illuminate\Foundation\Http\Middleware\VerifyCsrfToken as Middleware;

class VerifyCsrfToken extends Middleware
{
    /**
     * The URIs that should be excluded from CSRF verification.
     *
     * @var array<int, string>
     */
    protected $except = [
        'line_marketing/webhook/receive', // 👈 ここを追加しました
    ];
}
ルートをつくる
では、最後にルートをつくりましょう。
routes/web.php
use App\Http\Controllers\LineMarketingWebhookController;
use App\Http\Controllers\LineMarketingDownloadController;

Route::prefix('line_marketing')->group(function(){

    Route::prefix('webhook')->controller(LineMarketingWebhookController::class)->group(function(){

        Route::post('receive', 'receive')->name('line_marketing.receive');

    });
    Route::prefix('download')->controller(LineMarketingDownloadController::class)->group(function(){

        Route::get('/{download_id}/{uuid}', 'download')->name('line_marketing.download');

    });

});
はい!
これで作業は完了です。
お疲れ様でした。😄
テストしてみる
では、実際にテストしてみましょう❗
まずは、LINEボットにお友達登録してみましょう。
どうなるでしょうか・・・・・・
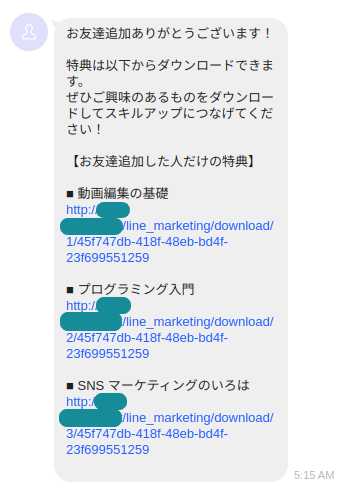
はい❗
お友達登録のメッセージが自動で送信されてきました。
では、まずはLINEユーザーがデータベースに保存されているかチェックしておきましょう。
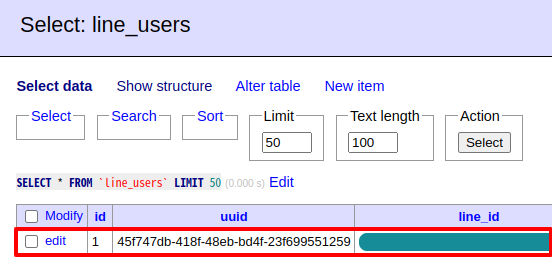
はい❗
うまく保存されています。
成功です。😄✨
では、送信されてきた特典のダウンロードURLにアクセスしてみましょう。
今回は「プログラミング入門」をクリックします。
うまくいくでしょうか・・・・・・
![]()
はい❗
ちゃんと「プログラミング」が保存されたことが表示されました。
では、せっかくなので「動画編集」の方もダウンロードURLをクリックしてからデータベースを確認してみましょう。
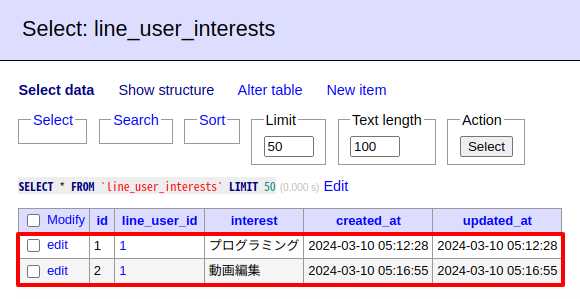
はい❗
興味のある項目が保存されています。
つまり、この人には「プログラミング」や「動画編集」関連の商品をアプローチすれば、より成約に繋がりやすいということになります。
すべて成功です😄✨
企業様へのご提案
今回のような機能を用意しておくと、LINEをつかった「より CVR を高める施策」を打つことができます。
また、LINEは以下のような特徴があるため、よりマーケティングには強力なツールだと言われています。
- ユーザー数が、9,600万人(2024.3.10 現在)
- 開封率が高い(メールの2倍ほどというデータもあるようです)
- クリック率も高い
- 登録がかんたん(メールアドレスを入力する必要がない)
- 到達率が高い(メールは迷惑メールとして処理される可能性がある)
もし御社がLINEを使ったマーケティングをご希望でしたらいつでもお気軽にご相談ください。
お待ちしております。😄✨
おわりに
ということで、今回は「Laravel を使って LINE マーケティング」をやってみました。
私はもちろんプログラマーの出身ですが、これまで「こういう機能つくって」と言われても、何のためにつくるのかをきちんと理解していなかった部分がありました。
しかし、マーケティングを理解することで2倍にも3倍にもスキルの価値があがることを実感しています。
まだまだスタートしたばかりですが、これからもブラッシュアップして「エンジニア x マーケティング」で市場価値を高めていくつもりです。
ぜひ皆さんも「エンジニア x 何か」で自分の価値を高めていってくださいね。
ではでは〜❗
 「よし!
「よし!
確定申告おわった!!
…いや、今年から消費税もだ😫 ギャー」