九保すこひです(フリーランスのITコンサルタント、エンジニア)
さてさて、この間 Laravel + React でリアルタイム・チャットをつくる という記事が思いのほか多く読んでいただきました。(ありがとうございます❗)
そして、それに調子づいてというわけではないですが、少し長めコードを使った記事を公開してみようという気分になりました(笑)
しかし、「複雑な内容 + 長いコード」となると味の濃すぎる料理みたいになってしまうので、テーマはとても薄味の「お問い合わせフォーム」でやってみることにしました。
そこで❗
今回は「Laravel + React」で細部にもこだわったお問い合わせフォームをつくってみます。
ぜひ何かの参考になりましたら嬉しいです😄✨
 「腕時計が2つとも
電池切れになってしまった❗」
開発環境: Laravel 9.x、React、Vite、Inertia.js、TailwindCSS、PHP 8.1
目次
グループ(Enum)をつくる
まずはEnumで以下の「お問い合わせの種類」グループをつくります。
- 商品に関するお問い合わせ
- ご注文に関するお問い合わせ
- サポートに関するお問い合わせ
- その他のお問い合わせ
なお、Enumとは「グループ構成」を先に決めておけるもので、簡単に言うと「いや、それグループに入ってないから!」とエラーが出る(つまり、おかしなデータが入ってこないようにできる)スグレモノです。
PHP 8.1から使えるようになりました。
ということで、まずはEnumから作っていきましょう❗
app/Enums/ContactType.php
<?php

namespace App\Enums;

use Illuminate\Support\Collection;

enum ContactType: int
{
    // ID
    case Question = 100;
    case Order = 200;
    case Support = 300;
    case Other = 9900;

    public function name(): string
    {
        return match ($this) {
            self::Question => '商品に関するお問い合わせ',
            self::Order => 'ご注文に関するお問い合わせ',
            self::Support => 'サポートに関するお問い合わせ',
            self::Other => 'その他のお問い合わせ',
        };
    }

    public static function collection(): Collection
    {
        $collection = collect();

        foreach (self::cases() as $case) {

            $collection->push([
                'id' => $case->value,
                'name' => $case->name(),
            ]);

        }

        return $collection;
    }
}
これで「お問い合わせの種類」が便利に使えるようになりました!
バリデーションをつくる
次に、「フォームから送信されたデータが本当に正しい送信なのか?」をチェックするためのバリデーションをつくっていきます。
以下のコマンドを実行してください。
php artisan make:request ContactRequest
すると、専用のFormRequestファイルが作成されるので、中身を以下のようにします。
app/Http/Requests/ContactRequest.php
<?php

namespace App\Http\Requests;

use App\Enums\ContactType;
use Illuminate\Foundation\Http\FormRequest;
use Illuminate\Validation\Rules\Enum;

class ContactRequest extends FormRequest
{
    /**
     * Determine if the user is authorized to make this request.
     *
     * @return bool
     */
    public function authorize()
    {
        return true;
    }

    /**
     * Get the validation rules that apply to the request.
     *
     * @return array<string, mixed>
     */
    public function rules()
    {
        return [
            'subject_id' => [
                'required',
                new Enum(ContactType::class)
            ],
            'name' => [
                'required',
                'string',
                'max:255',
            ],
            'email' => [
                'required',
                'string',
                'email',
                'max:255',
            ],
            'message' => [
                'required',
                'string',
                'max:1000',
            ],
            'url' => [
                'nullable',
                'url',
                'max:255',
            ],
        ];
    }
}
Enumがバリデーション・ルールに用意されてるので簡単にチェックできますね👍 さすがLaravelです❗
コントローラーをつくる
続いて、コントローラーを作っていきましょう。
以下のコマンドを実行してください。
php artisan make:control ContactController
すると、ファイルが作成されるので中身を以下のように変更します。
app/Http/Controllers/ContactController.php
<?php

namespace App\Http\Controllers;

use App\Enums\ContactType;
use App\Http\Requests\ContactRequest;
use App\Mail\Contacted;
use Illuminate\Http\Request;
use Illuminate\Support\Facades\Mail;
use Inertia\Inertia;

class ContactController extends Controller
{
    public function create()
    {
        $contact_types = ContactType::collection();

        return Inertia::render('Contact/Create', [
            'contactTypes' => $contact_types,
        ]);
    }

    public function store(ContactRequest $request)
    {
        $subject = ContactType::from($request->subject_id)->name(); // Enam からお問い合わせの種類名を取得
        $params = [
            'subject' => $subject,
            'name' => $request->name,
            'email' => $request->email,
            'message' => $request->message,
            'url' => $request->url,
        ];

        try {

            Mail::send(new Contacted($params)); // メール送信

        } catch (\Exception $e) {

            throw $e;

        }

        return to_route('contact.complete');
    }

    public function complete()
    {
        return Inertia::render('Contact/Complete');
    }
}
この中で(少し??)重要なのが、Enumの取得をしているContactType::from()の部分です。
こうやって該当するEnumを取得し、さらにname()で名前を取得しているんですね。
やっぱりEnumは便利ですね❗
メール送信部分をつくる
続いて、先ほどのコントローラー内で使ったMailable(メール送信部分。今回はLaravel 9.35から使える新パターンです)をつくっていきます。
以下のコマンドを実行してください。
php artisan make:mail Contacted
Mailableのファイルが作成されるので、中身を以下のようにします。
app/Mail/Contacted.php
<?php

namespace App\Mail;

use Illuminate\Bus\Queueable;
use Illuminate\Contracts\Queue\ShouldQueue;
use Illuminate\Mail\Mailable;
use Illuminate\Mail\Mailables\Address;
use Illuminate\Mail\Mailables\Content;
use Illuminate\Mail\Mailables\Envelope;
use Illuminate\Queue\SerializesModels;

class Contacted extends Mailable
{
    use Queueable, SerializesModels;

    /**
     * Create a new message instance.
     *
     * @return void
     */
    public function __construct(
        private array $params // ← PHP 8 からは自動で $this->params に格納できる
    )
    {}

    /**
     * Get the message envelope.
     *
     * @return \Illuminate\Mail\Mailables\Envelope
     */
    public function envelope()
    {
        // ↓↓↓ 本来は .env や コンフィグにセットするべきです
        $from = new Address('from@example.com', 'お問い合わせフォーム');
        $to = [new Address('admin@example.com', '管理者')];

        return new Envelope(
            from: $from,
            to: $to,
            subject: 'お問い合わせがありました',
        );
    }

    /**
     * Get the message content definition.
     *
     * @return \Illuminate\Mail\Mailables\Content
     */
    public function content()
    {
        return new Content(
            view: 'emails.contacted',
            with: [
                'params' => $this->params,
            ],
        );
    }

    /**
     * Get the attachments for the message.
     *
     * @return array
     */
    public function attachments()
    {
        return [];
    }
}
※ 新パターンのMailableの書き方、すっきりして分かりやすいですね👍
【追記:2022.11.21】後で実行してみたところ以下のようなエラーがでましたので修正しました。($toは、配列としてセットしないといけないようです)
Email "管理者" does not comply with addr-spec of RFC 2822.
なお、ここで重要なのがPHP 8.0から導入された「Class constructor property promotion」です。
ちょっと大層な名前に聞こえますが、これは「メンバ変数の格納が省略できるよ」というものです。
例えば、これまで以下のようにコンストラクタに入ってきた変数をいちいち格納していたかと思います。
class YourGreatClass
{
    private $params;

    public function __construct(array $params)
    {
        $this->params = $params; // ← ここ
    }
これが省略してこれだけでOKになる、ということですね。
public function __construct(
    private array $params
)
「コードが減る = バグも少なくなる」ということなのでぜひ活用していきたいですね。😄
そして、メール文面もビューで作成します。
resources/views/emails.contacted.blade.php
お問い合わせがありました。<br>
以下が内容になります。<br><br>

<strong>お問い合わせの種類</strong>: {{ $params['subject'] }}<br>
<strong>お名前</strong>: {{ $params['name'] }}<br>
<strong>メールアドレス</strong>: {{ $params['email'] }}<br>
<strong>URL</strong>:{{ $params['url'] }}<br>
<strong>お問い合わせ内容</strong>: <br>
{!! nl2br($params['message']) !!}<br><br>

<strong>株式会社○○</strong><br>
https://example.com/
※ ちなみに、私はメール送信テストにMailCatcherを愛用しています。
そして、MailCatcherで送信をするには.envを以下のように変更してください。(起動も忘れずに!)
MAIL_MAILER=smtp
MAIL_HOST=127.0.0.1
MAIL_PORT=1025
※ もし MailCatcher をインストールしていない方はインストールするか、mailgunなどのサービスを利用してください。(私は解除を忘れて課金されてしまいましたが…😫)
ビューをつくる
次に、ビュー(テンプレート)部分です。
ここでReactをバリバリ使うことになります。
まずは、お問い合わせフォーム部分です。
resources/js/Pages/Contact/Create.jsx
import {useState, useEffect} from 'react';
import {Inertia} from '@inertiajs/inertia';
import FormLabel from '@/Components/FormLabel';
import ErrorMessage from '@/Components/ErrorMessage';

export default function Create(props) {

    // Data
    const [subjectId, setSubjectId] = useState('');
    const [name, setName] = useState('');
    const [email, setEmail] = useState('');
    const [message, setMessage] = useState('');
    const [url, setUrl] = useState('');
    const contactTypes = props.contactTypes;

    // Submit
    const handleSubmit = () => {

        if(confirm('送信します。よろしいですか?')) {

            const data = {
                subject_id: subjectId,
                name: name,
                email: email,
                message: message,
                url: url,
            };

            Inertia.post(
                route('contact.store'),
                data
            )

        }

    };

    // Errors
    const errors = props.errors;
    useEffect(() => {

        if(Object.keys(errors).length > 0) {

            // エラーの箇所まで自動でスクロールする
            const errorElements = document.querySelectorAll('.error-message');
            let topPositions = [];

            [].forEach.call(errorElements, element => {

                const top = element.getBoundingClientRect().top;
                topPositions.push(top);

            });

            const scrollTop = Math.min(...topPositions) - 180;
            window.scrollTo({
                top: scrollTop,
                behavior: 'smooth'
            });

        }

    }, [errors]);

    return (
        <div className="p-5">
            <h1>お問い合わせフォーム</h1>
            <div className="border p-4 bg-gray-50 w-full md:w-1/2">
                <div className="mb-3">
                    <FormLabel required>お問い合わせの種類</FormLabel>
                    <select name="type" className="form-control text-smw-full md:w-1/2" value={subjectId} onChange={e => setSubjectId(e.target.value)}>
                        <option value="">▼ 選択してください</option>
                        {contactTypes.length > 0 && contactTypes.map(contactType => (
                            <option key={contactType.id} value={contactType.id}>{contactType.name}</option>
                        ))}
                    </select>
                    <ErrorMessage message={errors.subject_id}></ErrorMessage>
                </div>
                <div className="mb-3">
                    <FormLabel required>お名前</FormLabel>
                    <input type="text" className="w-full md:w-1/2" value={name} onChange={e => setName(e.target.value)} />
                    <ErrorMessage message={errors.name}></ErrorMessage>
                </div>
                <div className="mb-3">
                    <FormLabel required>メールアドレス</FormLabel>
                    <input type="email" className="w-full md:w-1/2" value={email} onChange={e => setEmail(e.target.value)} />
                    <ErrorMessage message={errors.email}></ErrorMessage>
                </div>
                <div className="mb-3">
                    <FormLabel required>お問い合わせ内容</FormLabel>
                    <textarea name="body" className="form-control w-full block" rows="5" value={message} onChange={e => setMessage(e.target.value)}></textarea>
                    <ErrorMessage message={errors.message}></ErrorMessage>
                </div>
                <div className="mb-3">
                    <FormLabel>URL</FormLabel>
                    <input type="text" className="w-full md:w-1/2" value={url} onChange={e => setUrl(e.target.value)} />
                    <ErrorMessage message={errors.url}></ErrorMessage>
                </div>
                <button
                    type="button"
                    className="text-white bg-blue-700 font-medium rounded text-sm px-5 py-2.5 mr-2 mb-2" onClick={handleSubmit}>
                    送信する
                </button>
            </div>
        </div>
    )

}
特別難しい部分は無いですが、ユーザビリティを考慮して「エラー時に自動スクロールしてエラー箇所まで移動してくれる」ようにしています。
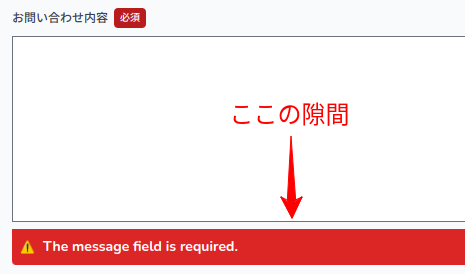
ちなみに、<textarea> ... </textarea>にはclassNameにblock(スタイルシートで言うところのdisplay: block;)が入っていますが、これはすぐ下に隙間ができてしまうためです。
そして、完了時のビューです。
resources/js/Pages/Contact/Complete.jsx
export default function Create() {

    return (
        <div className="p-5">
            <h1>送信が完了しました</h1>
            <div className="border p-4 bg-gray-50">
                <p>
                    お問い合わせをいただきましてありがとうございました。<br />
                    できるだけ早くお返事させていただきますので、しばらくお待ちくださいませ。
                </p>
            </div>
        </div>
    )

}
コンポーネントをつくる
では、先ほどのビューの中でコンポーネント「FormLabel」と「ErrorMessage」を使っていますので、これらを作っていきます。
まず入力ボックスの上に表示する「ラベル」をつくります。
↓↓↓ こんなカンジ

resources/js/Components/FormLabel.jsx
export default function FormLabel({ required, children }) {

    return (
        <label className="font-medium text-xs text-gray-700 mb-2 flex items-center">
            {children}
            {required && (
                <small className="bg-red-700 text-white rounded px-1.5 py-0.5 ml-1.5">必須</small>
            ) || (
                <small className="bg-gray-300 text-gray-700 rounded px-1.5 py-0.5 ml-1.5">任意</small>
            )}
        </label>
    );

}
requiredを使って「必須」と「任意」のラベルを切り替えているところに注目してください。こうすると「パラメータをつける or つけないだけ」で切り替えができるので便利です👍
そして、エラーメッセージを表示するコンポーネントです。
↓↓↓ こんなカンジ

resources/js/Components/ErrorMessage.jsx
export default function FormLabel({ message }) {
return (
<>
{message && (
<div className="bg-red-600 text-white font-bold p-2 mb-3 rounded-bl rounded-br flex items-center text-sm error-message">
<span className="text-xs mr-2">⚠</span> {message}
</div>
)}
</>
);
}
ちなみに、もしエラーメッセージがない場合は何も表示されないようになっています。
日本語化する
ここまでのコードで問題なくお問い合わせフォームは機能しますが、エラーメッセージが英語のままになっていると思います。
そこで、今回はLaravel-LangとLaravel-Lang-Publisherを使って日本語化します。
まずは以下のコマンドでパッケージをインストールしてください。
composer require laravel-lang/publisher laravel-lang/lang laravel-lang/attributes --dev
※ なお、私の環境ではコンフリクトが発生しインストールできませんでしたので、「バージョンつき」で実行しました。
composer require laravel-lang/publisher:^13.0 laravel-lang/lang:^10.9 laravel-lang/attributes:^1.1 --dev
パッケージがインストールできたら、以下のコマンドを実行してください。
php artisan lang:add ja
これで、lang/jaフォルダが作成され、その中に翻訳ファイルが格納されることになります。
そして、忘れてはいけないのがLaravel本体の言語設定です。
config/app.php
'locale' => 'ja', // `en` から変更
※ もしLaravelをインストールしたての場合は合わせて以下の部分も変更しておくといいでしょう。
- timezone: Asia/Tokyo
- faker_locale: ja_JP
なお、fallback_localeは、メインの言語が存在しなかったときの予備言語ですので、そのままenでいいでしょう。
これで作業は完了です。
お疲れ様でした😄✨
テストしてみる
では、今回のコードを実際に試してみましょう❗
Viteを起動後、「http://******/contact/create」へアクセスします。
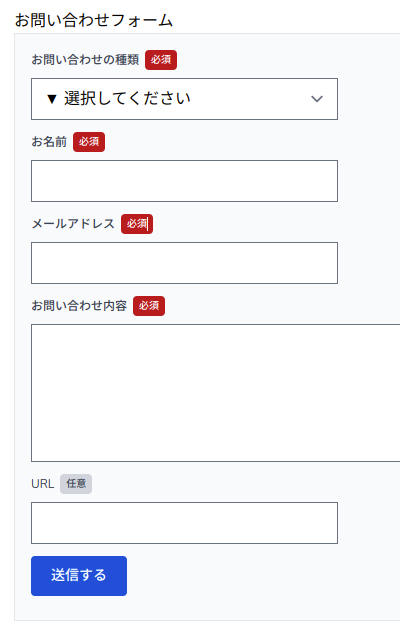
すると、フォームが以下のように表示されます。
必須と任意が切り替わっていますね。
では、このフォームにすべてエラーが出るようにして送信をしてみます。
すると・・・・・・
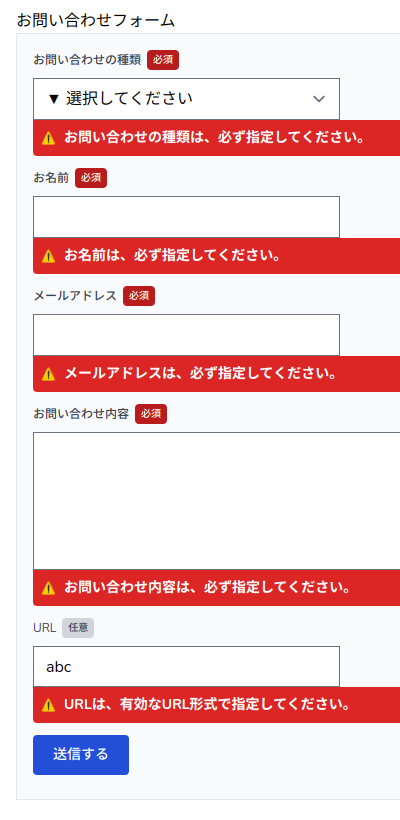
はい❗
すべての項目でエラーが表示されました。
では、次は逆に「エラーがない」状態で送信してみましょう。
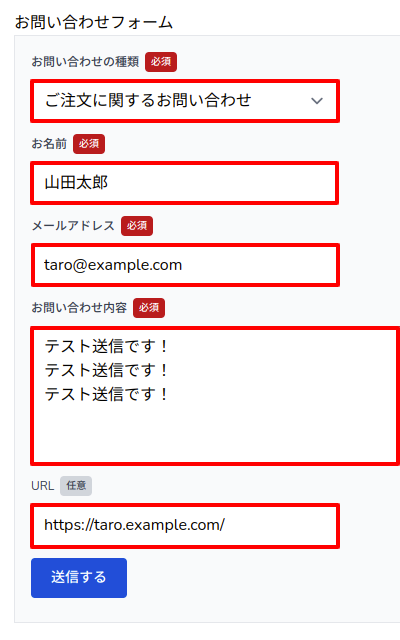
どうなったでしょうか・・・・・・

はい❗
完了ページが表示されました。
では、メールは送信されているでしょうか??
たのむぞ!!!
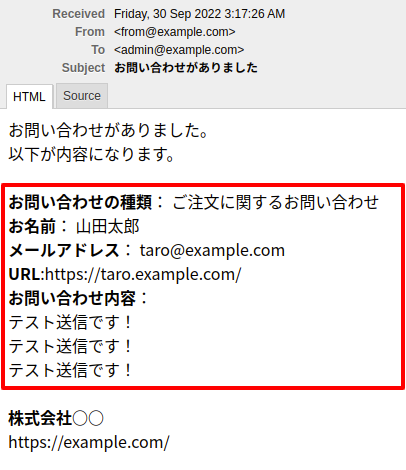
はい❗
こちらもうまく入力内容が送信されてました。
すべて成功です😄✨
デモページをつくりました
せっかくなので、デモページをつくりました。
以下から試せますので、よろしければ体験してみてください。
📝 デモページ
企業様へのご提案
今回開発した内容は「お問い合わせフォーム」ということで、本来はとてもシンプルに作成することができますが、今回は「よりモダンな」コードを心がけて開発してみました。
もし今後、御社の開発環境を刷新されたいなどといったご希望がございましたら、いつでもお気軽にご連絡ください。きっとお力になれるかと思います。
お待ちしております。😄✨
おわりに
ということで、今回は「Laravel + React」で問い合わせフォームを作ってみました。
「シンプルなテーマ + 少し長いコード」のタッグでお届けしましたがいかがだったでしょうか。
個人的な感想としては、お問い合わせフォームというありふれた開発であるにも関わらず、結構いろいろな知識が必要になってきますので、初学者の勉強のためにもいいんじゃないでしょうか。
ぜひ皆さんも研究してみてくださいね。
ではでは〜❗
 「ビールが値上がりする❗❓
んー…変わらず飲むよ🍺」
