

九保すこひです(フリーランスのITコンサルタント、エンジニア)
さてさて、前回「Vite + Inertia + React」でログイン機能をつくってみましたが、今回もその流れで基本的な「追加・変更・削除・閲覧」部分(いわゆる CRUD)をつくってみることにしました。
なお、できるだけコンパクトにしたかったのですが、気がつけば1万文字を大きく超えるボリュームになってしまい「2回に分割した方がよかったのでは…」と思ったりもしました。
しかし「技術系ブログ界のこち亀」のような、いつ読み始めても楽しめる(できるだけ続きものにはしない)スタンスでブログ運営をしていることもあり、あえて1回で公開することにしました(笑)
そこで❗
今回は「Laravel + Vite + Inertia + React」で「追加・変更・削除・閲覧」機能をつくってみます。
ぜひ何かの参考になりましたら嬉しいです😊✨
 「人生で初めて
ル・プティ・ムートンという
高級ワインを飲みました🍷✨
(ただし、自分では買ってないです)」
開発環境: Laravel 9.x、Vite、Inertia、ReactJS
目次
必要なファイルをつくる
では、まずはLaravel側で必要なファイルをつくります。
以下のコマンドで一気に「モデル」「マイグレーション」「Seeder(テストデータ作成)」「コントローラー」を用意しましょう。
php artisan make:model Post -msc
では、それぞれ作成されたファイルの中身を変更していきます。
マイグレーション
まずはDBの設計図になるマイグレーションです。
database/migrations/****_**_**_******_create_posts_table.php
// 省略

public function up()
{
    Schema::create('posts', function (Blueprint $table) {
        $table->id();
        $table->string('title')->comment('タイトル');
        $table->text('body')->comment('本文');
        $table->timestamps();
    });
}

// 省略
Seeder
次に、DBにテストデータを用意できるSeederファイルです。
database/seeders/PostSeeder.php
// 省略

class PostSeeder extends Seeder
{
    // 省略

    public function run()
    {
        for($i = 0; $i < 25; $i++) {

            Post::create([
                'title' => 'タイトル' . $i,
                'body' => '本文' . $i,
            ]);

        }
    }
}
なお、Seederは作成しただけでは有効になりませんので、DatabaseSeeder.phpへ登録します。
database/seeders/DatabaseSeeder.php
// 省略

class DatabaseSeeder extends Seeder
{
    // 省略

    public function run()
    {
        // 省略

        $this->call(PostSeeder::class); // 👈 ここを追加しました
    }
}
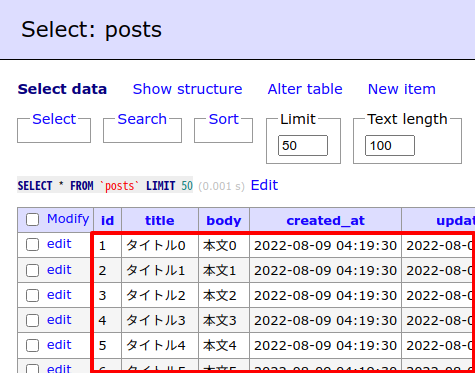
では、この状態でDBを初期化してみましょう。
以下のコマンドを実行してください。
php artisan migrate:fresh --seed
すると、postsテーブルは次のようになります。
コントローラー
そして、コントローラーです。
app/Http/Controllers/PostController.php
<?php

namespace App\Http\Controllers;
use App\Http\Requests\PostRequest;
use App\Models\Post;
use Inertia\Inertia;

use Illuminate\Http\Request;

class PostController extends Controller
{
    public function index()
    {
        $posts = Post::paginate(5);

        return Inertia::render('Post/Index', [
            'title' => 'Laravel: Vite + Inertia + React で CRUD サンプル',
            'posts' => $posts,
            'message' => session('message'),
        ]);
    }

    public function create()
    {
        return Inertia::render('Post/Create');
    }

    public function store(PostRequest $request)
    {
        $post = new Post();
        $post->title = $request->title;
        $post->body = $request->body;
        $post->save();

        return redirect()->route('post.index')->with([
            'message' => '登録が完了しました',
        ]);
    }

    public function show(Post $post)
    {
        return Inertia::render('Post/Show', [
            'post' => $post,
        ]);
    }

    public function edit(Post $post)
    {
        return Inertia::render('Post/Edit', [
            'post' => $post,
        ]);
    }

    public function update(PostRequest $request, Post $post)
    {
        $post->title = $request->title;
        $post->body = $request->body;
        $post->save();

        return redirect()->route('post.index')->with([
            'message' => '変更が完了しました',
        ]);
    }

    public function destroy(Request $request, Post $post)
    {
        $post->delete();

        // ページ番号つきでリダイレクト(削除時にページ移動してしまわないため)
        return redirect()
            ->route('post.index', ['page' => $request->page])
            ->with('message', '削除が完了しました');
    }
}
コードは少し長いものの、通常のCRUDとほぼ同じです。
違う部分といえば、Inertia::render()の部分ですね。
これは、Inertia用のデータを用意するためのもので、後でつくることになるresources/js/Pagesフォルダ内のビュー(テンプレート)を呼び出しています。
バリデーションをつくる
先ほどのコントローラー内でセットしたPostRequestが、まだ存在していないので、ここでつくっていきます。
以下のコマンドを実行してください。
php artisan make:request PostRequest
すると、ファイルが作成されるので、中身を以下のように変更します。
app/Http/Requests/PostRequest.php
// 省略

class PostRequest extends FormRequest
{
    public function authorize()
    {
        return true;
    }

    public function rules()
    {
        return [
            'title' => 'required|string|max:255',
            'body' => 'required|string|max:255',
        ];
    }
}
【追記:2023.03.12】訪問者さんからのご質問をいただいたので、コードを変更しました。
これで、PostController内のstore()とedit()でバリデーション(入力チェック)が有効になりました。
ビューをつくる
では、実際にブラウザから見ることになるビュー(テンプレート)を作っていきましょう。
作成するページは以下の4つです。
- 一覧: index
- 個別表示: show
- データ追加: create
- データ変更: edit
では、順に見ていきましょう。
index
resources/js/Pages/Post/Index.jsx
import React from "react";
import { Inertia } from "@inertiajs/inertia";
import { Link } from '@inertiajs/inertia-react';
import Pagination from "@/Components/Pagination";

export default function Index(props) {

    // Data
    const { message } = props;

    // Methods
    const onDelete = id => {

        if(confirm('削除します。よろしいですか?')) {

            const url = route('post.destroy', id);
            const params = {
                _method: 'delete',
                page: props.posts.current_page
            };

            // delete() ではパラメータを送信できないため、あえて post() を使っています
            Inertia.post(url, params);

        }

    };

    return (
        <div className="p-5">
            <h1 className="font-bold">{props.title}</h1>
            {message && <div id="message" className="mt-2 text-green-700  bg-green-100 p-3 rounded-lg">{message}</div>}
            <div className="text-right p-3 mb-2">
                <Link className="text-white bg-green-700 rounded-lg text-sm px-4 py-2 mr-2" href={route('post.create')}>+ 追加する</Link>
            </div>
            <table className="w-full bg-gray-100">
                <thead className="bg-blue-100">
                    <tr>
                        <th>ID</th>
                        <th>タイトル</th>
                        <th>操作</th>
                    </tr>
                </thead>
                <tbody>
                    {props.posts.data.map(post => (
                        <tr key={post.id}>
                            <td className="p-2 border">{post.title}</td>
                            <td className="p-2 border">{post.body}</td>
                            <td className="p-2 border">
                                <Link
                                    className="text-white bg-gray-400 rounded-lg text-sm px-4 py-2 mr-2"
                                    href={route('post.show', { id: post.id })}>
                                    確認
                                </Link>
                                <Link
                                    className="text-white bg-blue-700 rounded-lg text-sm px-4 py-2 mr-2"
                                    href={route('post.edit', { id: post.id })}>
                                    変更
                                </Link>
                                <button
                                    className="text-white bg-red-700 rounded-lg text-sm px-4 py-2 mr-2"
                                    onClick={() => onDelete(post.id)}>
                                    削除
                                </button>
                            </td>
                        </tr>
                    ))}
                </tbody>
            </table>

            <Pagination data={props.posts} />
        </div>
    );
}
ループしているところなどVueと似た部分もあるので、Vueに慣れている方なら比較的シンプルに完了できるかと思います。(ちなみに、route()が使えるのは便利ですね👍)
なお、<Pagination />の部分は独自コンポーネントになりますので、後でつくることにします。
show
resources/js/Pages/Post/Show.jsx
import React from "react";
import { Link, Head } from '@inertiajs/inertia-react';

export default function Show(props) {

    const { title, body } = props.post;

    return (
        <div className="p-4">
            <h1 className="font-bold mb-3">{title}</h1>
            <div className="mb-3">{body}</div>
            <Link className="text-white bg-blue-700 rounded-lg text-sm px-4 py-2" href={route('post.index')}>戻る</Link>
        </div>
    );
}
postデータを表示しているだけのシンプルな内容になっています。
create
resources/js/Pages/Post/Create.jsx
import React from 'react';
import PostForm from "@/Components/Post/Form";

export default function Create(props) {

    const { post, errors } = props;

    return (
        <PostForm type="create" post={post} errors={errors}></PostForm>
    );

}
editとフォームを共通化してます。(「コンポーネントをつくる」で紹介します)
edit
resources/js/Pages/Post/Edit.jsx
import React from 'react';
import PostForm from "@/Components/Post/Form";

export default function Edit(props) {

    const { post, errors } = props;

    return (
        <PostForm type="edit" post={post} errors={errors}></PostForm>
    );

}
createとフォームを共通化してます。(「コンポーネントをつくる」で紹介します)
コンポーネントをつくる
続いて、ビューの中でセットしたコンポーネントが存在していないので、それぞれつくっていきます。
フォーム
createとeditで表示する入力フォームはほとんど同じなので、コンポーネントにして共通化します。
というのも、共通化しておくと、もし変更があっても1つのファイルだけを触ればOKになり、後でラクできるからです(← コレ大事 😊👍)
resources/js/Components/Post/Form.jsx
import React, { useState } from 'react';
import Label from "@/Components/Label";
import {Link, useForm} from "@inertiajs/inertia-react";
import {Inertia} from "@inertiajs/inertia";
import Loading from "@/Components/Loading";
import _ from 'lodash';

export default function Form(props) {

    // Data
    const type = props.type; // create or edit
    const post = props.post;
    const errors = props.errors;
    const { data, setData } = useForm({
        title: _.get(post, 'title', ''),
        body: _.get(post, 'body', ''),
    });
    const [loading, setLoading] = useState(false);

    // Methods
    const onFinish = () => setLoading(false);
    const onSubmit = () => {

        setLoading(true);

        if(type === 'create') { // 登録 or 変更で切り替える

            const url = route('post.store');
            Inertia.post(url, data, { onFinish });

        } else if(type === 'edit') {

            const url = route('post.update', props.post.id);
            Inertia.put(url, data, { onFinish });

        }

    };

    return (
        <div className="p-4">
            <div className="mb-3">
                <Label>タイトル</Label>
                <input className="w-80 border border-gray-500 p-2 rounded" value={data.title} onChange={e => setData('title', e.target.value)} />
                {errors.title && <div className="mt-2 text-red-500 bg-red-100 p-2 rounded">{errors.title}</div>}
            </div>
            <div className="mb-3">
                <Label>本文</Label>
                <textarea className="w-80 border border-gray-500 p-2 rounded" value={data.body} onChange={e => setData('body', e.target.value)} />
                {errors.body && <div className="mt-2 text-red-500 bg-red-100 p-2 rounded">{errors.body}</div>}
            </div>
            <button type="button" className="text-white bg-blue-700 rounded-lg text-sm px-4 py-2 mr-5" onClick={onSubmit}>送信する</button>
            <Link href={route('post.index')}>戻る</Link>
            <br />
            <Loading show={loading}></Loading>
        </div>
    );

}
内容としては、フォームでデータを管理し、送信するという流れになっています。
また、Lodashはこういうとき便利ですね👍
ページリンク
では、次にページリンク(pagination)です。
resources/js/Components/Pagination.jsx
import React from 'react';
import NavLink from "@/Components/NavLink";

export default function Pagination({ data }) {

    return (
        <div className="bg-white px-4 py-3 flex items-center justify-between border-t border-gray-200 sm:px-6">
            <div className="hidden sm:flex-1 sm:flex sm:items-center sm:justify-between">
                <div>
                    <nav className="relative z-0 inline-flex rounded-md shadow-sm -space-x-px">
                        {data.total > 0 && data.links.map(link => (
                            <NavLink
                                key={link.label}
                                href={link.url}
                                active={link.active}>
                                <span dangerouslySetInnerHTML={{ __html: link.label }} />
                            </NavLink>
                        ))}
                    </nav>
                </div>
            </div>
        </div>
    );

}
ここでは、Laravelのpaginate()から取得できるデータ構造に合わせてページリンクをつくっています。
ローディング(送信中かどうかが分かる表示)
送信時に何もリアクションがないと、「ん…送信されてる??」と不安になるので、完了するまでの間「読み込み中…」と表示するようにします。
なお、クルクル回るアイコンを使うと、よりリアルタイム感があっていいですね👍
resources/js/Components/Loading.jsx
import React from 'react';

export default function Loading({ show = false }) {

    return (
        <>
            {show && <span>読み込み中...</span>}
        </>
    );

}
ここでは、showがtrueかfalseかで表示/非表示を切り替えているだけです。
ルートをつくる
では、最後にルートです。
以下を追加してください。
routes/web.php
// 省略

Route::prefix('post')->controller(PostController::class)->group(function(){

    Route::get('/', 'index')->name('post.index');
    Route::get('/create', 'create')->name('post.create');
    Route::post('/', 'store')->name('post.store');
    Route::get('/{post}', 'show')->name('post.show');
    Route::get('/{post}/edit', 'edit')->name('post.edit');
    Route::put('/{post}', 'update')->name('post.update');
    Route::delete('/{post}', 'destroy')->name('post.destroy');

});

// 省略
作業はここで完了です。
お疲れ様でした😊✨
テストしてみる
では、実際にテストしてみましょう❗
まずはブラウザで「http://******/post」へアクセスします。
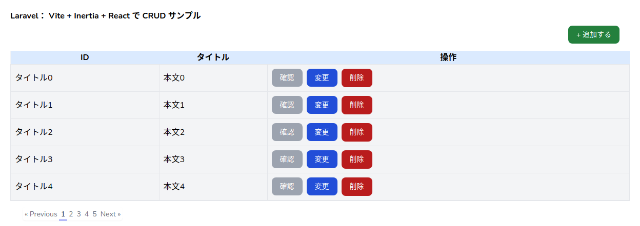
はい❗ページ一覧が表示されました。
では、まずはデータを登録するために「+ 追加する」ボタンをクリックしてみます。

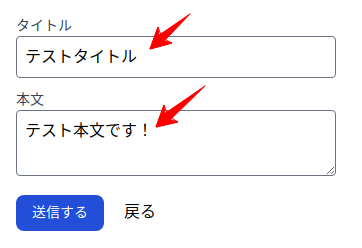
すると、入力フォームが表示されるので、以下のようにして送信ボタンを押してみます。
すると・・・・・・
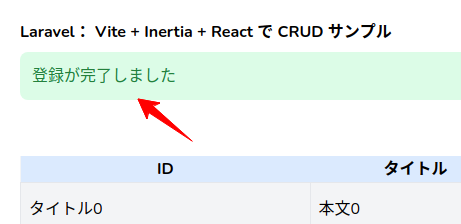
ページが移動して完了メッセージが表示されました。
では、ページリンクの最後まで移動してデータを確認してみましょう。
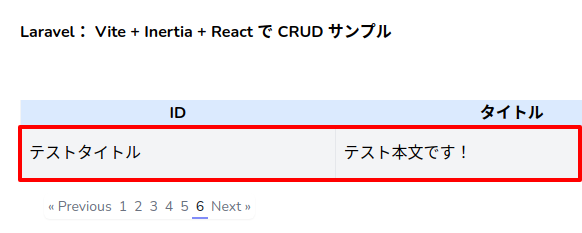
はい❗先ほど登録したデータを確認することができました。
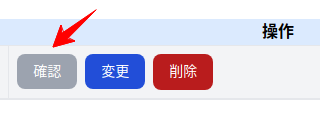
では、次にこのデータで変更機能のチェックをしてみます。
すぐ右側にある「変更」ボタンをクリックします。
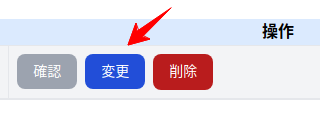
すると、先ほどと同じフォーム(共通化している部分)が表示されるので、中身を変更して送信してみましょう。
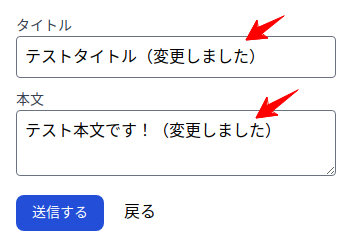
すると・・・・・・
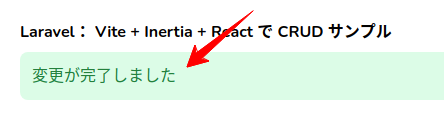
変更完了メッセージが表示されました。
では、今回もページ移動してきちんとデータ変更できているか確認してみましょう。
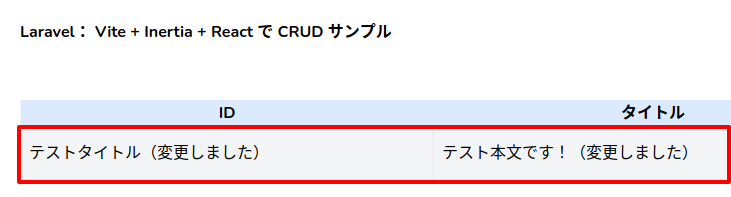
はい❗
先ほどの変更が反映されています。
では、続いて確認ページです。
すぐ右側にある「確認」ボタンをクリックします。
すると・・・・・・
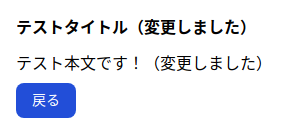
はい❗先ほど変更した内容が表示されました。
では、最後に削除です。
先ほどに一覧ページに戻って「削除」ボタンをクリックします。
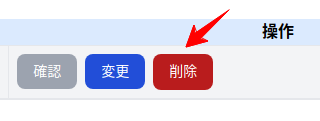
アラート確認がでるので「OK」ボタンをクリックすると・・・・・・
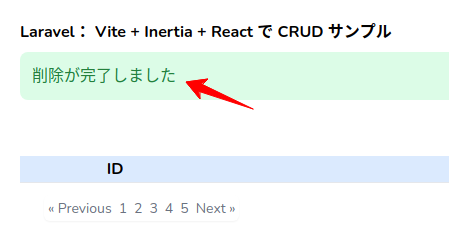
はい❗
削除完了メッセージが表示され、先ほどまで表示されていたデータが消えました。
すべて成功です😊✨
企業様へのご提案
これはReactに限らずですが、今回のように共通部分のコンポーネントをつくり、別の場所でも利用しやすくしておくことで、開発のスピードをあげることができます。
また、CSSフレームワークも同じものをつかっている場合でしたら、複数のプロジェクト間でもコンポーネントを再利用しやすいため、さらに開発効率を上げることができるでしょう。
ぜひそういった開発をご希望でしたら、いつでもお気軽にご相談ください。
お待ちしております。😊✨
おわりに
ということで、今回は「Laravel + Vite + Inertia + React」でCRUD機能をつくってみました。
なお、私は長年「Vue派」だったのでReactはあまり使って来ませんでしたが、昔チャレンジしたときよりはゼンゼン好印象でした。
「バーチャルDOM」のclassNameはちょっと嫌かなとは思うのですが、全体的に整理整頓されたコードが書けますし、なによりViteを使っているのでnpmのときのようなビルド時間が不要というのも大きな理由の1つです。
また、少し前にlivewireを使ってみましたが、個人的な印象としてはそっちに近いのかな、という印象を受けました。
ぜひ皆さんもVueとの違いを楽しんでみてくださいね。
ではでは〜❗
 「ワーケーションしたら、
生活リズムが
バラバラになってしまいました…」