九保すこひです(フリーランスのITコンサルタント、エンジニア)
さてさて、この間誕生日を迎え、人生が少しずつ長くなっているのを感じています。
そして、こういった場合に「あの頃はよく遊びにいってたな」とか「あの旅行楽しかったな」なんて思い出したりするのですが、それと同時に「ちょっとしたやっかい事」があるのを思い出しました。
それが・・・・・・・
出欠の確認
です。
これは仕事でもあると思うのですが、出欠をとるとき、代表者がメンバー全員にメールを送り、返信してもらって「Aさんは出席、Bさんは欠席・・・」というカンジになりますが、これってメンバーが多くなるとめんどうになりますよね。
そこで❗
今回はこの「出欠システム」をLaravelでつくってみることにしました。
ぜひ何かの参考になりましたら嬉しいです。😊✨
 「最近、真夏になると、
風がドライヤーのよう・・・」
開発環境: Laravel 8.x、Vue 3
目次
前提として
今回はプライベートな出欠システムを考えていますので、Laravelにログイン機能がインストールされ、テストユーザーが登録されていることが前提です。
もしまだの方は以下のページを参考にしてみてください。
📝 参考ページ: Laravel Breezeで「シンプルな」ログイン機能をインストール
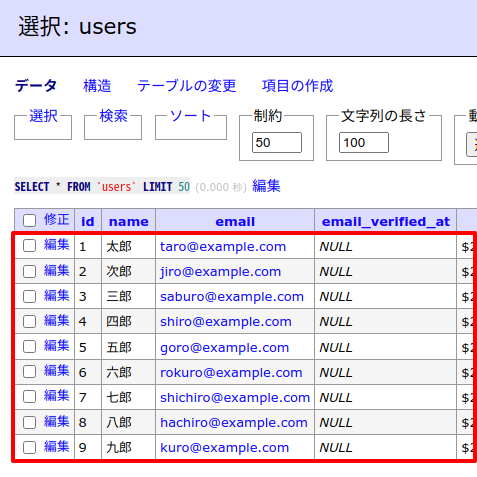
実際のテーブルはこんなカンジです。
では、はりきってやっていきましょう❗
DBまわりをつくる
まずはデータを保管するためのDBテーブルをつくっていきます。
今回は必要になるのは、次の3つです。
- イベント: どんなイベントがあるのか
- 出欠: 誰が出席/欠席/未回答なのか
- 出欠タイプ: 出席/欠席/未回答のマスターデータ
ということでこれらのモデル&マイグレーションをつくっていきましょう。
以下のコマンドを実行してください。
php artisan make:model Meeting -m
※ 今回Eventというモデルでも良かったのですが、LaravelにはEvent機能もありますし、もし予約語とバッティングするとイヤなので、あえてMeetingにしました。m(_ _)m
すると、ファイルが2つ作成されるのでそれぞれ中身を次のようにします。
database/migrations/****_**_**_******_create_meetings_table.php
// 省略

public function up()
{
    Schema::create('meetings', function (Blueprint $table) {
        $table->id();
        $table->unsignedBigInteger('user_id')->comment('ユーザーID');
        $table->string('name')->comment('イベント名');
        $table->text('description')->comment('イベント詳細');
        $table->timestamps();

        $table->foreign('user_id')->references('id')->on('users');
    });
}

// 省略
そしてモデルです。
app/Models/Meeting.php
<?php

namespace App\Models;

use Illuminate\Database\Eloquent\Factories\HasFactory;
use Illuminate\Database\Eloquent\Model;

class Meeting extends Model
{
    use HasFactory;

    // Relationship
    public function attendances()
    {
        return $this->hasMany(MeetingAttendance::class, 'meeting_id', 'id');
    }
}
次に、出欠データのモデル&マイグレーションですが、先に「出欠タイプ」をつくります。
データは以下の3つです。
- 出席 => 1
- 欠席 => 2
- 未回答 => 99
以下のコマンドを実行してください。
php artisan make:model MeetingAttendanceType -m
同じく作成されたファイルを以下のように変更します。
database/migrations/****_**_**_******_create_meeting_attendance_types_table.php
// 省略

public function up()
{
    Schema::create('meeting_attendance_types', function (Blueprint $table) {
        $table->id();
        $table->string('name')->comment('名前');
    });
}

// 省略
※ なお、出席タイプはマスターデータなのでcreated_atとupdated_atは省略しています。
app/Models/MeetingAttendanceType.php
<?php

namespace App\Models;

use Illuminate\Database\Eloquent\Factories\HasFactory;
use Illuminate\Database\Eloquent\Model;

class MeetingAttendanceType extends Model
{
    use HasFactory;

    public $timestamps = false; // 👈 日付は無効にする

    // Constants
    const TYPE_YES = 1;
    const TYPE_NO = 2;
    const TYPE_NOT_YET = 99;
}
では、出欠テーブル本体です。
php artisan make:model MeetingAttendance -m
こちらも作成されたファイルを以下のように変更します。
database/migrations/****_**_**_******_create_meeting_attendances_table.php
// 省略
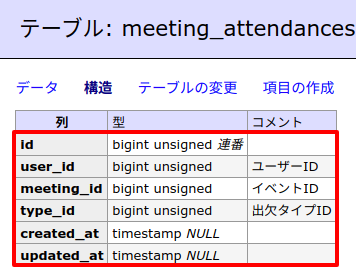
Schema::create('meeting_attendances', function (Blueprint $table) {
$table->id();
$table->unsignedBigInteger('user_id')->comment('ユーザーID');
$table->unsignedBigInteger('meeting_id')->comment('イベントID');
$table->unsignedBigInteger('type_id')->comment('出欠タイプID');
$table->timestamps();
$table->foreign('user_id')->references('id')->on('users');
$table->foreign('meeting_id')->references('id')->on('meetings');
$table->foreign('type_id')->references('id')->on('meeting_attendance_types');
});
// 省略
次にモデルです。
app/Models/MeetingAttendance.php
<?php

namespace App\Models;

use Illuminate\Database\Eloquent\Factories\HasFactory;
use Illuminate\Database\Eloquent\Model;

class MeetingAttendance extends Model
{
    use HasFactory;

    // Relationship
    public function type()
    {
        return $this->belongsTo(MeetingAttendanceType::class, 'type_id', 'id');
    }
}
DBデータをつくる
では、「出欠タイプ」をmeeting_attendance_typesテーブルに登録できるようSeederファイルを作っておきましょう。
以下のコマンドを実行してください。
php artisan make:seed MeetingAttendanceTypeSeeder
するとSeederファイルが作成されるので中身を次のようにします。
database/seeders/MeetingAttendanceTypeSeeder.php
<?php

namespace Database\Seeders;

use App\Models\MeetingAttendanceType;
use Illuminate\Database\Seeder;

class MeetingAttendanceTypeSeeder extends Seeder
{
    /**
     * Run the database seeds.
     *
     * @return void
     */
    public function run()
    {
        $names = [
            MeetingAttendanceType::TYPE_YES => '出席',
            MeetingAttendanceType::TYPE_NO => '欠席',
            MeetingAttendanceType::TYPE_NOT_YET => '未回答',
        ];

        foreach ($names as $id => $name) {

            $meeting_attendance_type = new MeetingAttendanceType();
            $meeting_attendance_type->id = $id;
            $meeting_attendance_type->name = $name;
            $meeting_attendance_type->save();

        }
    }
}
Seederは、作成しただけでは有効にはなりませんので、Laravel側へ登録しましょう。
database/seeders/DatabaseSeeder.php
<?php

namespace Database\Seeders;

use Illuminate\Database\Seeder;

class DatabaseSeeder extends Seeder
{
    /**
     * Seed the application's database.
     *
     * @return void
     */
    public function run()
    {
        // 省略

        $this->call(MeetingAttendanceTypeSeeder::class);
    }
}
これで、DBまわりの設定は完了です。
では、この状態でDBを再構築してみましょう。
以下のコマンドを実行してください。
php artisan migrate:fresh --seed
実行が完了すると、実際のテーブルはこうなります。


イベント(ミーティング)を登録する部分をつくる
では、ここからはユーザーがブラウザで操作する部分をつくっていきます。
まずは、イベント(ミーティング)を登録する部分です。
コントローラーをつくる
ではコントローラーをつくります。
以下のコマンドを実行してください。
php artisan make:controller MeetingController
するとファイルが作成されるので中身を次のようにします。
app/Http/Controllers/MeetingController.php
<?php

namespace App\Http\Controllers;

use App\Mail\MeetingCreated;
use App\Models\Meeting;
use App\Models\MeetingAttendance;
use App\Models\MeetingAttendanceType;
use App\Models\User;
use Illuminate\Http\Request;
use Illuminate\Support\Facades\DB;
use Illuminate\Support\Facades\Mail;

class MeetingController extends Controller
{
    public function create()
    {
        $user_id = auth()->id();
        $users = User::where('id', '!=', $user_id)->get(); // 自分以外のユーザー取得

        return view('meeting.create')->with([
            'users' => $users
        ]);
    }

    public function store(Request $request)
    {
        // バリデーションは割愛します

        $result = false;

        DB::beginTransaction();

        try {

            $meeting = new Meeting();
            $meeting->user_id = auth()->id();
            $meeting->name = $request->name;
            $meeting->description = $request->description;
            $result = $meeting->save();

            $user_ids = $request->user_ids;

            foreach ($user_ids as $user_id) {

                $attendance = new MeetingAttendance();
                $attendance->user_id = $user_id;
                $attendance->meeting_id = $meeting->id;
                $attendance->type_id = MeetingAttendanceType::TYPE_NOT_YET;
                $attendance->save();

            }

            DB::commit();
            $result = true;

            $this->sendMail($meeting, $user_ids);

        } catch (\Exception $e) {

            DB::rollBack();

        }

        return ['result' => $result];
    }

    private function sendMail(Meeting $meeting, array $user_ids)
    {
        $users = User::whereIn('id', $user_ids)->get();
        Mail::cc($users)->send(new MeetingCreated($meeting));
    }
}
※ なお、今回のメインは「出欠システム」なので出欠確認データの一覧や変更・削除、バリデーションは割愛しています。
ビューをつくる
続いて、先ほど作成したコントローラーで必要になるビュー(HTML部分)をつくります。
以下のBladeファイルを作成してください。
resources/views/meeting/create.blade.php
<html>
<head>
    <link href="https://cdn.jsdelivr.net/npm/bootstrap@5.0.1/dist/css/bootstrap.min.css" rel="stylesheet">
</head>
<body>
<div id="app">
    <div class="p-4">
        <div class="row">
            <div class="col-6 mb-3">
                <label class="form-label">イベント名(ミーティング名)</label>
                <input type="text" class="form-control" v-model="params.name">
            </div>
        </div>
        <div class="row">
            <div class="col-6 mb-3">
                <label class="form-label">詳細</label>
                <textarea rows="5" class="form-control" v-model="params.description"></textarea>
            </div>
        </div>
        <div class="row">
            <div class="col-6 mb-3">
                <label class="form-label">招待するユーザー</label>
                <div v-for="user in users">
                    <label>
                        <input type="checkbox" :value="user.id" v-model="params.user_ids"> <span v-text="user.name"></span>
                    </label>
                </div>
            </div>
        </div>
        <button type="button" class="btn btn-primary" @click="onSubmit">送信する</button>
    </div>
</div>
<script src="https://cdn.jsdelivr.net/npm/bootstrap@5.0.1/dist/js/bootstrap.min.js"></script>
<script src="https://unpkg.com/vue@3.1.1/dist/vue.global.prod.js"></script>
<script src="https://cdnjs.cloudflare.com/ajax/libs/axios/0.21.1/axios.min.js"></script>
<script>

    Vue.createApp({
        data() {
            return {
                params: {
                    name: '',
                    description: '',
                    user_ids: []
                },
                users: @json($users)
            }
        },
        methods: {
            onSubmit() {

                if(confirm('送信します。よろしいですか?')) {

                    const url = '{{ route('meeting.store') }}';

                    axios.post(url, this.params)
                        .then(response => {

                            if(response.data.result === true) {

                                this.params = {
                                    name: '',
                                    description: '',
                                    user_ids: []
                                }

                                alert('登録完了!');

                            }

                        })
                        .catch(error => {

                            // エラー処理は割愛します。

                        });

                }

            }
        }
    }).mount('#app');

</script>
</body>
</html>
ルートを登録する
コントローラーで作成したメソッドへブラウザからアクセスできるようルートを登録します。
routes/web.php
use App\Http\Controllers\MeetingController;

// 省略

Route::prefix('meeting')->middleware('auth')->group(function(){

    Route::get('create', [MeetingController::class, 'create'])->name('meeting.create');
    Route::post('store', [MeetingController::class, 'store'])->name('meeting.store');

});
※ なお、今回はログイン必須にするためにauthミドルウェアをつけています。
メール送信部分をつくる
先ほど作成したコントローラー内では、イベント(ミーティング)が登録された時点で出欠確認ページのURLをメール送信するようにしています。
そこで、以下のコマンドを実行してMailableを作成してください。
app/Mail/MeetingCreated.php
<?php

namespace App\Mail;

use App\Models\Meeting;
use Illuminate\Bus\Queueable;
use Illuminate\Contracts\Queue\ShouldQueue;
use Illuminate\Mail\Mailable;
use Illuminate\Queue\SerializesModels;

class MeetingCreated extends Mailable
{
    use Queueable, SerializesModels;

    private $meeting;

    /**
     * Create a new message instance.
     *
     * @return void
     */
    public function __construct(Meeting $meeting)
    {
        $this->meeting = $meeting;
    }

    /**
     * Build the message.
     *
     * @return $this
     */
    public function build()
    {
        $url = route('meeting_attendance.edit', $this->meeting->id);

        return $this
            ->from('no-reply@example.com')
            ->subject('イベント(ミーティング)への招待がありました')
            ->text('emails.meeting_created', [
                'meeting' => $this->meeting,
                'url' => $url
            ]);
    }
}
そして、Mailableの中でセットしたメール文面をつくります。
以下のファイルを作成してください。
resources/views/emails/meeting_created.blade.php
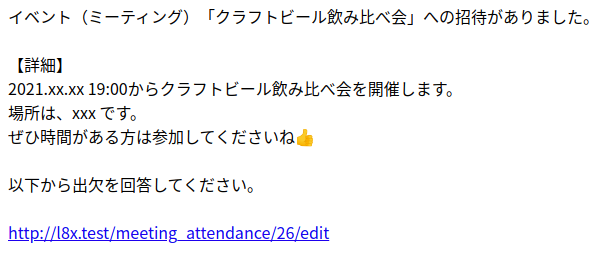
イベント(ミーティング)「{{ $meeting->name }}」への招待がありました。

【詳細】
{{ $meeting->description }}

以下から出欠を回答してください。

{{ $url }}
これで、イベントが登録されたら該当するユーザーに以下のようなメールが送信されることになります。
※ なお、ルートが存在していないので、この時点でメール送信テストする場合は、route('meeting_attendance.edit', $this->meeting->id);の部分を適当なURLに変更して実行してください。
出欠を回答する部分をつくる
では今回メインとなる「出欠の回答」をする部分です。
コントローラーをつくる
まずはコントローラーです。
以下のコマンドを実行してください。
php artisan make:controller MeetingAttendanceController
するとファイルが作成されるので、中身を以下のようにします。
app/Http/Controllers/MeetingAttendanceController.php
<?php

namespace App\Http\Controllers;

use App\Models\Meeting;
use App\Models\MeetingAttendance;
use App\Models\MeetingAttendanceType;
use Illuminate\Http\Request;

class MeetingAttendanceController extends Controller
{
    public function create(Meeting $meeting)
    {
        $grouped_attendances = $meeting->attendances->groupBy('type_id');
        $attendance_types = MeetingAttendanceType::pluck('name', 'id');

        return view('meeting_attendance.create')->with([
            'meeting' => $meeting,
            'grouped_attendances' => $grouped_attendances,
            'attendance_types' => $attendance_types
        ]);
    }

    public function update(Meeting $meeting, Request $request)
    {
        // バリデーションは割愛します

        $result = false;
        $user_id = auth()->id();
        $attendance = MeetingAttendance::where('meeting_id', $meeting->id)
            ->where('user_id', $user_id)
            ->first();

        if(!is_null($attendance)) {

            $attendance->type_id = $request->type_id;
            $result = $attendance->save();

        }

        return ['result' => $result];
    }
}
ビューをつくる
続いてcreate()内でセットしたビュー(HTML)です。
以下のファイルを作成してください。
resources/views/meeting_attendance/create.blade.php
<html>
<head>
    <link href="https://cdn.jsdelivr.net/npm/bootstrap@5.0.1/dist/css/bootstrap.min.css" rel="stylesheet">
</head>
<body>
<div id="app">
    <div class="p-4">
        <div class="mb-3">
            「<strong>{{ $meeting->name }}</strong>」への出欠はどうしますか?
            <div class="mt-3 mb-4">
                <button
                        type="button"
                        class="btn btn-outline-primary me-3"
                        v-text="name"
                        v-for="(name,id) in attendanceTypes"
                        @click="onSubmit(id)"></button>
            </div>
            <span class="badge bg-primary mb-2">現在の出欠状況</span>
            <div class="p-3 bg-light">
                @foreach($grouped_attendances as $id => $attendances)
                    <div>
                        {{ $attendance_types[$id] }}: {{ $attendances->count() }}人
                    </div>
                @endforeach
            </div>
        </div>
    </div>
</div>
<script src="https://cdn.jsdelivr.net/npm/bootstrap@5.0.1/dist/js/bootstrap.min.js"></script>
<script src="https://unpkg.com/vue@3.1.1/dist/vue.global.prod.js"></script>
<script src="https://cdnjs.cloudflare.com/ajax/libs/axios/0.21.1/axios.min.js"></script>
<script>

    Vue.createApp({
        data() {
            return {
                attendanceTypes: @json($attendance_types)
            }
        },
        methods: {
            onSubmit(typeId) {

                if(confirm('送信します。よろしいですか?')) {

                    const url = '{{ route('meeting_attendance.update', $meeting->id) }}';
                    const params = {
                        type_id: typeId,
                        _method: 'PUT'
                    };

                    axios.post(url, params)
                        .then(response => {

                            if(response.data.result === true) {

                                alert('登録完了!');
                                location.reload();

                            }

                        })
                        .catch(error => {

                            // エラー処理は割愛します。

                        });

                }

            }
        }
    }).mount('#app');

</script>
</body>
</html>
ミドルウェアをつくる
今回はプライベートな出欠確認システムを想定していますので、招待されていないユーザーは回答ページにアクセスできないようにします。
そこで、ミドルウェアを使って「権限のある人だけ」閲覧できるようにしましょう。以下のコマンドを実行してください。
php artisan make:middleware IsInvitedUser
するとファイルが作成されるので、中身を次のように変更します。
app/Http/Middleware/IsInvitedUser.php
// 省略

public function handle(Request $request, Closure $next)
{
    if(auth()->check()) {

        $meeting = $request->route('meeting');
        $is_invited = $meeting->attendances->contains(function($attendance){ // データが存在するかチェック

            return (intval($attendance->user_id) === intval(auth()->id()));

        });

        if($is_invited === true) {

            return $next($request);

        }

    }

    return redirect('/'); // 強制リダイレクト
}

// 省略
なお、ミドルウェアは作成しただけでは有効にならないので、Laravelへ登録します。
app/Http/Kernel.php
protected $routeMiddleware = [

    // 省略

    'is_invited_user' => IsInvitedUser::class
];
ルートをつくる
では、最後にルートをセットします。
routes/web.php
use App\Http\Controllers\MeetingAttendanceController;

Route::prefix('meeting_attendance')->middleware(['auth', 'is_invited_user'])->group(function(){

    Route::get('{meeting}/edit', [MeetingAttendanceController::class, 'create'])->name('meeting_attendance.edit');
    Route::put('update/{meeting}', [MeetingAttendanceController::class, 'update'])->name('meeting_attendance.update');

});
テストしてみる
では実際にテストしてみましょう❗
まず、「太郎さん」でログインして「http://******/meeting/create」へアクセスします。
するとフォームが表示されるので、適当に内容を入力します。
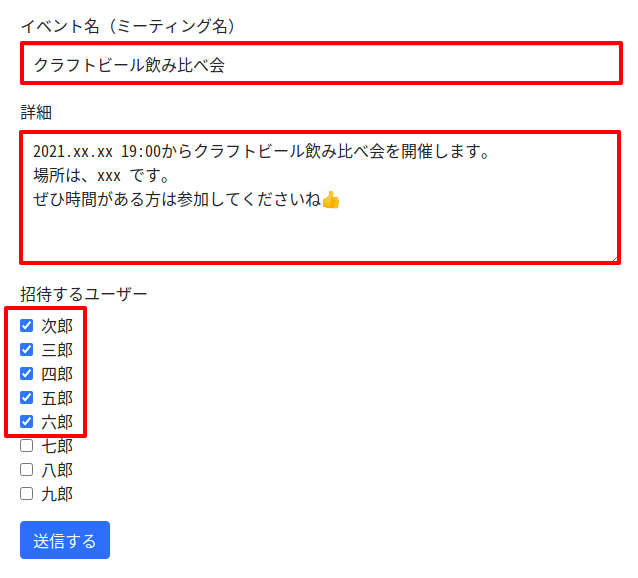
(いつもビールでスミマセン🍺✨)
そして、「送信する」ボタンをクリックします。
すると・・・・・・
メールが送信されてきました。
ここで、「太郎さん」はログアウトして、次は先ほど招待された「次郎さん」でログインします。(他の人はアクセス権限がないからです)
すると、以下のようなページが表示されます。
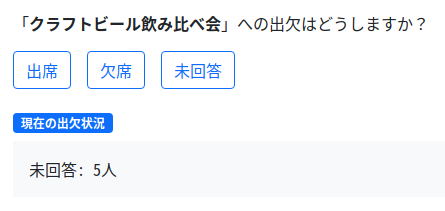
では、今回は「出席」をクリックしてみましょう。
どうなったでしょうか・・・・・・??
はい❗
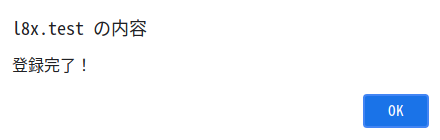
登録完了のアラートが表示されました。
最後にOKボタンを押してページが変わるかチェックしてみましょう。
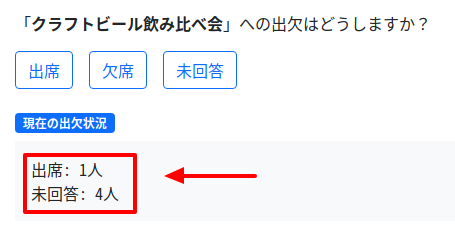
うまく変更されました❗
成功です😊✨
企業様へのご提案
今回は基本的な部分のみを実装しましたが、拡張することで以下のような機能をつくることができます。
- メールだけでなく、LINE や Chatwork などのメッセージング・サービスと連携できる(ユーザー自信が選択できるようにする)
- タイマー実行をつかって、期限が迫っているのにまだ回答していない人へ「未回答の出欠があります」と通知をすることができる
- 出欠の登録があった時点で、イベントを登録した人に「現在の状況」を知らせることができる
- もし日時などイベントに変更があった場合は「変更がありました」などのメッセージを招待ユーザー全員に送り、再度出欠をとることができる
- メールが届かなかった場合は登録者に通知し、個別に同じメッセージを送信できるようにする
- ユーザーごとに「過去の出席率」などを出し意欲的かどうかをチェックする。
- 過去のデータからより出席してくれる日時や内容の統計をとる
などなど。
もしこういった機能をご希望でしたらぜひお問い合わせからご連絡ください。
どうぞよろしくお願いいたします。m(_ _)m
おわりに
ということで、今回はLaravelで出欠確認システムをつくってみました。
最近ではLINEなどでも同様の機能があるようですが、既存システムがある場合は特定のデータを含めることも簡単ですし、また外部のシステムに依存しないため情報流出の危険性も少なくできるんじゃないでしょうか(もちろんサイト自体にきちんとした対策をしないと、ですが)
なお、今回に限らずですが、やはりLaravelのCollectionは強力だと感じました。(contains()のところで特に感じました👍)
Collectionのメソッドを知っているか知っていないかだけで、コード量が増減しますし、ということは省コード&時短ができるということです。
ぜひ私も「これをやる必要がある」となると、公式ドキュメントを見なくてもパッとメソッド名が思いつくようになりたいですね。
Laravel開発陣には足を向けて寝られないです(心から!)
ではでは〜❗

「なとりのタイカレー缶詰
おいっしいです!」