

九保すこひです(フリーランスのITコンサルタント、エンジニア)
さてさて、先日確定申告に行ったのですが、そこには私以外にもたくさんの方がいらっしゃってて職員の方も全力で対応されているようでした。
そのため、入り口で「受付番号」を発行して自分の順番が来るのを待っていたのですが、その時あるアイデアが浮かびました。
受付番号システムって、Laravel + Pythonでつくれるよね❓❓
と。
そこで、早速Amazonで以下のサーマル・レシート・プリンタを購入(4,499円)してやってみることにしました。

ということで、今回はチャレンジ企画です。
ぜひ皆さんに楽しんでいただけると嬉しいです😊✨
※なお、このシステムを使えばコスト削減できますので、ぜひ企業様方ご依頼お待ちしています😊👍(ブラウザを使うので通常のパソコンやiPadで運用できます❗)

「レシートプリンタって
安いのがあるんですね😲」
目次
やりたいこと
今回開発する内容はおおまかに次の4つです。
- お客さんが受付番号を発行できる(レシートに印刷)
- スタッフが受付データを「呼び出し」「完了」にステータス変更できる
- 呼び出し設定された受付番号をリスト表示し、お客さんに順番が来たことを知らせる
では、実際にやっていきましょう❗
モデル&マイグレーションをつくる
受付タイプデータ
まずは受付タイプです。
php artisan make:model ReceptionType -m
コマンドを実行したら、モデルを開いてリレーションシップを追加します。
/app/ReceptionType.php
<?php

namespace App;

use Illuminate\Database\Eloquent\Model;

class ReceptionType extends Model
{
    // Relationship
    public function waits() { // 👈 待っているお客さん(現在 + 次の受付データ)

        return $this->hasMany('App\Reception', 'type_id', 'id')
            ->whereIn('status', ['ready', 'preparation']);

    }

    public function readies() { // 👈 対応中のお客さん

        return $this->hasMany('App\Reception', 'type_id', 'id')
            ->whereIn('status', ['ready']);

    }

    private function getToday() {

        return today()->format('Y-m-d');

    }
}
そして、マイグレーションを変更しましょう。
/database/migrations/****_**_**_******_create_reception_types_table.php
// 省略

public function up()
{
    Schema::create('reception_types', function (Blueprint $table) {
        $table->id();
        $table->string('name')->comment('受付タイプの名前');
        $table->timestamps();
    });
}

// 省略
受付データ
次に受付データです。
ここで受付番号を管理します。
php artisan make:model Reception -m
続いて、先にモデルにセットするReceptionCreatingイベントを作ります。
php artisan make:event ReceptionCreating
イベントのファイルが作成されたら中身を次のようにしてください。
/app/Events/ReceptionCreating.php
// 省略

public function __construct(Reception $reception)
{
    // 今日の最大受付番号を取得
    $received_on = today()->format('Y-m-d');
    $max_reception_number = \App\Reception::where('received_on', $received_on) // 今日の日付で絞り込み
        ->where('type_id', $reception->type_id) // 同じ受付タイプで絞り込み
        ->max('reception_number');
    $reception->reception_number = intval($max_reception_number) + 1; // 新しい受付番号をセット
    $reception->received_on = $received_on;
}

// 省略
この中では、receptionsテーブルに新規データ追加するとき、自動で受付番号と今日の日付をセットします。
そして、モデルを開いてイベントを追加します。
/app/Reception.php
<?php

namespace App;

use App\Events\ReceptionCreating;
use Illuminate\Database\Eloquent\Model;

class Reception extends Model
{
    protected $dispatchesEvents = [
        'creating' => ReceptionCreating::class
    ];
}
また、マイグレーションを以下のように変更してください。
/database/migrations/****_**_**_******_create_receptions_table.php
// 省略

public function up()
{
    Schema::create('receptions', function (Blueprint $table) {
        $table->id();
        $table->unsignedBigInteger('type_id')->comment('reception_types.id');
        $table->integer('reception_number')->comment('受付番号');
        $table->string('status')->default('preparation')->comment('状態'); // preparation: 準備中, ready: 準備済み, complete: 完了
        $table->date('received_on')->comment('受付した日付');
        $table->timestamps();

        $table->foreign('type_id')->references('id')->on('reception_types');
    });
}

// 省略
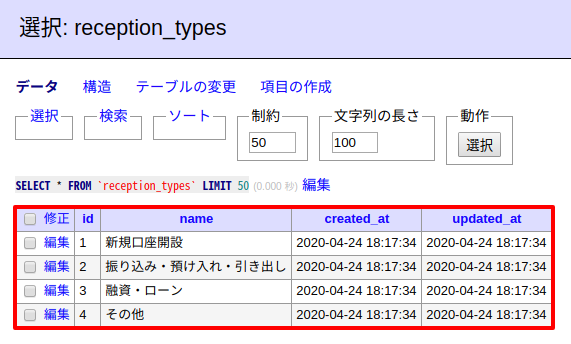
初期(テスト)データをつくる
先ほどつくったテーブルreception_typesに今回は以下4つの受付タイプを追加します。
- 新規口座開設
- 振り込み・預け入れ・引き出し
- 融資・ローン
- その他
では、以下のコマンドを実行してください。
php artisan make:seed ReceptionTypesSeeder
/database/seeds/ReceptionTypesSeeder.php
<?php

use Illuminate\Database\Seeder;

class ReceptionTypesSeeder extends Seeder
{
    /**
     * Run the database seeds.
     *
     * @return void
     */
    public function run()
    {
        $type_names = [
            '新規口座開設',
            '振り込み・預け入れ・引き出し',
            '融資・ローン',
            'その他'
        ];

        foreach($type_names as $type_name) {

            $reception_type = new \App\ReceptionType();
            $reception_type->name = $type_name;
            $reception_type->save();

        }
    }
}
次にReceptionTypesSeederを登録します。
/database/seeds/DatabaseSeeder.php
<?php

use Illuminate\Database\Seeder;

class DatabaseSeeder extends Seeder
{
    /**
     * Seed the application's database.
     *
     * @return void
     */
    public function run()
    {
         //$this->call(UsersTableSeeder::class);
         $this->call(ReceptionTypesSeeder::class); // 👈 追加
    }
}
では、マイグレーションを実行しましょう。
php artisan migrate:fresh --seed
reception_typesテーブルはこうなります。
ルートをつくる
では、次にルートです。
/routes/web.php
// ブラウザ側 ・・・ ①
Route::get('reception/number_tag', 'ReceptionController@number_tag');
Route::get('reception/display', 'ReceptionController@display');
Route::get('reception/manage', 'ReceptionController@manage');

// Ajax ・・・ ②
Route::post('ajax/reception', 'Ajax\ReceptionController@store');
Route::put('ajax/reception/{reception}', 'Ajax\ReceptionController@update');
Route::get('ajax/reception_type', 'Ajax\receptionTypeController@index');
ルートの中ではそれぞれ次の役割をもっています。
①ブラウザ側
- reception/number_tag: お客さんが受付番号を発行するページ
- reception/display: 順番が回ってきた受付番号を表示するページ
- reception/manage: スタッフが受付データを管理するページ
②Ajax側
- ajax/reception: 新規受付データを追加する
- ajax/reception/{reception}: 受付データを更新する(ステータス変更)
- ajax/reception_type: 受付タイプ(と関連データ)を取得する
コントローラーをつくる
そして、コントローラーですが全部で3つ作ります。
ブラウザ側のコントローラー
以下のコマンドを実行してください。
php artisan make:controller ReceptionController
中身はこうなります。
<?php

namespace App\Http\Controllers;

use Illuminate\Http\Request;

class ReceptionController extends Controller
{
    // 👇 追加
    public function number_tag() {

        return view('reception.number_tag');

    }

    public function display() {

        return view('reception.display');

    }

    public function manage() {

        return view('reception.manage');

    }
}
Ajax側のコントローラー
以下のコマンドを実行してください。
php artisan make:controller Ajax\\ReceptionController
このコントローラーは、receptionsテーブルにデータを追加/更新するために使います。
中身はこうなります。
/app/Http/Controllers/Ajax/ReceptionController.php
<?php

namespace App\Http\Controllers\Ajax;

use App\Http\Controllers\Controller;
use Illuminate\Http\Request;

class ReceptionController extends Controller
{
    public function store(Request $request) { // 👈 新規追加

        // バリデーション
        $request->validate([
            'type_id' => 'required|integer|exists:reception_types,id'
        ]);

        // 新規待受データを追加
        $reception = new \App\Reception();
        $reception->type_id = $request->type_id;
        $result = $reception->save();
        return ['result' => $result];

    }

    public function update(Request $request) {{ // 👈 更新

        // バリデーション
        $request->validate([
            'status' => 'in:ready,complete'
        ]);

        $reception = \App\Reception::find($request->id);
        $reception->status = $request->status;
        $result = $reception->save();
        return ['result' => $result];

    }
}
なお、それぞれのメソッドが実行されるのは次の場合です。
- store: お客さんが受付番号を発行した
- update: スタッフが待っているお客さんを呼び出した
- update: 相談が完了した
そして、受付タイプをAjaxで取得するコントローラーもつくります。
同じく以下のコマンドを実行してください。
php artisan make:controller Ajax\\ReceptionTypeController
中身は以下のように変更してください。
/app/Http/Controllers/Ajax/ReceptionTypeController.php
<?php

namespace App\Http\Controllers\Ajax;

use App\Http\Controllers\Controller;
use Illuminate\Http\Request;

class ReceptionTypeController extends Controller
{
    public function index() {

        return \App\ReceptionType::with('waits', 'readies')
            ->withCount('waits')
            ->get();

    }
}
この中では、受付タイプを取得するのですが同時に以下のデータもリレーションシップを通して取得しています。
- waits: 待っているお客さん&その件数
- readies: 対応中のお客さん
ビューをつくる
では、ビューをつくっていきます。
内容は次のとおりです。
- お客さんが受付番号を発行するページ
- 管理者が待受を操作するページ
- 順番が来たことが分かる呼び出しページ
では、ひとつずつ作っていきましょう。
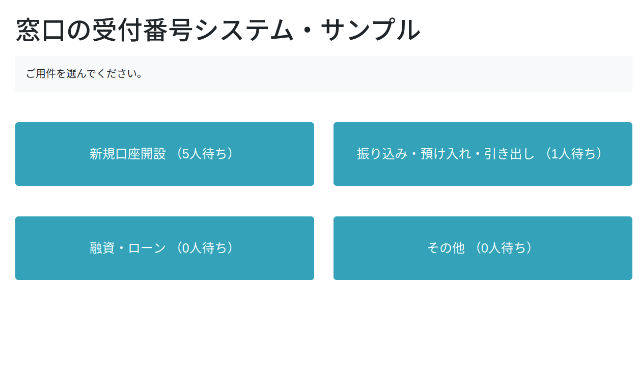
お客さんが受付番号を発行するページ
/resources/views/reception/number_tag.blade.php
<html>
<head>
    <link href="https://stackpath.bootstrapcdn.com/bootstrap/4.4.1/css/bootstrap.min.css" rel="stylesheet">
</head>
<body>
    <div id="app" class="p-4">
        <h1 class="mb-3">窓口の受付番号システム・サンプル</h1>
        <div class="bg-light p-3 mb-5">
            ご用件を選んでください。
        </div>
        <div class="row">
            <!-- 受付タイプごとのボタンをつくる ・・・ ① -->
            <div class="col-md-6" v-for="t in receptionTypes">
                <button
                    type="button"
                    class="btn btn-info btn-lg btn-block mb-5 text-bold"
                    style="height:100px;"
                    :disabled="submitting"
                    @click="issueNumberTag(t.id)">
                    <span v-text="t.name"></span>
                    (<span v-text="t.waits_count"></span>人待ち)
                </button>
            </div>
            <div class="col-md-12 text-center" v-if="submitting">
                <h1 class="text-danger text-bold">受付番号をお取りください。</h1>
            </div>
        </div>
    </div>
    <script src="https://cdnjs.cloudflare.com/ajax/libs/vue/2.6.11/vue.min.js"></script>
    <script src="https://cdnjs.cloudflare.com/ajax/libs/axios/0.19.2/axios.min.js"></script>
    <script>

        new Vue({
            el: '#app',
            data: {
                receptionTypes: [],
                submitting: false
            },
            methods: {
                getTypes() {

                    // reception_typesのデータ取得
                    axios.get('/ajax/reception_type')
                        .then(response => {

                            this.receptionTypes = response.data;

                        });

                },
                issueNumberTag(receptionTypeId) {

                    this.submitting = true;

                    // 選択されたボタンの受付タイプIDを送信してreceptionsデータを追加 ・・・ ②
                    const url = '/ajax/reception';
                    const params = {
                        type_id: receptionTypeId
                    };
                    axios.post(url, params)
                        .then(response => {

                            if(response.data.result === true) {

                                console.log('登録成功!');

                            }

                        })
                        .catch(error => { /* エラー処理 */ })
                        .then(() => {

                            // 受付番号を印刷する時間として5秒待機する
                            setTimeout(() => {

                                this.submitting = false;
                                this.getTypes();

                            }, 5000);

                        });

                }
            },
            mounted() {

                this.getTypes();
                setInterval(() => { // 3秒ごとに受付データを更新する

                    this.getTypes();

                }, 3000);

            }
        });

    </script>
</body>
</html>
この中で重要なのは次のとおりです。
①受付タイプごとのボタンをつくる
全ての受付タイプに対応するボタン(今回は4つ)をループで作成することになりますが、ループの元になるreceptionTypesはmounted()の中でAjaxを通して取得しています。
②選択されたボタンの受付タイプIDを送信して「receptions」データを追加
ここは各ボタンがクリックされたときに実行されます。
送信されるデータは、クリックされた受付タイプのIDで、このデータを使ってAjax\ReceptionControllerでデータ登録することになります。(つまり、新しい受付をすることになります)
表示するとこうなります。
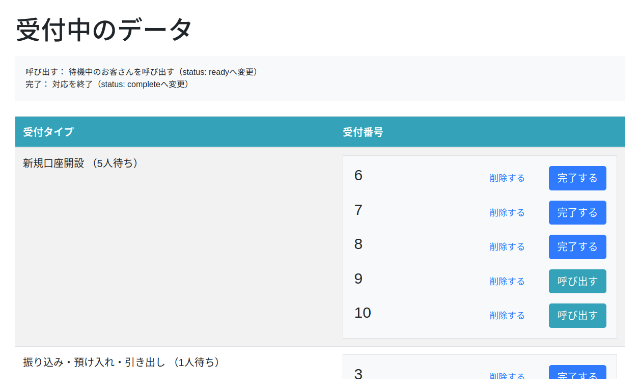
管理者が待受を操作するページ
次に、お客さんの受付データを変更できるようにするページです。
/resources/views/reception/manage.blade.php
<html>
<head>
    <link href="https://stackpath.bootstrapcdn.com/bootstrap/4.4.1/css/bootstrap.min.css" rel="stylesheet">
</head>
<body>
    <div id="app" class="p-4">
        <h1 class="mb-3">受付中のデータ</h1>
        <div class="bg-light p-3 mb-4">
            <small>
                呼び出す: 待機中のお客さんを呼び出す(status: readyへ変更)<br>
                完了: 対応を終了(status: completeへ変更)
            </small>
        </div>
        <table class="table table-striped">
            <thead class="bg-info text-white">
                <tr>
                    <th>受付タイプ</th>
                    <th>受付番号</th>
                </tr>
            </thead>
            <tbody>
                <tr v-for="t in receptionTypes">
                    <td>
                        <span v-text="t.name"></span>
                        (<span v-text="t.waits_count"></span>人待ち)
                    </td>
                    <td>
                        <div style="max-height:300px;overflow-x:hidden;overflow-y:auto;"
                             class="border bg-light border-1 px-3 py-2"
                             v-if="t.waits.length">
                            <div class="row py-2" v-for="w in t.waits">
                                <div class="col-md-3 pl-3">
                                    <h4 v-text="w.reception_number"></h4>
                                </div>
                                <!-- 👇 操作ボタン -->
                                <div class="col-md-9 text-right">
                                    <button
                                        type="button"
                                        class="btn btn-sm btn-link mr-4"
                                        @click="updateStatusTo('complete', w.id)">削除する</button>
                                    <button
                                        type="button"
                                        class="btn btn-info"
                                        @click="updateStatusTo('ready', w.id)"
                                        v-if="w.status=='preparation'">呼び出す</button>
                                    <button
                                        type="button"
                                        class="btn btn-primary"
                                        @click="updateStatusTo('complete', w.id)"
                                        v-if="w.status=='ready'">完了する</button>
                                </div>
                            </div>
                        </div>
                    </td>
                </tr>
            </tbody>
        </table>
    </div>
    <script src="https://cdnjs.cloudflare.com/ajax/libs/vue/2.6.11/vue.min.js"></script>
    <script src="https://cdnjs.cloudflare.com/ajax/libs/axios/0.19.2/axios.min.js"></script>
    <script src="https://cdnjs.cloudflare.com/ajax/libs/lodash.js/4.17.15/lodash.min.js"></script>
    <script>

        new Vue({
            el: '#app',
            data: {
                receptionTypes: []
            },
            methods: {
                getTypes() {

                    // reception_typesのデータ取得
                    axios.get('/ajax/reception_type')
                        .then(response => {

                            this.receptionTypes = response.data;

                        });

                },
                updateStatusTo(status, receptionId) {

                    if(confirm('ステータスを変更します。よろしいですか?')) {

                        // 👇 受付データを変更する
                        const url = '/ajax/reception/'+ receptionId;
                        const params = {
                            id: receptionId,
                            status: status
                        };
                        axios.put(url, params)
                            .then(response => {

                                if(response.data.result === true) {

                                    console.log('変更完了!');
                                    this.getTypes();

                                }

                            });

                    }

                }
            },
            mounted() {

                this.getTypes();
                setInterval(() => { // 3秒ごとに受付データを更新する

                    this.getTypes();

                }, 3000);

            }
        });

    </script>
</body>
</html>
表示例はこうなります。
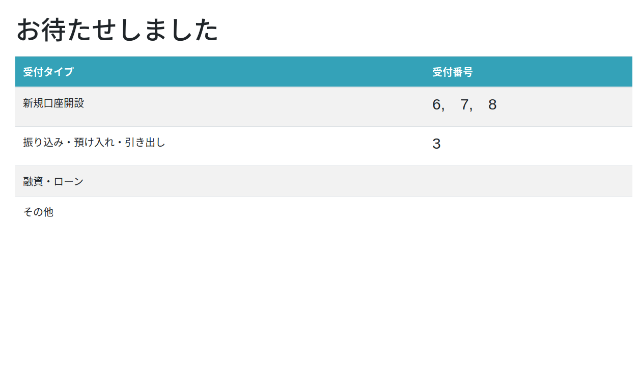
順番が来たことが分かる呼び出しページ
最後にお客さんが自分の順番を確認する「呼び出し」ページです。
/resources/views/reception/display.blade.php
<html>
<head>
    <link href="https://stackpath.bootstrapcdn.com/bootstrap/4.4.1/css/bootstrap.min.css" rel="stylesheet">
</head>
<body>
    <div id="app" class="p-4">
        <h1 class="mb-3">お待たせしました</h1>
        <table class="table table-striped">
            <thead class="bg-info text-white">
                <tr>
                    <th>受付タイプ</th>
                    <th>
                        受付番号
                    </th>
                </tr>
            </thead>
            <tbody>
                <tr v-for="t in receptionTypes">
                    <td v-text="t.name"></td>
                    <td>
                        <div v-if="t.readies.length">
                            <h4 v-text="getReceptionNumbers(t.readies).join(', ')"></h4>
                        </div>
                    </td>
                </tr>
            </tbody>
        </table>
    </div>
    <script src="https://cdnjs.cloudflare.com/ajax/libs/vue/2.6.11/vue.min.js"></script>
    <script src="https://cdnjs.cloudflare.com/ajax/libs/axios/0.19.2/axios.min.js"></script>
    <script src="https://cdnjs.cloudflare.com/ajax/libs/lodash.js/4.17.15/lodash.min.js"></script>
    <script>

        new Vue({
            el: '#app',
            data: {
                receptionTypes: []
            },
            methods: {
                getTypes() {

                    // reception_typesのデータ取得
                    axios.get('/ajax/reception_type')
                        .then(response => {

                            this.receptionTypes = response.data;

                        });

                },
                getReceptionNumbers(receptions) {

                    return _.map(receptions, reception => {

                        return reception.reception_number;

                    });

                }
            },
            mounted() {

                this.getTypes();
                setInterval(() => { // 3秒ごとに受付データを更新する

                    this.getTypes();

                }, 3000);

            }
        });

    </script>
</body>
</html>
見た目はこんなカンジです。
テストしてみる
では、ここまでで一旦テストしてみましょう❗
YouTubeにアップロードした動画をご覧ください。
ダウンロードする
今回は予想してた以上にコードも記事も長くなってしまったので、以下2回でお届けすることにしました。
- 窓口の受付番号システムをつくる・Laravel編
- 窓口の受付番号システムをつくる・Python編
そのため、ソースコードのダウンロードは次回記事で行ってください。(釣りタイトルみたいになってゴメンナサイ😫)
おわりに
ということで今回はこのブログ初の2回に分けた記事になりました。
元々は、受付を一人ずつで考えていたのでもっとシンプルだったんですけど、せっかくレシート・プリンタも買ったし、あれもこれも、、、と考えるとコードのボリュームが増えてしまいました💦
それにしても、技術の発展で過去に何百万単位の費用がかかっていたものが今リーズナブルに開発できるようになってスゴイですね。
その昔は電卓も1万円ぐらいしてたのが、今はダイソーで売ってますし、パソコンもラズベリーパイならメモリ4GBが1万円以下で買えるのは冷静に考えると驚くばかりです🎉✨
何にせよ、最終的にコードを少なくするようにもっていきましたので、ぜひ次回のPython編もお楽しみください。
ではでは〜❗

「OSもLinuxなら、
無料ですよ👍」