
九保すこひです(フリーランスのITコンサルタント、エンジニア)
さてさて、これはここ数年に限らずですが、グローバル化が進んだことで海外の方を日本で見かけることは珍しくなくなりました。
特にインバウンド需要が高まっていたときは「日本なのに日本語が聞こえない」ぐらい観光客の方々がいらっしゃっていて、日本経済にプラスになっていたことは間違いないと言っていいでしょう。
そして、現在はコロナ禍にありますが、段階的に緩和する方向になっているようですので、今後はまたある機能が必要になってくるんじゃないかと考えています。
それは・・・・・・
翻訳機能
です。
やはり、母国語で情報を得ることが便利なのは間違いありませんよね。
そして、一方で「翻訳機能」としてよく聞くようになったのが、
DeepL(でぃーぷえる)
ですよね。
DeepL はとても優秀な翻訳サービスで、中には公式ドキュメントをDeepLで日本語化している人も多いんじゃないでしょうか。
そこで❗
今回は、DeepLのAPIを使ってLaravelのテキスト翻訳をしてみます。
ぜひ何かの参考になりましたら嬉しいです。😄✨
 「お腹の調子が悪いので、
スタンディング開発を試し中・・・
(どうなるかな🤔)」
開発環境: Laravel 9.x
目次
やりたいこと
今回やりたいことは、「日本語を登録しておくと、DeepLから翻訳データをとってきて保存する」というものです。
(cronを使って定期的に実行することを想定しています)
なお、今回は日本語から翻訳するのは「英語」と「中国語」の2つです。
では、今回も楽しんでやっていきましょう❗
【追記:2022.6.1】
残念ながら 2022.6.1 現在、韓国語とベトナム語には対応していないようです。なお、対応している言語はこちらの「Listing supported languages」をご覧ください。
【追記:2023.2.21】
韓国語とノルウェー語に対応したようです!
DeelL API が使えるようにする
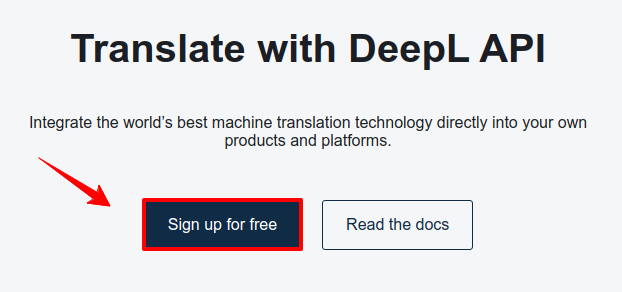
まずはDeepLが使えないといけませんので、ユーザー登録をします。
こちらのページ へアクセスして登録ボタンをクリックします。
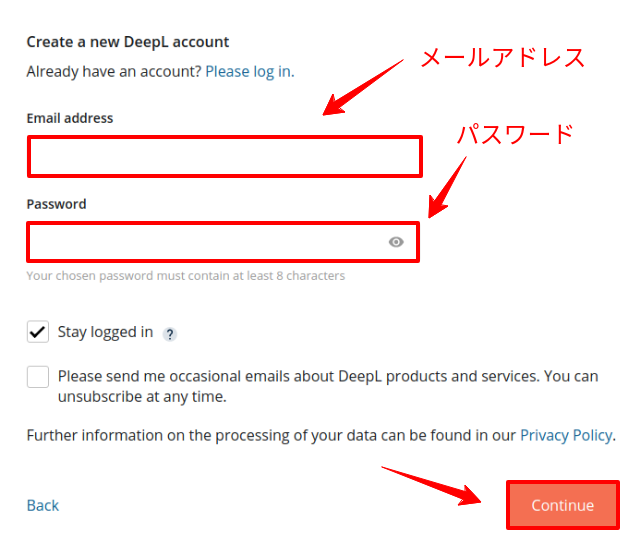
ページ移動したら、メールアドレスとパスワードを入力して、「Continue」ボタンをクリックしてください。
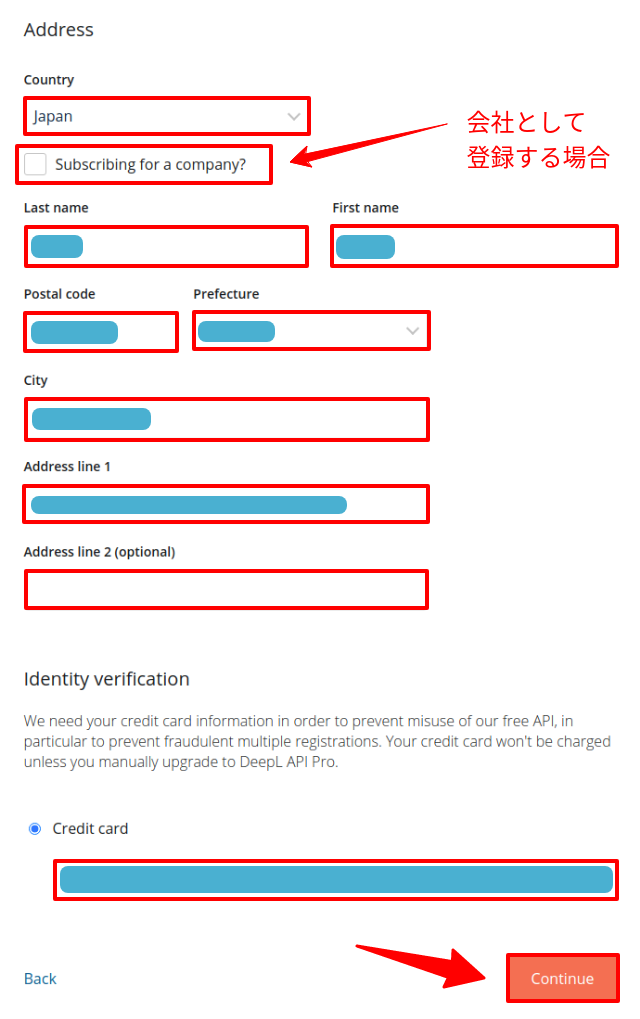
そして、各ユーザー情報の入力です。
以下を参考にして入力してください。
- Country ・・・ Japan
- Subscribing for a company? ・・・ 会社としての登録ですか?(チェックをいれると会社名を入力するボックスが表示されます)
- Last name ・・・ 姓
- First name ・・・ 名
- Postal code ・・・ 郵便番号(123-4567 の形式)
- Prefecture ・・・ 都道府県
- City ・・・ 市区町村
- Address line 1 ・・・ それ以降の住所
- Address line 2 ・・・ ビル名など(任意)
- Credit card ・・・ クレジットカード番号
※ ちなみに英語表記の住所が分からない場合は、君に届け! というとても便利なサービスがあるのでおすすめです。
※ クレジットカード番号の注意書きとして、「重複で使わないように登録してもらいます。有料バージョンにしない限り課金されません」と書いてあります。
入力し終わったら「Continue」ボタンをクリックしてください。
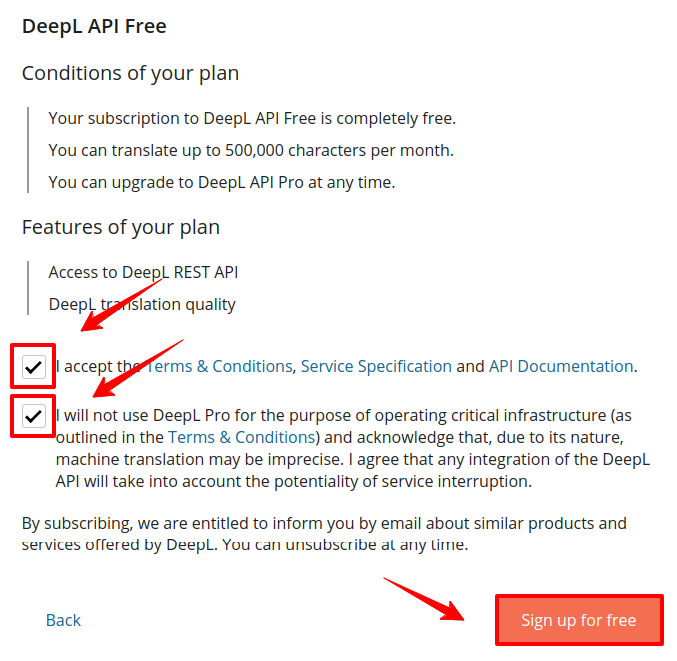
移動すると、同意フォームが表示されます。
2つのチェックボックスをオンにして「Sign up for free」ボタンをクリックしてください。
なお、概要は以下のとおりです。(超意訳です)
- 「規約に同意します👍」
- 「翻訳を使ってサイトがおかしくなっても文句は言いません👍」
ページ移動すると、登録完了画面が表示されます。
次はAPI にアクセスするための「キー」を取得するために以下のリンクへ移動しましょう。
※ なお、ページ下部には「登録番号を控えておいてください」と書かれています。(この番号は、登録完了メールにも記載されています)

移動したら、さらにアカウントページへ移動します。

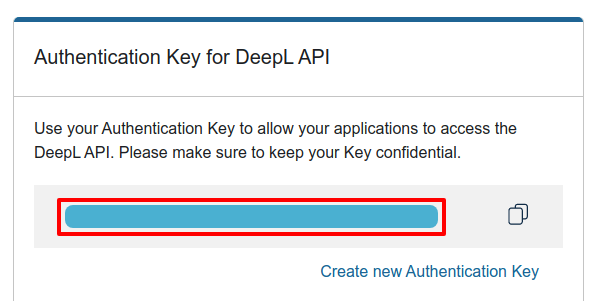
すると、ページ下の方に「Authentication Key for DeepL API」という項目があるので、これをコピー&ペーストしてLaravelの.envへ記載しておきます。
.env
# 省略

DEEPL_AUTH_KEY=********************************
これでDeepLの設定は完了しました!
続いてLaravel側の作業へ移行しましょう👍
翻訳データを管理するモデル&マイグレーションをつくる
では、今回はデータベースを使って翻訳データを管理しますので、モデルとマイグレーションを「2ペア」作ります。
以下のコマンドを実行してください。
php artisan make:model Translation -m
php artisan make:model TranslationItem -m
【追記:2022.5.11】訪問ユーザーさまからご指摘をいただきまして「pph → php」へ修正しました。みなさん、いつもありがとうございます!
すると、モデルとマイグレーションの2ファイルが作成されるので、中身をそれぞれ以下のように変更してください。
app/Models/Translation.php
<?php

namespace App\Models;

use Illuminate\Database\Eloquent\Factories\HasFactory;
use Illuminate\Database\Eloquent\Model;

class Translation extends Model
{
    use HasFactory;

    const LOCALES = [ // サポートする言語
        'ja', // 日本語
        'en', // 英語
        'zh', // 中国語
    ];

    // Relationship
    public function items()
    {
        return $this->hasMany(TranslationItem::class, 'translation_id', 'id');
    }

    // Others
    public static function getConfigData($locale) // 翻訳データを key => value 形式にして取得
    {
        $translations = Translation::whereHas('items', function($query) use($locale) {

            $query->where('locale', $locale);

        })
        ->get();

        return $translations->map(function($translation) use($locale) {

           return [
               'key' => $translation->key,
               'text' => $translation->items
                   ->firstWhere('locale', $locale)
                   ->text
           ];

        })
        ->pluck('text', 'key');
    }
}
※ TranslationItem.phpはそのままで OK です。
database/migrations/****_**_**_******_create_translations_table.php
// 省略

public function up()
{
    Schema::create('translations', function (Blueprint $table) {
        $table->id();
        $table->string('key')->comment('翻訳キー');
        $table->timestamps();

        $table->unique('key');
    });
}

public function down()
{
    Schema::dropIfExists('translations');
}

// 省略
database/migrations/****_**_**_******_create_translation_items_table.php
// 省略

public function up()
{
    Schema::create('translation_items', function (Blueprint $table) {
        $table->id();
        $table->unsignedBigInteger('translation_id')->comment('翻訳ID');
        $table->string('locale')->comment('言語'); // 2文字のコード
        $table->text('text')->nullable()->comment('テキスト');
        $table->timestamps();

        $table->unique(['translation_id', 'locale']);
        $table->foreign('translation_id')->references('id')->on('translations')->onDelete('cascade');
    });
}

public function down()
{
    Schema::dropIfExists('translation_items');
}

// 省略
テストデータをつくる
続いて、データベースが空のままでは翻訳ができませんので、Seederを使っていくつかテストデータを用意しておきます。
以下のコマンドを実行してください。
php artisan make:seed TranslationSeeder
すると、Seederファイルが作成されるので、中身を以下のように変更します。
database/seeders/TranslationSeeder.php
<?php

namespace Database\Seeders;

use App\Models\Translation;
use App\Models\TranslationItem;
use Illuminate\Database\Console\Seeds\WithoutModelEvents;
use Illuminate\Database\Seeder;

class TranslationSeeder extends Seeder
{
    /**
     * Run the database seeds.
     *
     * @return void
     */
    public function run()
    {
        $jp_texts = [
            'login' => 'ログイン',
            'logout' => 'ログアウト',
            'sign_up' => 'ユーザー登録',
            'contact' => 'お問い合わせ',
            'to_password_reminder' => 'パスワードを忘れましたか?'
        ];

        foreach($jp_texts as $key => $text) {

            $translation = new Translation();
            $translation->key = $key;
            $translation->save();

            $translation_item = new TranslationItem();
            $translation_item->translation_id = $translation->id;
            $translation_item->locale = 'ja';
            $translation_item->text = $text;
            $translation_item->save();

        }
    }
}
Seederは作成しただけでは有効になりませんので、DatabaseSeeder.phpへ登録します。
database/seeders/DatabaseSeeder.php
<?php

namespace Database\Seeders;

use Illuminate\Database\Console\Seeds\WithoutModelEvents;
use Illuminate\Database\Seeder;

class DatabaseSeeder extends Seeder
{
    public function run()
    {
        // \App\Models\User::factory(10)->create();

        $this->call(TranslationSeeder::class); // 👈 ここを追加しました
    }
}
では、マイグレーションを実行してテーブルを作成しましょう。
以下のコマンドを実行してください。
php artisan migrate:fresh --seed
すると、実際のテーブルは以下のようになりました。
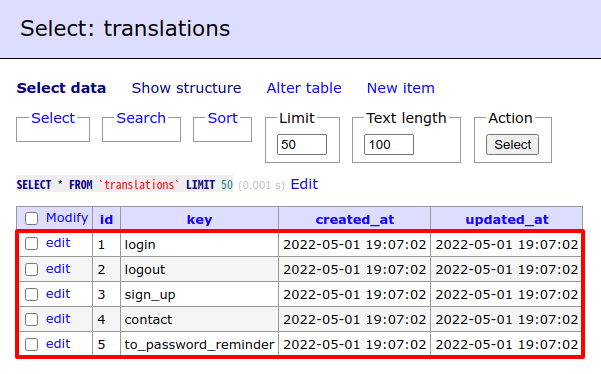
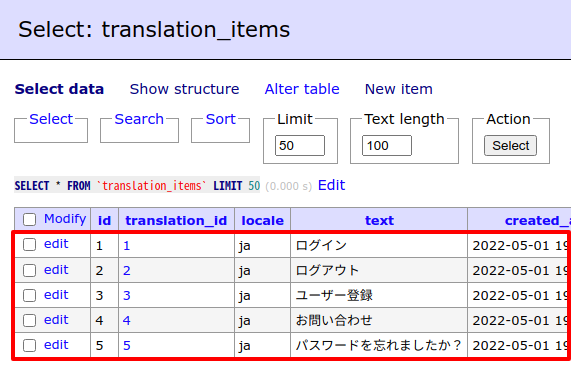
DeepLで 自動翻訳する Artisan コマンドをつくる
では、DeepLのAPIで翻訳する部分です。
翻訳は、Laravelのコマンド(Artisanコマンド)をつくって、それを何度もタイマー実行することで、ひとつずつ自動で翻訳を進める形になります。
では、翻訳用のコマンドをつくります。
以下のコマンドを実行してください。
php artisan make:command TranslationCommand
すると、ファイルが作成されるので、中身を以下のように変更してください。
app/Console/Commands/TranslationCommand.php
<?php

namespace App\Console\Commands;

use App\Models\Translation;
use App\Models\TranslationItem;
use Illuminate\Console\Command;
use Illuminate\Support\Arr;
use Illuminate\Support\Facades\Http;

class TranslationCommand extends Command
{
    private $from_locale = ''; // 翻訳元の言語
    private $to_locales = []; // 翻訳先の言語

    /**
     * The name and signature of the console command.
     *
     * @var string
     */
    protected $signature = 'translate {--from=ja : The language to translate from}';

    /**
     * The console command description.
     *
     * @var string
     */
    protected $description = 'Translate text through DeepL';

    /**
     * Execute the console command.
     *
     * @return int
     */
    public function handle()
    {
        $all_locales = Translation::LOCALES;
        $this->from_locale = $this->option('from');
        $this->to_locales = Arr::except($all_locales, [$this->from_locale]); // 元言語を除外した言語

        if(!in_array($this->from_locale, $all_locales, true)) { // 言語がサポートされていない場合

            return Command::INVALID;

        }

        $translation = $this->getTranslation();

        if(is_null($translation)) {

            $this->info('Nothing to translate.');
            return Command::SUCCESS; // 翻訳すべきデータがない場合は終了

        }

        foreach ($this->to_locales as $to_locale) {

            $translation_item = $translation->items->where('locale', $to_locale)->first();

            if(is_null($translation_item)) { // 翻訳先の言語が存在しない場合

                $this->translate($translation, $to_locale);

            }

        }

        return Command::SUCCESS;
    }

    private function getTranslation()
    {
        return Translation::query()
            ->with('items')
            ->whereHas('items', function($query) {

                $query->where('locale', $this->from_locale); // 元言語が存在していて、

            })
            ->where(function($query) {

                foreach($this->to_locales as $to_locale) {

                    $query->orWhereDoesntHave('items', function($q) use ($to_locale) {

                        $q->where('locale', $to_locale); // 他言語が存在しないもの

                    });

                }

            })
            ->first();
    }

    private function translate(Translation $translation, $to_locale)
    {
        $from_text = $translation->items
            ->firstWhere('locale', $this->from_locale)
            ->text; // 翻訳元のテキスト

        $url = 'https://api-free.deepl.com/v2/translate';
        $params = [
            'auth_key' => env('DEEPL_AUTH_KEY'), // 本来は config/services.php などにセットすべきです
            'text' => $from_text,
            'source_lang' => $this->from_locale,
            'target_lang' => $to_locale,
        ];
        $response = Http::get($url, $params);

        if($response->ok()) {

            $response_data = $response->json();
            $translated_text = Arr::get($response_data, 'translations.0.text'); // ない場合は null が返される

            $translation_item = new TranslationItem();
            $translation_item->translation_id = $translation->id;
            $translation_item->locale = $to_locale;
            $translation_item->text = $translated_text;
            $translation_item->save();

            $this->info('Translated to '. $to_locale .': "'. $from_text .'" -> "'. $translated_text .'"');

        } else {

            $this->error('Oh, something went wrong...');

        }

    }
}
少しコード量が多いですが、中身としては「翻訳データが存在していないデータ」を取得し、DeepLで翻訳データを取得&保存しているだけです。
これで、コマンドが完成しました!(ちなみにコマンドはファイルを作成するだけでLaravel側へ登録されるようになったんですね。便利 😄👍)
翻訳済みデータが適用されるようにする
では、最後にDeepLを使って翻訳したデータをLaravelのヘルパー関数trans()で使えるようにします。
といっても、Laravelの機能を応用するだけですので、各言語のファイルを用意するだけでOKです。
lang/ja/deepl.php
<?php

use App\Models\Translation;

return Translation::getConfigData('ja');
lang/en/deepl.php
<?php

use App\Models\Translation;

return Translation::getConfigData('en');
lang/zh/deepl.php
<?php

use App\Models\Translation;

return Translation::getConfigData('zh');
※ ちなみに読み込みを早くするためにはキャッシュを用意するといいでしょう。
これで作業は完了です!
お疲れ様でした😄✨
テストしてみる
では、実際にテストしてみましょう❗
まずは、DeepLから翻訳データを取得して保存する部分です。
まだ日本語以外の翻訳が存在していないのを確認して・・・・・・

先ほど作成したコマンドを実行します。
php artisan translate
すると・・・・・・

はい❗
英語&中国語の翻訳データが取得できました。
では、データベースの方も確認しておきましょう。
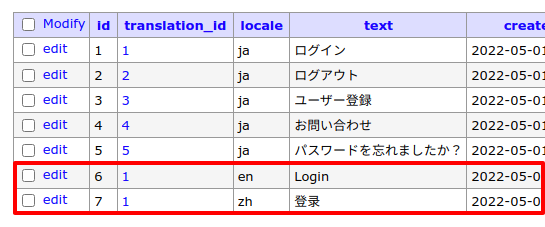
はい❗
うまく保存もできているようですね。
あとは、何回かこのコマンドを実行すると・・・・・・
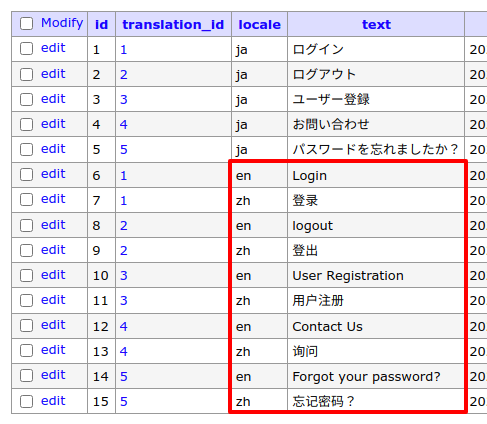
はい❗
日本語で登録した全ての翻訳データをつくることができました。
成功です😄✨
では、実際に翻訳データが切り替わるのかどうかのチェックもしておきましょう。
以下のようにルートをつくります。
routes/web.php
// 省略

Route::get('translation', function(){

    echo trans('deepl.to_password_reminder');

});
そして、まず言語を日本語にセットしてみましょう。
config/app.php
// 省略

'locale' => 'ja',

// 省略
これで、「https://******/translation」へアクセスします。
どうなるでしょうか・・・・・・
![]()
うまく日本語で表示されました。
では、残りの言語も確認しておきましょう。
![]()
![]()
はい❗
英語・中国語ともにうまく表示されました。
すべて成功です😄✨
追記:翻訳データを追加するコマンド
【追記:2022.6.1】
実際に個人サイトで翻訳をしていてDBに翻訳データを追加するのは「ちょっとめんどうだな」と感じたので、コマンドで登録できるようにしてみました。
app/Console/Commands/MakeTranslation.php
<?php

namespace App\Console\Commands;

use App\Models\Translation;
use App\Models\TranslationItem;
use Illuminate\Console\Command;
use Illuminate\Support\Arr;
use Illuminate\Support\Facades\Artisan;
use Illuminate\Support\Facades\DB;

class MakeTranslation extends Command
{
    /**
     * The name and signature of the console command.
     *
     * @var string
     */
    protected $signature = 'make:trans '.
        '{ --api : Whether use DeepL API automatically or not } '.
        '{ --locale= : Locale to save }';

    /**
     * The console command description.
     *
     * @var string
     */
    protected $description = 'Command description';

    /**
     * Create a new command instance.
     *
     * @return void
     */
    public function __construct()
    {
        parent::__construct();
    }

    /**
     * Execute the console command.
     *
     * @return int
     */
    public function handle()
    {
        $translation_locale = $this->option('locale');

        if(empty($translation_locale)) {

            $translation_locale = config('app.locale');

        }

        $anticipations = [
            'key' => [
                'question' => 'Key?',
            ],
            'text' => [
                'question' => 'Text?',
            ],
        ];
        $inputs = [];

        foreach ($anticipations as $key => $anticipation) {

            $question = $anticipation['question'];
            $default = Arr::get($anticipation, 'default', '');
            $anticipation_text = $this->anticipate($question, [], $default);

            if(empty($anticipation_text)) {

                $this->error(ucfirst($key) .' is required');
                return;

            }

            $inputs[$key] = $anticipation_text;

        }

        $translation_key = $inputs['key'];
        $translation_text = $inputs['text'];

        DB::beginTransaction();

        try {

            $translation = Translation::firstOrNew([
                'key' => $translation_key
            ]);
            $translation->save();

            $translation_item = TranslationItem::firstOrNew([
                'translation_id' => $translation->id,
                'locale' => $translation_locale,
            ]);
            $translation_item->text = $translation_text;
            $translation_item->save();
            DB::commit();

        } catch (\Exception $e) {

            DB::rollBack();
            $this->error($e->getMessage());
            return;

        }

        $should_translate = $this->option('api');

        if($should_translate === true) { // DeepL API で自動翻訳する場合

            $this->info('Translating...');
            Artisan::call('translate');

        }

        $this->info('Done!');
        return Command::SUCCESS;
    }
}
もちろん、Laravel側への登録もお忘れなく👍
app/Console/Kernel.php
<?php

namespace App\Console;

use App\Console\Commands\MakeTranslation;

// 省略

class Kernel extends ConsoleKernel
{
    /**
     * The Artisan commands provided by your application.
     *
     * @var array
     */
    protected $commands = [

        // 省略

        MakeTranslation::class,
    ];
これで、make:transとコマンド実行すると以下のように「キー」と「翻訳したいテキスト」を聞かれるのでそれぞれ入力するとDBへ自動的に登録されます。
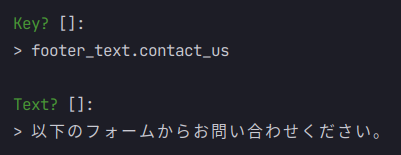
また、--apiオプションをつけると、自動的にDeepLを通した翻訳も実行してくれます😄👍
追記:翻訳データをPHPコードにするコマンド
【追記:2022.6.2】
記事の途中では言語情報は以下のようにDBから直接読み込むようにしていますが、これだといちいちDBを確認しにいかないといけないので、「うーん、それもちょっとめんどうだな」となりました。
return Translation::getConfigData('ja');
そこで、もういっそのことDBから翻訳データを取得し、PHPファイルを作成するコマンドをつくることにしました。
こうすれば、コマンド一発で以下のようなファイルを各言語で自動作成できるので便利だと考えました。
<?php

return [
  'page_title.category' => 'カテゴリ',

  // 省略
];
ということで、コマンドのコードです。
app/Console/Commands/GenerateTranslation.php
<?php

namespace App\Console\Commands;

use App\Models\Translation;
use Illuminate\Console\Command;

class GenerateTranslation extends Command
{
    /**
     * The name and signature of the console command.
     *
     * @var string
     */
    protected $signature = 'generate:trans';

    /**
     * The console command description.
     *
     * @var string
     */
    protected $description = 'Generate translation file';

    /**
     * Create a new command instance.
     *
     * @return void
     */
    public function __construct()
    {
        parent::__construct();
    }

    /**
     * Execute the console command.
     *
     * @return int
     */
    public function handle()
    {
        $translations = Translation::with('items')
            ->orderBy('key', 'asc')
            ->get();
        $data = [];

        foreach ($translations as $translation) {

            $key = $translation->key;
            $translation_items = $translation->items;

            foreach ($translation_items as $translation_item) {

                $locale = $translation_item->locale;
                $data[$locale][$key] = $translation_item->text;

            }

        }

        $this->generateLocaleCodes($data);

        return Command::SUCCESS;
    }

    private function generateLocaleCodes($data)
    {
        foreach ($data as $locale => $locale_data) {

            $path = resource_path('lang/' . $locale . '/deepl.php');
            $array_code = var_export($locale_data, true);
            $array_code = substr($array_code, 7, -1);
            $code = "<?php\n\nreturn [". $array_code ."];";
            file_put_contents($path, $code);

            $this->info('Generated locale file for `' . $locale .'`');

        }
    }
}
そして、Laravelへ登録します。
app/Console/Kernel.php
<?php

namespace App\Console;

use App\Console\Commands\GenerateTranslation;

// 省略

class Kernel extends ConsoleKernel
{
    protected $commands = [

        // 省略

        GenerateTranslation::class,
    ];
これで、php artisan generate:transを実行すると翻訳用のPHPコードが作成されます。
※ なお、以前のファイルが確認なしで更新されるので気をつけてください。
ちなみに:タイマー実行する(cron)
タイマー実行するためにはcronを利用します。
ただし、実行環境はUbuntu(Linux)ですので、Windowsを使っている場合は気をつけてください。(macはいけるのかな??)
まず、PHPの場所を調べるために以下のコマンドを実行します。
which php
すると、/usr/bin/phpというような文字が表示されます。これがPHPのいる場所ですので、控えておいてください。
そして、Laravelがある場所も調べます。
Laravelのルート・フォルダに移動して以下のコマンドを実行してください。
pwd
すると絶対パスが取得されるので、このパスも控えておいてください。
そして、以下のコマンドでcronの設定をします。
sudo crontab -e
エディタが起動したら以下の文字列を追加&保存します。(これは、1分ごとに実行される例です)
* * * * * /usr/bin/php /home/PATH/TO/YOUR/LARAVEL/artisan translate
あとは、ツイッターのチェックでもして時間が過ぎたらDBをチェックしてみてください 👍
バックアップをとる
【追記:2022.6.18】
実は自分がやってしまったことなのですが、artisanコマンドで初期化した直後に、php artisan generate:transを実行したところ、これまでの翻訳が失われてしまいました。(幸いmysqldumpでバックアップをとっていましたが、流石に焦りますよね…💦)
ということで、そんな場合を見越して、コマンドを実行するたびに翻訳データのバックアップをとるようにするといいでしょう。
app/Console/Commands/GenerateTranslation.php
// 省略

private function generateLocaleCodes($data)
{
    foreach ($data as $locale => $locale_data) {

        $path = resource_path('lang/' . $locale . '/deepl.php');
        $copying_filename = $locale .'_'. now()->format('YmdHis') . '.php';
        $copying_path = storage_path('app/translation_backup/'. $copying_filename);
        File::copy($path, $copying_path); // ここでバックアップをとっています

        $array_code = var_export($locale_data, true);
        $array_code = substr($array_code, 7, -1);
        $code = "<?php\n\nreturn [". $array_code ."];";
        file_put_contents($path, $code);

        $this->info('Generated locale file for `' . $locale .'`');

    }
}
バックアップからインポートする
【追記:2022.6.23】
上の項目で自動的にバックアップするようにしましたが、これだけではDBデータが消えたあと元に戻すことはできません。
そのため、折角なのでインポート用のコマンドもつくってみました。
app/Console/Commands/ImportTranslation.php
<?php

namespace App\Console\Commands;

use App\Models\Translation;
use App\Models\TranslationItem;
use Illuminate\Console\Command;

class ImportTranslation extends Command
{
    /**
     * The name and signature of the console command.
     *
     * @var string
     */
    protected $signature = 'import:trans {--path=} {--locale=}';

    /**
     * The console command description.
     *
     * @var string
     */
    protected $description = 'Import translation';

    /**
     * Create a new command instance.
     *
     * @return void
     */
    public function __construct()
    {
        parent::__construct();
    }

    /**
     * Execute the console command.
     *
     * @return int
     */
    public function handle()
    {
        $path = $this->option('path');
        $locale = $this->option('locale');

        if(! file_exists($path)) {

            return Command::FAILURE;

        }

        $translation_data = include $path;

        foreach ($translation_data as $key => $text) {

            $this->info('Importing: ' . $key);

            $translation = Translation::firstOrNew([
                'key' => $key
            ]);
            $translation->save();

            $translation_item = TranslationItem::firstOrNew([
                'translation_id' => $translation->id,
                'locale' => $locale
            ]);
            $translation_item->translation_id = $translation->id;
            $translation_item->locale = $locale;
            $translation_item->text = $text;
            $translation_item->save();

        }

        return Command::SUCCESS;
    }
}
使い方は、以下2つのオプションをつけて実行するだけです。
- –path: バックアップされたファイル
- –locale: 言語(
jaなど)
実行例はこちら。
php artisan import:trans --path=/PATH/TO/YOUR/BACKUP/FILE --locale=en
【追記:2022.9.15】
オプションが--fileになっていたところを--pathに修正しました。
実際の使用例
私が個人的に運営している「街角コレクション」を「英語」「中国語」に対応させました。
興味のある方はぜひご覧ください❗
企業様へのご提案
今回のようにDeepLを利用することで簡単に翻訳データを用意することができます。しかも、DeepLの無料枠は「月50万文字(2022.5.2現在)」と、とても許容量が大きいですので、ある程度の規模まででしたら無料で利用することができるでしょう。(詳しくは、こちら)
また、とはいえ「AI での翻訳は精度に疑問がある」とお考えの方もいらっしゃると思います。その場合は TranslateCI という人による翻訳サービスもありますので、こちらもご対応ができるかと思います。
ぜひ翻訳機能をご用意になりたい場合は、お問い合わせからご連絡くださいませ。お待ちしております。😄✨
おわりに
ということで、今回はウワサのDeepLを使って、Laravelの翻訳を実装してみました。
ちなみに私の場合、パーフェクトには程遠いですが留学したおかげでDeepLを利用することはあまりありません。
しかし、今回少し長い文章で試してみたところ「確実に私より翻訳能力を持っている」という結論になりました😂
正直なところ、「まぁ、悪くないでしょ」程度だろうと考えていたのですが、ニュースサイトをコピペしてみたところ、そのままニュースサイトで紹介されているような英文でした。(ネイティブからするとちょっと違ったりするのかな??)
科学の進歩はすごいですね!
私も乗り遅れないようにしていきたいもんです。
ではでは〜❗

「A&W のハンバーガーが
どうしても食べたい!
来日ぷりーず🙏✨」


